

First start-up of the USB Ultra IR receiver
UPDATE: This Version 1.1 is now replaced by the new USB Ultra IR Version 2.0, to ensure the operation also on newer PCs with more recent motherboards.
Now we come finally to the most beautiful point of the whole work …
The wiring at the PC …
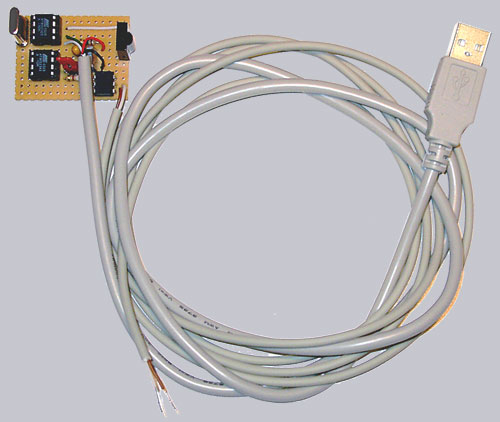
Who soldered and controlled everything several times, can now turn to the first operation of the USB Ultra IR. Switch off the PC (on the back of the PC with the main power switch!) and take off the left PC case side panel. Now we put the USB plug into a free USB socket and screw out a mounting bracket of a free slot. There we lead the approx. 150 cm long cable with the stripped, tinned, brown and white cable through.
Now we have several ways to connect these two poles of the opto coupler parallel to the power button, whereby I would like to specify a few ?
– The simplest method would be to be put the two poles from top into the socket of the power Button cable and fix the cable e.g. with some tape or a cable strap.
– Or we take off the 2-pole plug from the power button, put then from downside the two very thin wires of the cable into the socket and put that together to the Mainboard.
– Or we solder the two cable ends to the 2-pole plug of chassis power button.
– Or we solder the two cable ends directly to the front power button.
– Or we solder this to 2 special pins of the ATX power supply connector, but this is a little bit dangerous if you take the wrong pins by mistake.
– Or we connect it with a WOL (WakeOnLAN) connection as described on the second page, whereby I would not prefer this variant due to the missing switching off function.
However, it is your choice, but the cable should be well attached. For the first test one can fasten this provisionally and solder the cable correctly later. It may be that one must turn the polarity of the cable once, because the opto coupler connects only in one direction. Try out before soldering once provisionally.
Store the desired key of the remote control …
Now we come to the first test of the circuit. Attach the jumper to the USB Ultra IR and power on the power supply unit on the back of the PC and start the PC for example in the BIOS, since we need still no operating system.
Now we press the desired remote control key once for the learning the Power ON/OFF function. If everything is correctly soldered and the remote control unit works with the RC5* standard, the PC should now Power off. Thus the signal is already written in the memory of the 2343 Atmel IC and we can now take off the Jumper. By the way the signal remains in the Atmel IC, if the IC is longer time without power supply, because the data is stored in the EEPROM. The key can be changed at any time, simply repeat the above steps with the attached Jumper.
* Note: RC5 is a very common infrared coding standard of the company Philips and is also used with many other remote control units (e.g. Loewe, Grundig, Marantz, etc.). However there are also some remote controls, which works with other standards, like e.g. Sony (SIRCS), which cannot be recognized thus of the Atmel IC firmware. In this case simply use a conventional universal remote control, set it to a few Philips devices (e.g. TV) or try one after the other, until the PC reacts to the signal and power off / on. Alternatively most universal remote control units offers also a so-called browsing function, with which one can find very simply a suitable RC5 device (e.g. by pressing one button several times, etc.)
If the learning does not run in the first attempt (try the 2-pole cable to the Mainoard in both directions), it’s possible that the used remote control does not work with the RC5 standard mentioned before. Therefore please absolutely try it with a universal remote control, before an extensive error tracing. The Jumper can remain continuous attached for all tests until you’ve stored the desired code, because the opto coupler switches also in the learning mode.
Well then switch the PC on (of course with the remote control) and install the software …
The software is explained extensively in the previous USB receiver guide.
Here is the driver installation guide for the USB IR-receivers and all necessary downloads.
And here is the installation guide for girder with all download links and suitable plugins for girder.
Just one further operating system suggestion… In the system control of Microsoft Windows are some nice energie control settings, what windows should do when you press the power button. There you should select “shutdown” or “hibernation mode” when you press the power button, thus Windows will close all programs properly before the PC power off.