| Manufacturer | Plextor |
| Article number | PX-256M5Pro |
| Capacity | 256GB |
| Interface | SATA3 6GB/s |
| Cache | 512MB |
| Controller | Marvell |
| Flash Type | MLC – Multi-Level-Cell |
| Size | 2.5″ (100 x 69.85 x 7mm) |
| Weight | approx. 70 gramm |
| Speed | Read up to 540 MB/s / Write up to 460 MB/s |
| Seek Time | |
| Power Consumption | 0.25 Watt |
| MTBF | 2.4 million hours MTBF |
| Other | SMART support global wear leveling, garbage collection, instant restore technology, TRIM, bad block management algorithm, NCQ, 256-bit AES encryption encryption, backup software |
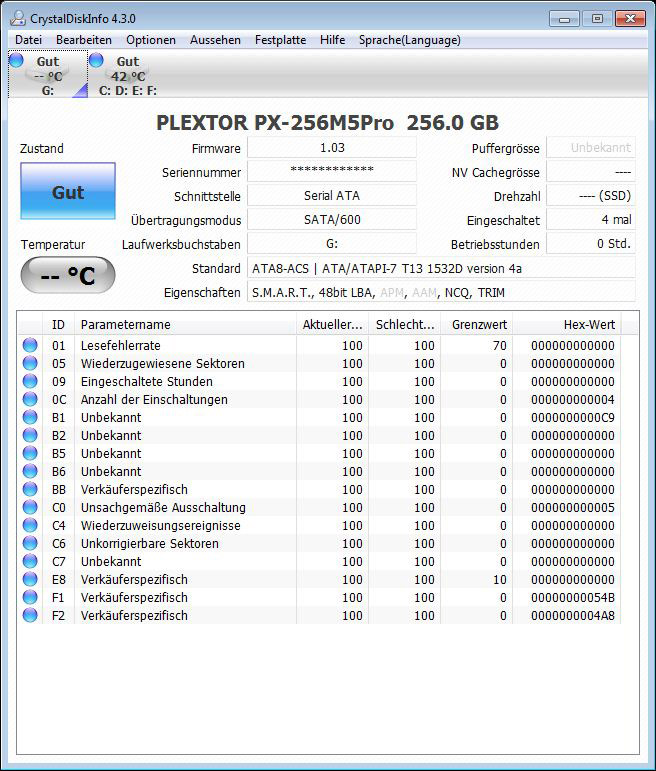
Here is a screenshot of Snipping the CrystalDiskInfo 4.3.0 SSD and HDD information software, where it is noticeable, that Plextor does not spend this SSD a temperature sensor:
SSD firmware update …
Before starting the tests, we’ve separately updated both Plextor SSDs to the latest firmware version. The SSD was delivered with firmware 1.02 and at the review date, Plextor offered the firmware version 1.03. Of course a test with the previous version was made as well, but it was not as fast and not so safe like the current one. The update of the Plextor firmware is relatively simple: Download the latest firmware from Plextor, burn the px-256m5pro_1.03.iso ISO file to a CD or transfer it with a suitable software to a USB stick, boot with this CD-ROM or USB thumb drive and confirm the SSD firmware update.
RAID setup …
The RAID installation is essentially quite simple: – first attach both SSD drives at a RAID capable controller e.g. on the motherboard. – then enable the RAID controller in the BIOS or by a Jumper (pay attention to additional references in the manual) and change the SATA controller in the BIOS from IDE or AHCI to RAID. – at the next start enter now the RAID BIOS with the explained key combination (ASRock e.g. CTRL+F). – there activate and define the desired RAID assignment.
There are some different RAID configurations and here are two simple RAID arrays: RAID1 mirror drives, in order to operate two or more drives at the expense of the size as much fail safe as possible reduntant. RAID0 stripe drives, in order to operate two or more drives at the expense of the data loss possibility with higher performance, thus without redundancy.
Since we want to reach a higher SSD speed, we create a RAID 0 striping. After the previously review with a stripe block size of 64KB vs. 128KB, we’ve decided to define a stripe block size of 64KB. Gigabyte Boundary remains to ON, Fast Init remains to ON and Cache Mode to WriteThru.
Hardware RAID 0 setup …
Here you can see a screenshot of the RAID BIOS ROM, where both 256GB SSD drives with RAID0 are striped as one logical 512GB SSD drive to achieve a higher performance:
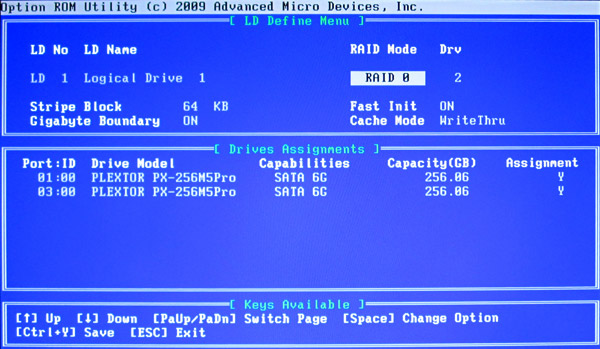
Now it’s necessary to save and confirm the RAID again with CTRL + Y. After that you can see the RAID 0 array already in the RAID BIOS:

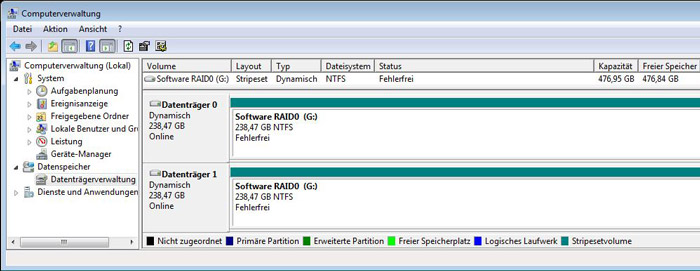
After creating the RAID array we restart the PC and see the new logical drive with the given LD name, in our case ocinside. In Windows, we can partition and format the RAID array now as an usual drive.
Software RAID 0 setup …
By the way, you can also create a software RAID over the operating system by striping both drives as a RAID in Windows 7 disk management. A software RAID 1, or JBOD can be already created with Microsoft Windows 7 Home Premium and the software RAID 0 with Microsoft Windows 7 Professional or Microsoft Windows 7 Ultimate. For our tests, we have Windows 7 Ultimate, so the software RAID0 could be set up easily: