

It’s very easy to increase the Vcore of MSI K7T Pro and K7T Pro2-A by desoldering or ! soldering one resistor to allow your CPU much higher frequency. Of course it’s necessary to be very careful if you’re soldering something on your mainboard in order not to kill your board. And of course your warranty void if you solder anything on your mainboard !
Therefore i recommend a good grounding and a soldering station with seperate grounding !
Before you begin to modify the Vcore you should lower the momentary Vcore at least about 0.2 Volt !!!
The voltage regulator of the K7T Pro and K7T Pro 2A board is the Semtech SC 1155 (programmable synchronous DC/DC hysteretic controller).
CLICK HERE to get to the new update for more voltage
First of all i have to say that this voltage regulator doesn’t have a voltage correction pin to pull up the Vcore.
There’s just a pin to degrease the Vcore – That’s really not a feature we’ve ever missed ! The pin is named DROOP (pin 2) and Semtech suggest to use a 2k resistor (202 SMD resistor) across IOUT. So i decide to use this pin for my experiments and i find out that MSI reduce the Vcore about 0,12 Volt with this resistor (R 60).
Here’s a picture with the location of R 60:
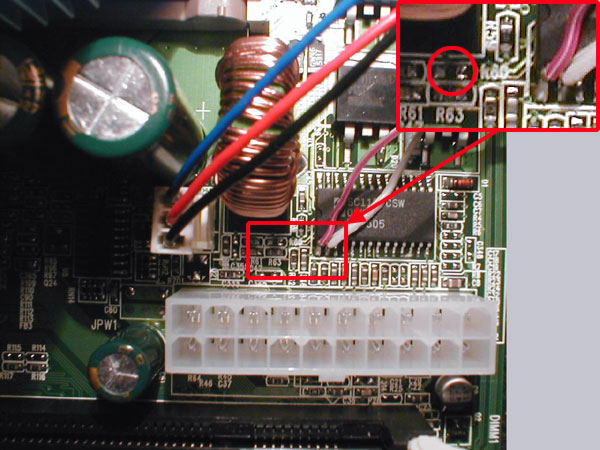
So if you solder out this 2 K resistor or brake the connection on one site you’ll pull up the Vcore about 0,12 Volt.
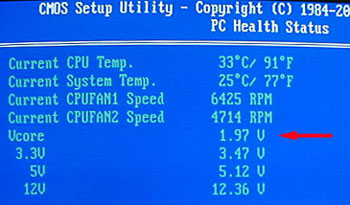
In the case of setting the Vcore to 1,85 Volt you’ll get approx. 1,97 Volt:
I know this is not very much but it should help your processor to handle higher frequency.
UPDATE: In cooperation with Visionary from VR-Zone
we find out that it’s also possible to take advantage of the Vsense Pin (PIN 6) of this voltage regulator to get higher Vcore.
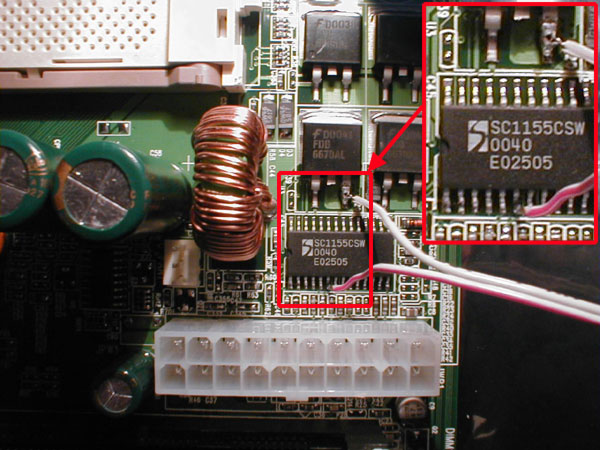
I find out that a 6,5 K Ohm resistor (blue, green, red) from PIN 6 to ground give an increasement of 0,22 Volt to the selected value.
So if you select 1,70 Volt in your BIOS you’ll get 1,97 Volt Vcore and at the highest value of 1,85 Volt you’ll get 2,07 Volt for your Thunderbird or Duron. This should be enough to push the CPU-frequency to the limit ! And if you need more voltage you’re able to lower the resistor value – my highest voltage was 2,97 V *lol*
Here’s a picture to see the correct soldering position:
And here’s a picture of the PC-Health menu after the modification:

Oh and i use the two gray cable with a variable resistor to degrease my VCore stepless while running the PC 🙂
But i recommend to use a second resistor in a line with about 5-6 K to prevent higher voltages by a mistake. Because while my tests i made a little failure to set the variable resistor to a wrong position without this second protection resistor in line and my poor Duron got 2,97 VOLT VCore !!! So be very careful with a variable resistor !
Pay attention to the CPU temperature after increasing the Vcore !!!
!