
It’s easy to increase the Vcore of Epox 8KTA3 by soldering just one resistor to the right point to allow your CPU much higher frequency. Of course it’s necessary to be very careful if you’re soldering something on your mainboard in order not to kill your board. And of course your warranty void if you solder anything on your mainboard !
Therefore i recommend a good grounding and a soldering station with seperate grounding !
Before you begin to modify the Vcore you should lower the momentary Vcore at least about 0.2 Volt !!!
If there’s a CS 5303 instead of HIP 6301 on your mainboard, please use the Epox 8KTA3+ guide !!!
The HIP 6301 is the KT7 voltage regulator (multi-phase Buck PWM CONTROLLER). This voltage regulator have a pin (FB/pin 7) for the voltage correction to allow manufacturers an optimal adaption of the Vcore and we can also use this pin to increase the vcore to “our correct Vcore” 🙂 In my test i used a normal 1/4 Watt resistor with 12 KOhm (brown, red, orange). It’s also possible to solder a SMD resistor (123 = 12K) from pin 7 (FB) to Pin 9 (GND).
But it may be that your mainboard doesn’t accept the new voltage 🙁 It’s because of the Over-Voltage Protection – OVP. If you are not able to select the multiplier (or something else) after this modification just take a higher resistance value (on some boards is 17 k = 2,03 Volt the maximum). Or solder a variable resistor from pin 7 to ground and find out your exact OVP value.
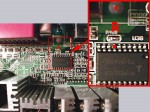
On this picture you can easy detect the positions of the two soldering points:
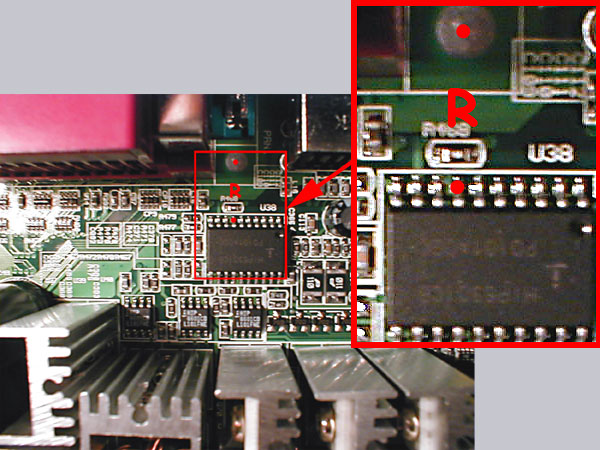
In the enlargement on the top right i marked the simplest places with two red points and an R. I didn’t solder the resistor directly to the board in order to modify the resistance value once again. Just solder the resistor to a cable and then solder this cable to the marked pins.
After this modification you should check the correct position !!!
Now put adhesive tape or a small piece of heat shrink sleeve over the resistor that it’s impossible to get a connection with other components. After this small modification your Vcore should be 0,2 Volt higher than you’ve selected in your bios.
So if you select a Vcore of 1,5 V the real ! Vcore is 1,71 Volt and with a selection of 1,75 V you’ll get 1,96 Volt.
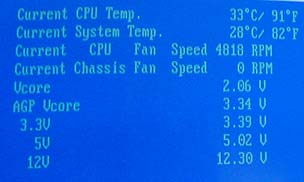
You get the highest Vcore of 2,06 Volt if you set the voltage in your BIOS to 1,85 Volt (or connect all L7 bridges).
Here’s a screenshot of my test with 1,85 Volt:
And if that’s still not enough for your CPU you could solder a smaller resistance value but the risk to destroy the processor is very high.
Pay attention to the CPU temperature after increasing the Vcore !!!
!