| Manufacturer | Crucial |
| Article number | CT128M4SSD2 |
| Capacity | 128GB |
| Interface | SATA3 6GB/s |
| Cache | 256MB |
| Controller | Marvell |
| Flash Type | MLC – Multi-Level-Cell |
| Size | 2.5″ (100.5 x 69,85 x 9,50mm) |
| Weight | 75 gramm |
| Speed | Read up to 500 MB/s / Write up to 175 MB/s |
| Seek Time | |
| Power Consumption | 0.065 Watt idle / 0.150 Watt average in operation |
| MTBF | 1.2 million hours |
| Other | RAID Support, SMART Support, Built-in EDC/ECC |
Here is a Snipping screenshot of the CrystalDiskInfo 4.3.0 SSD and HDD information software:

SSD firmware update …
At review date, the company Crucial offered the firmware version 000F for Marvell based m4 SSDs, which offers in comparison to the older versions a higher LPM (Link Power Management) performance without pauses and hesitations with certain host systems, a better stability on heavy load and an improved data protection in the event of an unexpected power loss. The update of the Crucial firmware is very easy and possible in two different methods: One way is to download the firmware from Crucial, unpack the contained ISO file, burn it on a CD, boot with this CD, select the SSD in the firmware update utility and confirm the firmware update several times. Or download the firmware with the “Windows 7 Updater Application” from Crucial, unpack the EXE file to the Desktop, start the firmware update utility, let the system restart, wait until the update is finished and let the operating system restart once again, as explained with possible problems in the special Crucial m4 256 GB SSD firmware 000F review. In the current RAID review we updated the SSDs with the most current firmware version FW000F, before setting up the RAID 0 array.
RAID Setup …
The RAID installation is essentially quite simple: – first attach both SSD drives at a RAID capable controller e.g. on the motherboard. – then enable the RAID controller in the BIOS or by a Jumper (pay attention to additional references in the manual) and change the SATA controller in the BIOS from IDE or AHCI to RAID. – at the next start enter now the RAID BIOS with the explained key combination (ASRock e.g. CTRL+F). – there activate and define the desired RAID assignment.
In order to explain only two simple RAID array type possibilities (there are still some further combinations): RAID1 mirror drives, in order to operate two or more drives at the expense of the size as much fail safe as possible reduntant. RAID0 stripe drives, in order to operate two or more drives at the expense of the data loss possibility with higher performance, thus without redundancy.
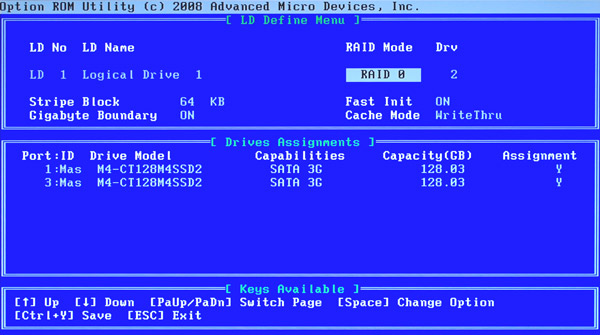
Since we would like to reach a higher SSD speed, we setup a RAID-0 Striping. After the previously review with a stripe block size of 64KB vs. 128KB, we’ve decided to define a stripe block size of 64KB. Gigabyte Boundary remains to ON, Fast Init remains to ON and Cache Mode to WriteThru.
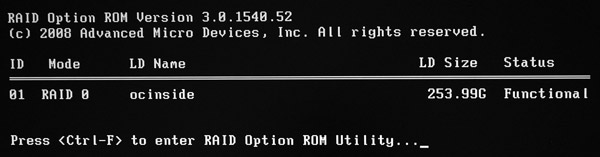
Here is a screenshot of the RAID BIOS ROM, where both 128 GB SSD drives are combined with RAID0 into one logical 256 GB SSD drive, in order to achieve a higher performance:
After creating the RAID array we restart the PC and see now the new logical drive assembly, to which we assigned the LD name ocinside, which we can partition and format now in the Windows like a conventional drive.