
BIOS and Overclocking …
Get fast to the right UEFI settings …
ASRock Z590 Extreme BIOS and Overclocking
ASRock Z590 Extreme UEFI BIOS Update
ASRock Z590 Extreme overclocking
ASRock Z590 Extreme memory settings
ASRock Z590 Extreme voltage settings
ASRock Z590 Extreme Overclock even easier
ASRock Z590 Extreme BIOS undervolting
ASRock Z590 Extreme Fan control
BIOS and overclocking …
Let us continue with the BIOS / UEFI Setup options and the UEFI overclocking. After switching on the PC, press the Del or F2 key to access the UEFI setup.
The ASRock Z590 Extreme UEFI BIOS has a graphical interface that allows intuitive operation with a mouse or can still be operated conventionally with a keyboard.
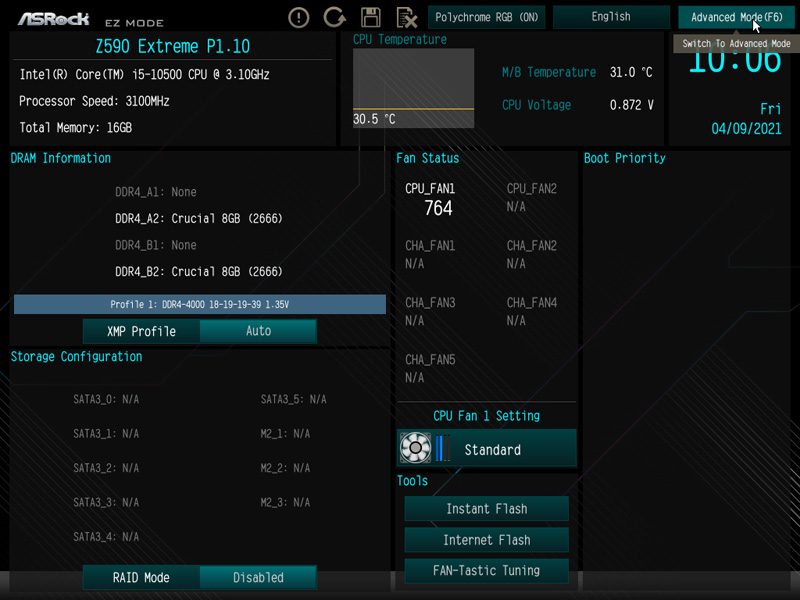
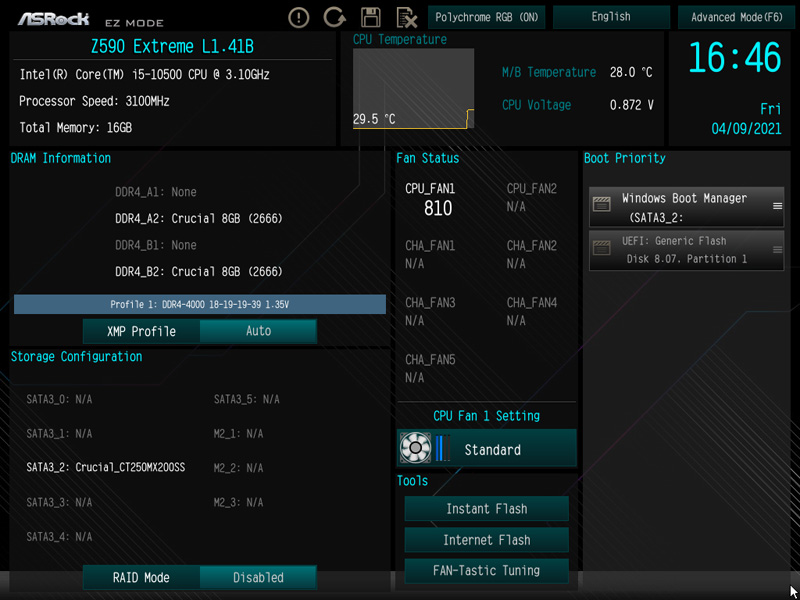
There is, as usual with the latest ASRock Intel motherboards, the ASRock EZ Mode – thus Easy Mode – which offers a clear entry page with many important information and still doesn’t look overloaded. To the basic information like time, date, CPU temperature, motherboard temperature, CPU voltage, first details about the hardware, fan speeds, hard disk population, RAID mode and fan settings with one click. The ASRock Z590 Extreme shows also the CPU temperature display as diagram.

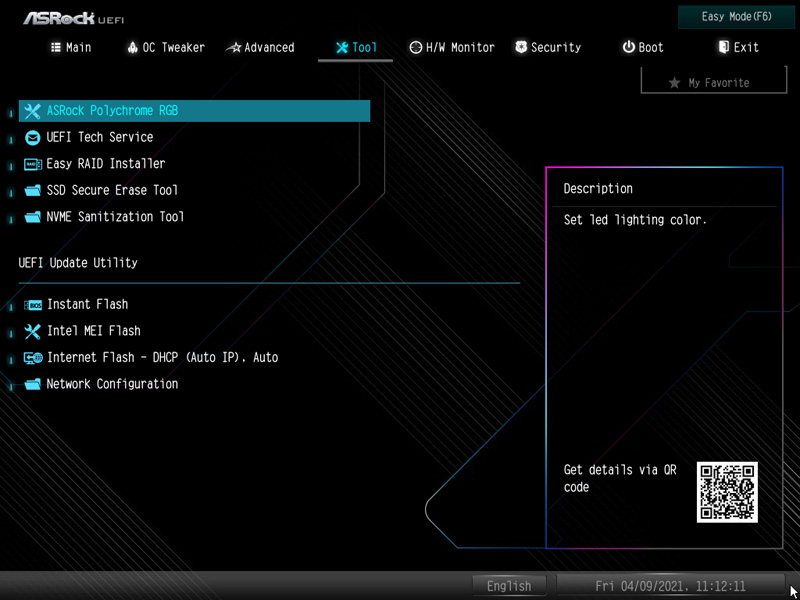
The original Tools page has been consolidated in the lower right area.
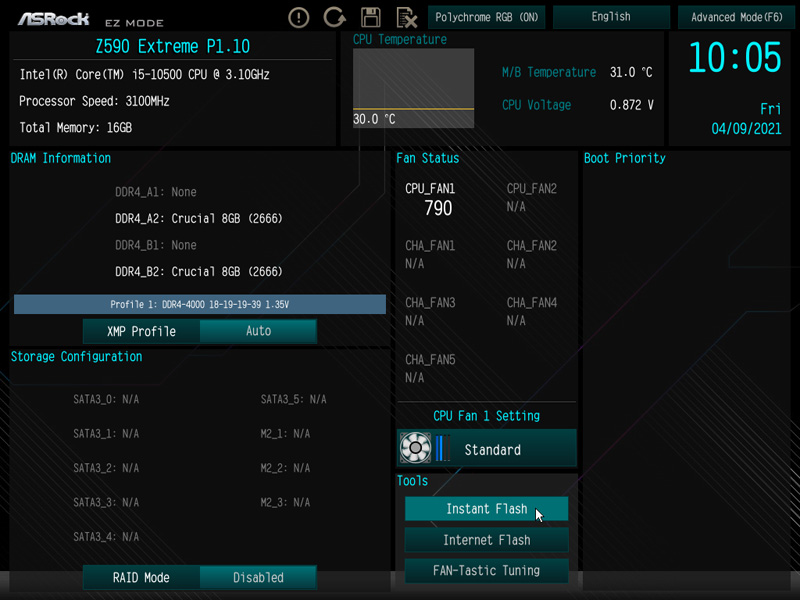
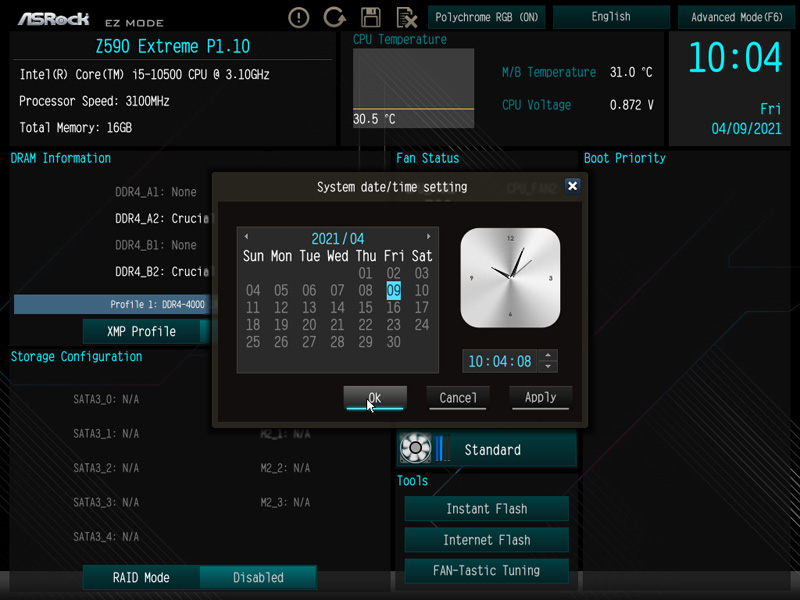
Of course you can also use the EZ menu to set the time and date.
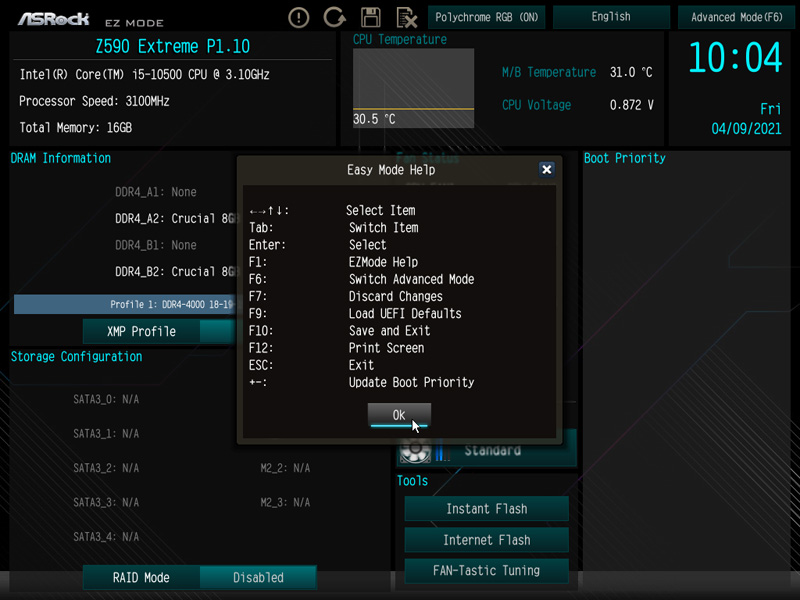
Many other functions can be operated optionally by means of function keys, which can be called up with F1. For example, if you want to publish a screenshot in our PC Forum, you can save it on a USB stick with F12.
With the F6 key or the upper right button you get into the usual ASRock Advanced Mode, which you can also set as default.
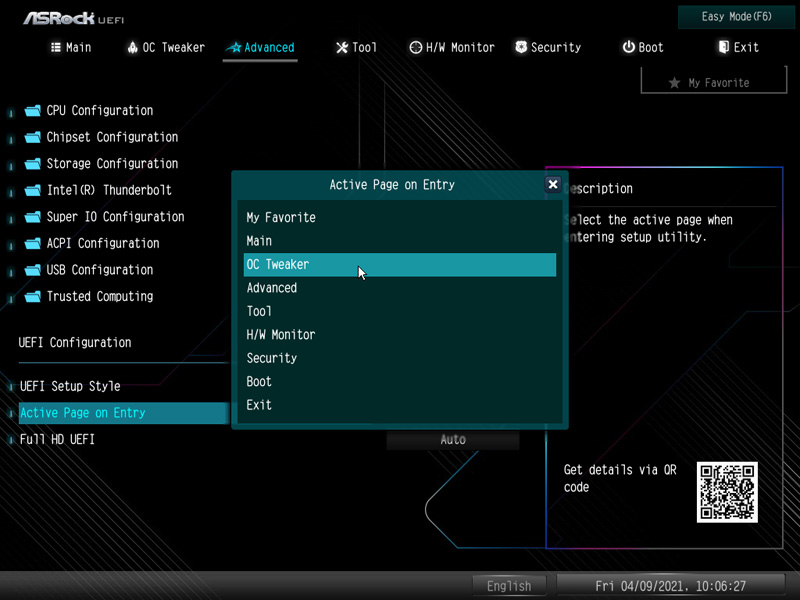
The System Browser view is no longer available on the ASRock Z590 Extreme motherboard, but you will find again the Full HD UEFI selection and the Active Page on Entry selection, with which you can decide on which UEFI page you want to start in the UEFI setup. With the ASRock Z590 Extreme you find the Active Page on Entry option and the Full HD UEFI selection under Advanced.
UEFI BIOS Update …
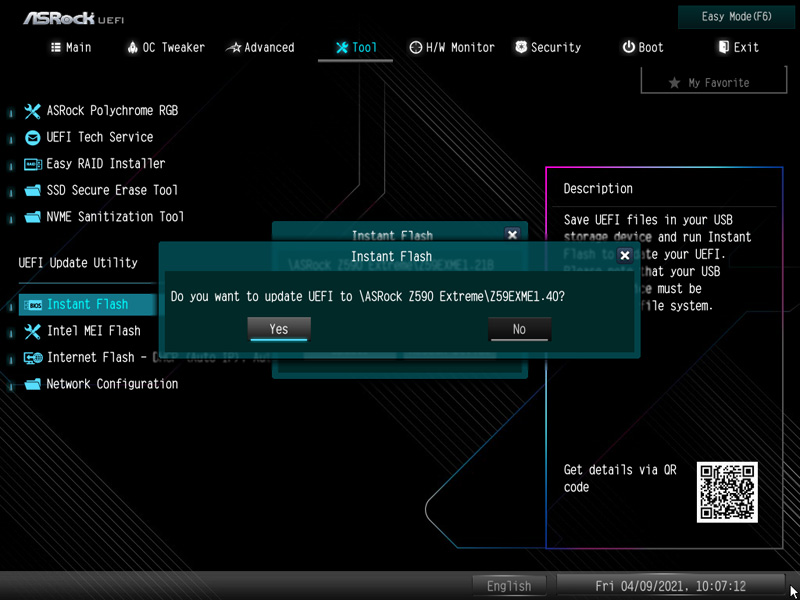
Before we start with the UEFI overclocking, we first update the UEFI BIOS to the latest version. Since ASRock regularly integrates new features, better memory support and new processors, the BIOS update is recommended in most cases. ASRock offers a few options for flashing the UEFI update, e.g. the very simple Instant Flash or even the ASRock Internet Flash with a direct connection to the Internet. Via the so-called ASRock Instant Flash option in the tool screen or via the F6 key at PC startup, you can access the ASRock Instant Flash utility. You can simply install a previously downloaded ASRock BIOS without a boot CD or similar by starting the ASRock Instant Flash Utility. Then select the BIOS Flash ROM from the desired drive such as a USB stick, which by the way you have to unpack after downloading. If, as in our case, there are multiple UEFI versions available on the USB stick thanks to the ASRock Beta BIOS download, simply select the desired UEFI update.

At the time of testing the UEFI BIOS version P1.40 was available as the latest download, which we of course installed over the pre-installed P1.10 version.
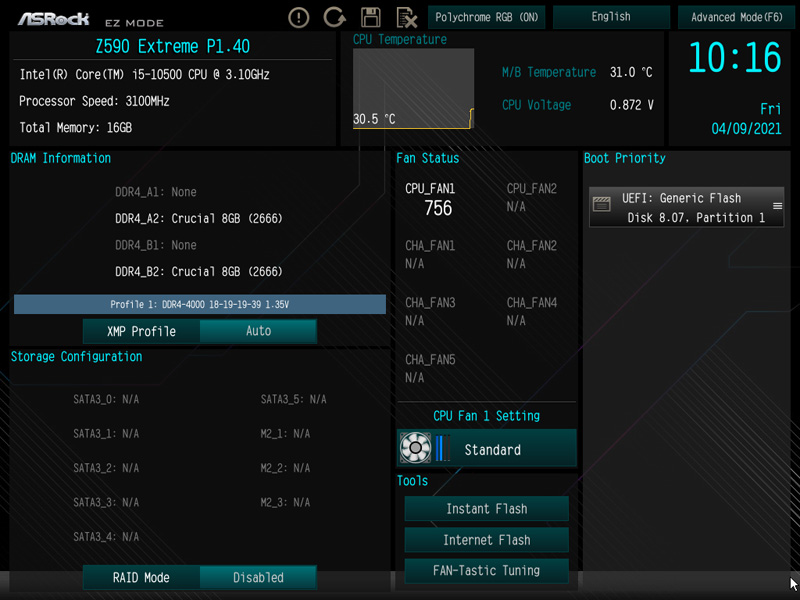
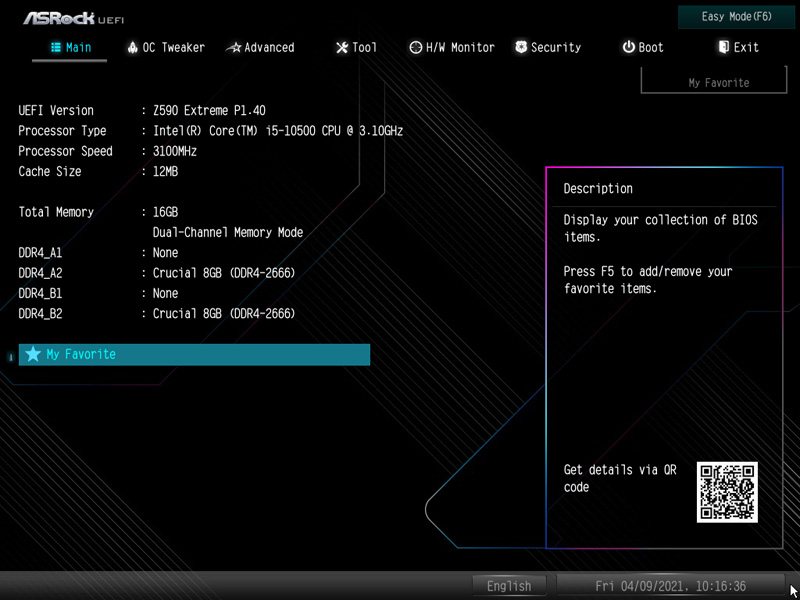
The new BIOS version is then available after a reboot. Here you can see the new P1.40 EZ BIOS entry page with the Intel Core i5-10500 CPU.
To see what advantages the latest ASRock Beta UEFI download brings, we also tested version L1.41B.
And here you can see the new P1.40 Advanced BIOS entry page with the Intel Core i5-10500 CPU.
The My Favorite function is very helpful, because you can store frequently used menu items here, so that you can easily see them on a page and access them more quickly. You start with an empty page – by the way, it is unfortunately also emptied after a BIOS update.
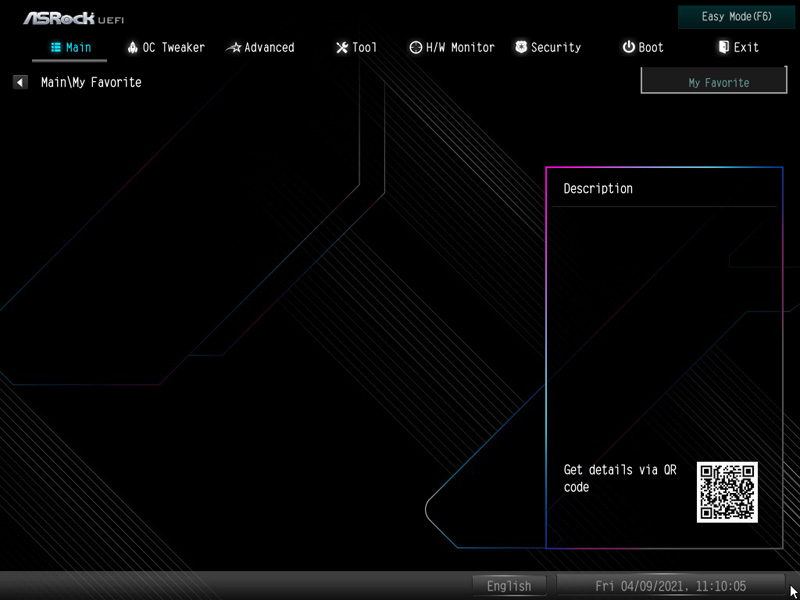
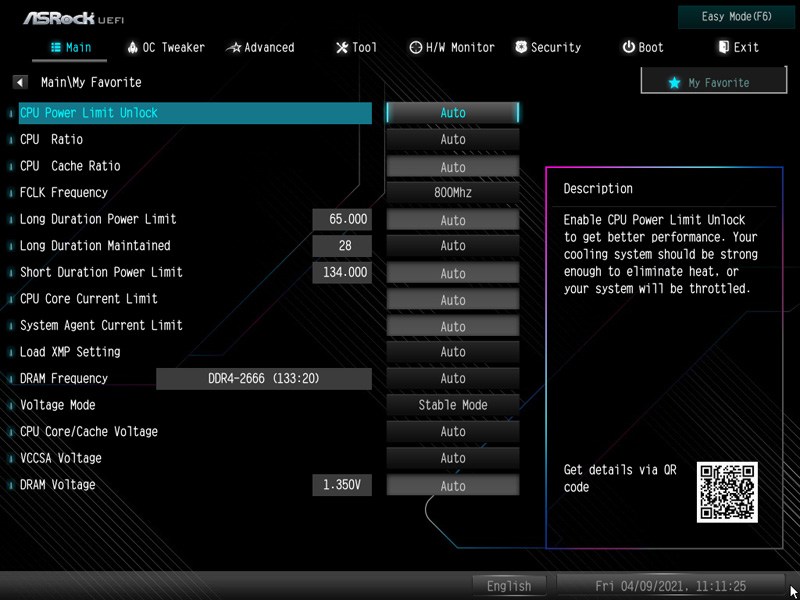
The My Favorite page is now filled with your own menu items by simply going to the respective menu item, then pressing F5 and the desired functions are already included in the My Favorite overview page. Here you can see a selection of possible favourites.
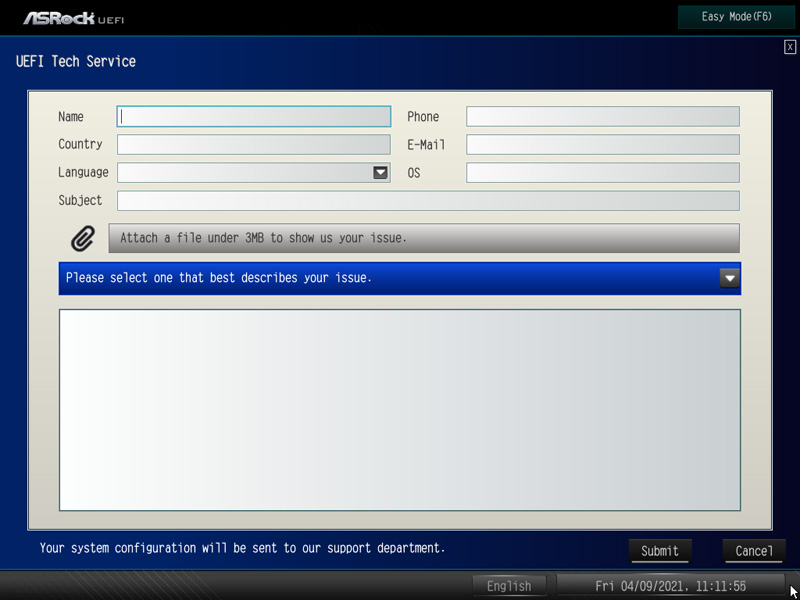
If you need technical UEFI support, you can even select the errors via the UEFI setup and even contact the ASRock Tech Service via network connection.
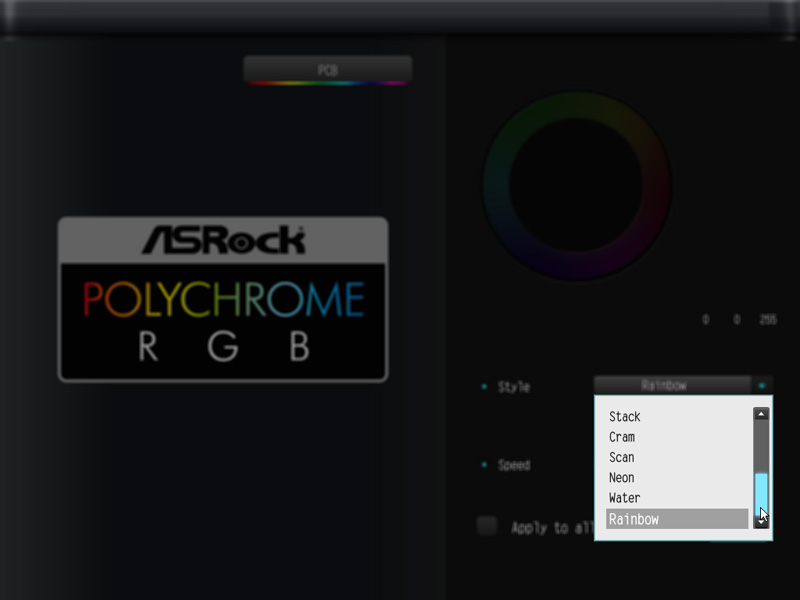
On the tools page of this ASRock Z590 Extreme motherboard is the ASRock Polychrome RGB LED entry, which is almost identical to the ASRock Polychrome RGB software, which we already mentioned on the previous page.
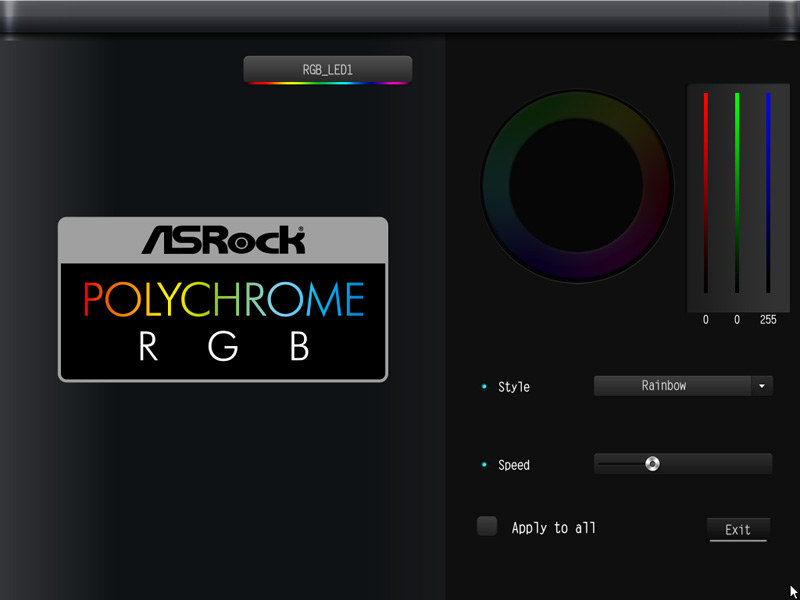
The Polychrome RGB LED menu has numerous setting options. You can select the color in an RGB color selector.
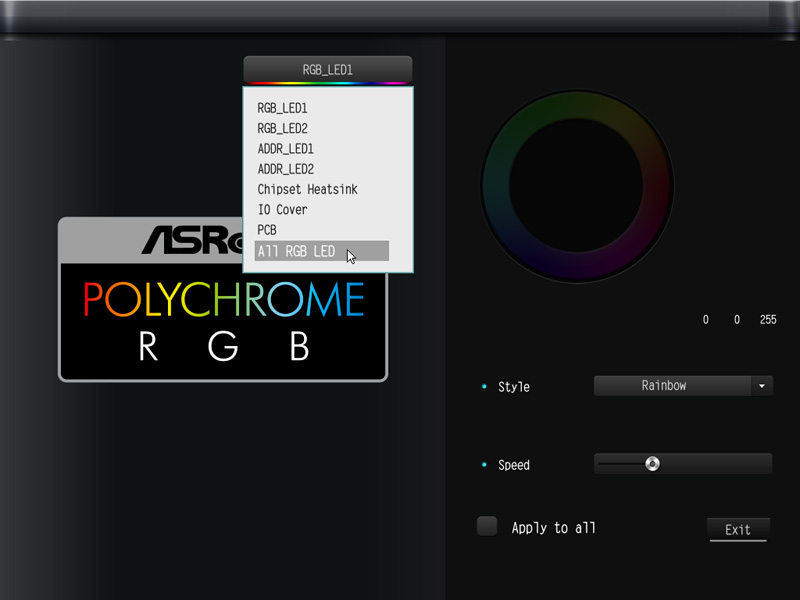
You can choose whether to control the RGB headers separately or all together.
And you can set in the Polychrome RGB LED menu whether the LEDs should shine continuously, “breathe”, be controlled randomly or even to music. So the user has numerous possibilities how and how fast the LED stripes should light up. And if you don’t need the lighting, you can of course disable it completely.
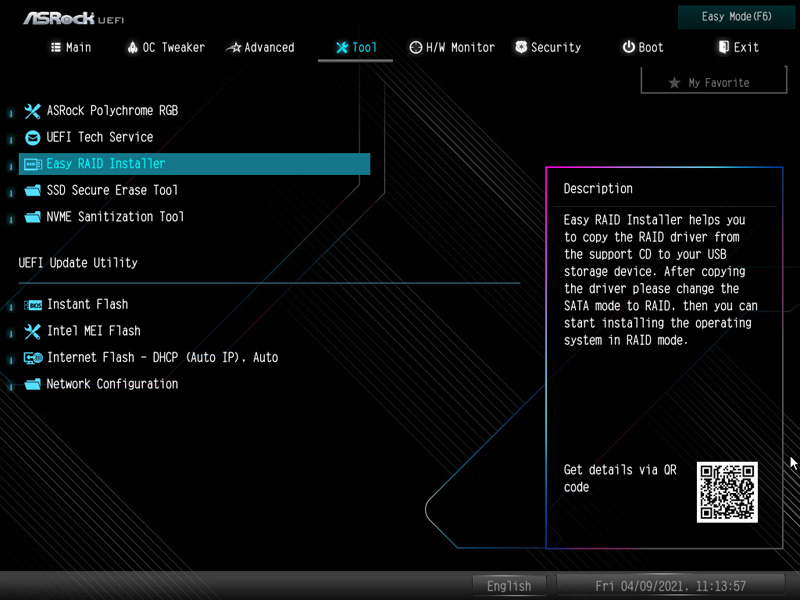
ASRock makes RAID driver installation very easy for the user by providing an easy way to download the latest RAID drivers with the Easy RAID Installer.
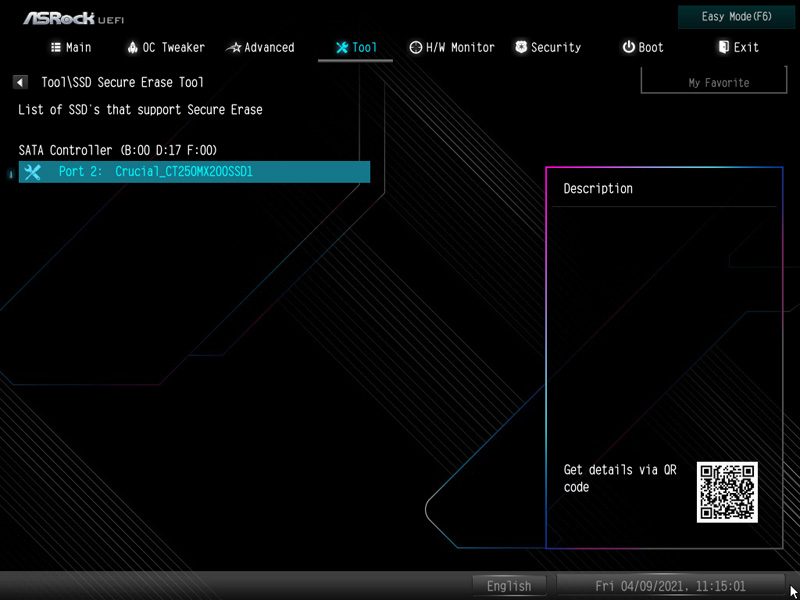
In addition to the NVME Sanitization Tool, the handy SSD Secure Erase BIOS Tool has also been reintegrated into the ASRock Z590 Extreme.
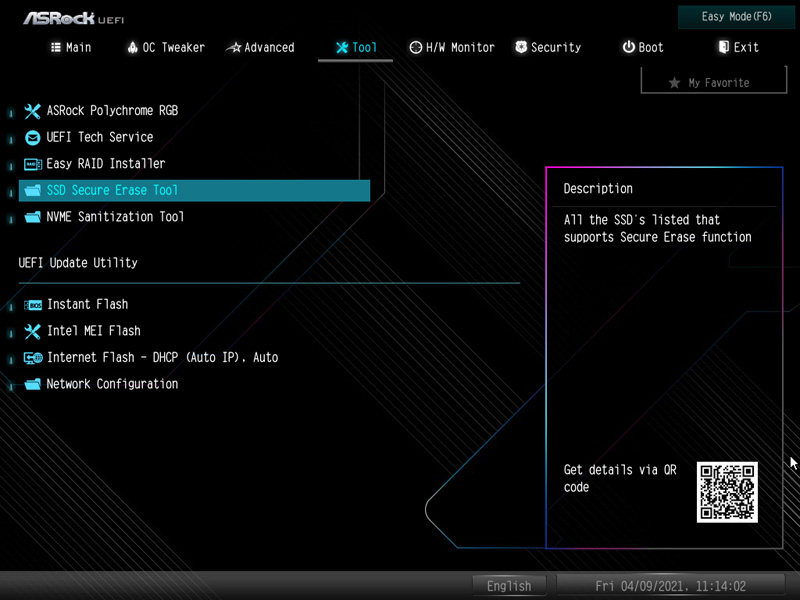
Simply select the desired SSD and it will be quickly and safely erased – for example, for secure deletion before the SSD sale or in case of serious problems with the partitioning. Great thing, but definitely use with caution! How to safely erase an SSD even without these SSD tools, we show here at Tips and Tricks Forum in the Erase SSD safely post.
ASRock Z590 Extreme Overclocking …
Now we come to the Intel LGA 1200 overclocking with the Z590 chipset on the ASRock Z590 Extreme motherboard. ASRock separates the OC-Tweaker menu of the ASRock Z590 Extreme into CPU Configuration, DRAM Configuration and Voltage Configuration.

A look into the OC-Tweaker menu is much more pleasant than than for example with a previously tested ASRock H470 Steel Legend motherboard or even with the ASRock B460 Steel Legend motherboard. Because with the Z690 you can finally overclock properly again compared to the B560 or H570! So if you use an Intel “K” CPU with open multiplier, you get all important settings for the multiplier and the BCLK.
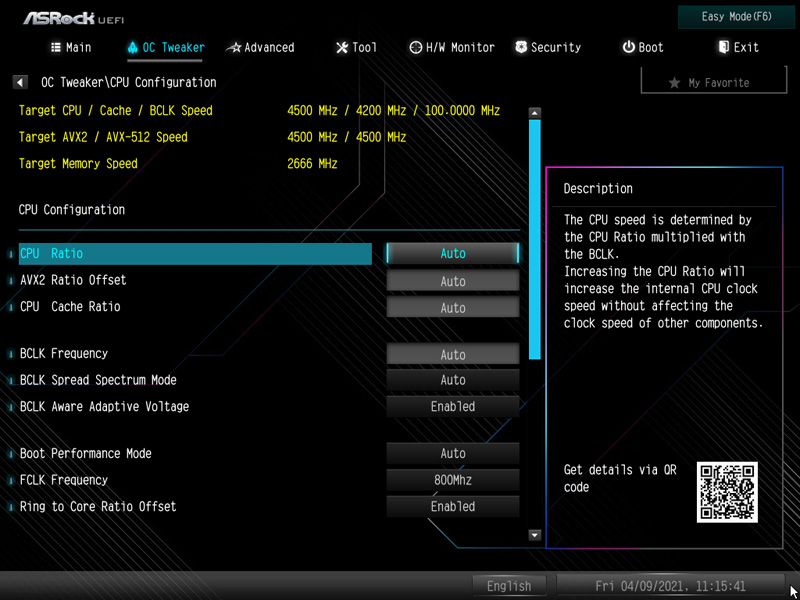
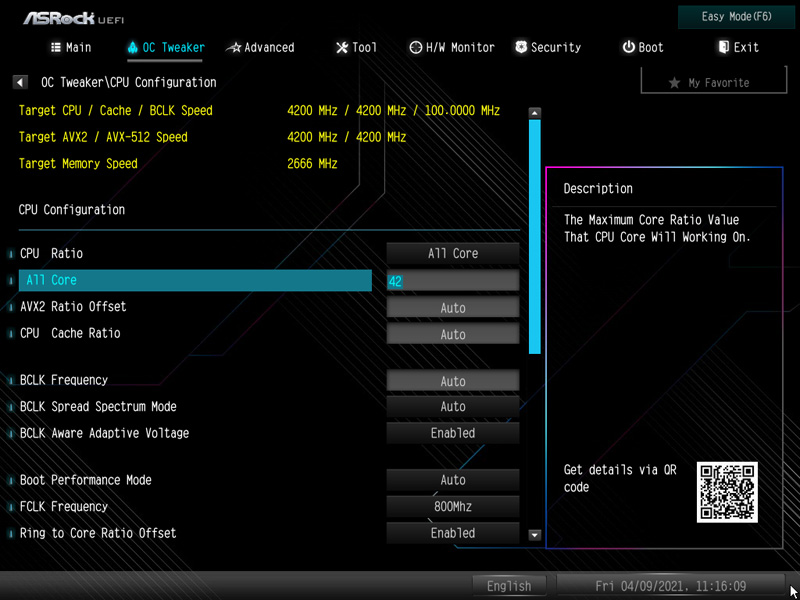
Of course, the multiplier can only be increased up to the maximum given multi of the CPU in a non-K Intel CPU, because overclocking via multiplier is reserved for Intel K CPUs.
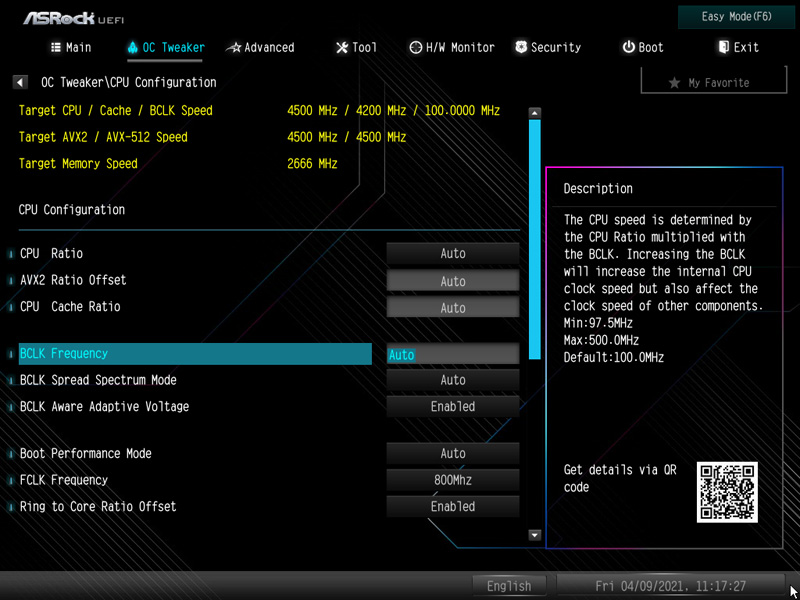
But even with a CPU with a locked multiplier, such as our Intel Core i5-10500 CPU, you can overclock the CPU a bit using BCLK.
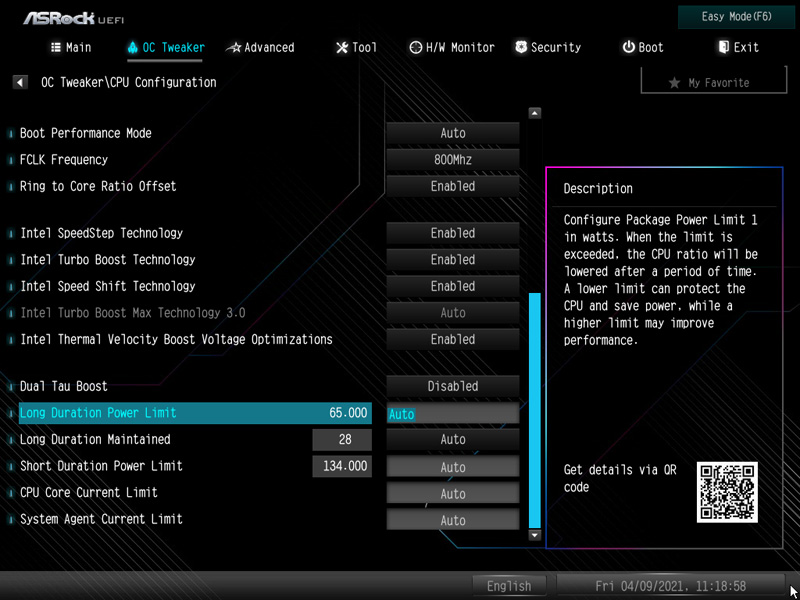
There is also the Boot Performance Mode setting for the speed during the boot process and the Power Limit settings, which are also very important for overclocking.
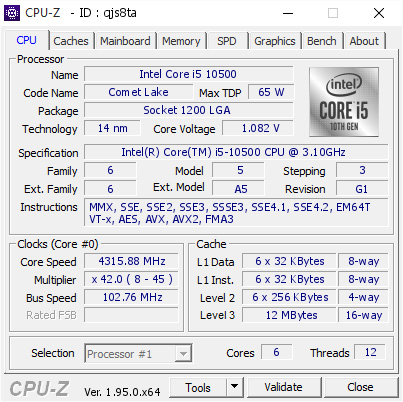
So an Intel Core i9-11900K or Intel Core i9-10900K CPU could be perfectly overclocked with this Intel Z590 motherboard. But even the Intel Core i5-10500 CPU with locked multi we could overclock a bit. If we discover possibilities to unlock the Multi in the future, we will publish them as usual in the Intel OC Forum or directly with an OC guide in the PC Workshop. Until then we have to be satisfied with the BCLK overclocking for locked CPUs, which of course overclocks all other components as well. Here you can see the confirmed CPU-Z Tool with 4315.88 MHz at 102.76 MHz BCLK.
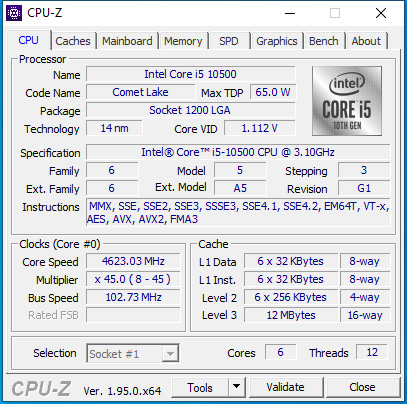
Without load on all cores, the locked Intel Core i5-10500 CPU even clocks up to 4623.03 MHz instead of 3100 MHz!
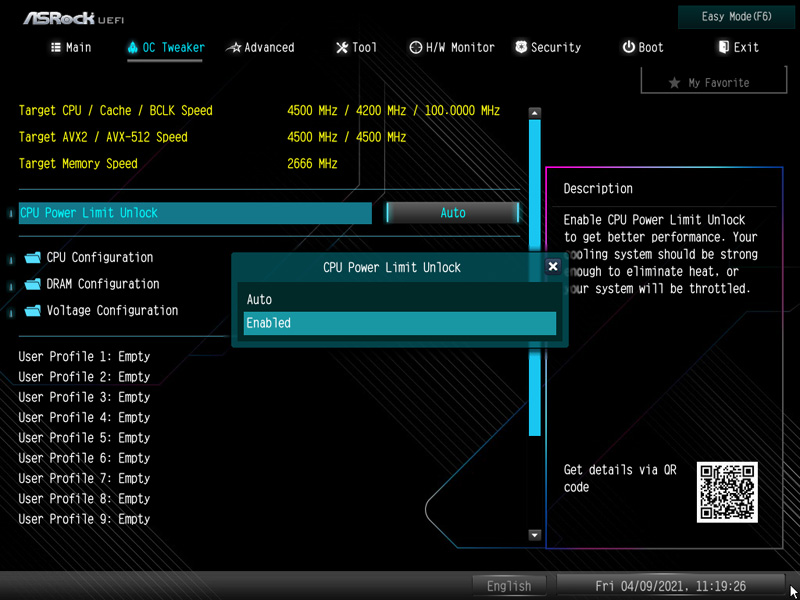
ASRock CPU Power Limit Unlock …
On the OC Tweaker entry page there is also the so called CPU Power Limit Unlock option, which allows you to overclock even a CPU with locked multiplier. You don’t get overclocking by multiplier, but you can control the powerlimit. Normally the Core i5-10500 CPU is given with a power limit of 65 Watt by Intel. That means, if the turbo clock frequency needs more than 65W power limit over a certain time, this is prevented by Intel with the Power Limit Throttling. We have already explained Intel Turbo Boost Short Power Max, Turbo Boost Power Max, Turbo Boost Power Time Window, Primary Plane Current Limit, Short Duration Power Limit, Long Duration Power Limit and similar power limits several times in our OC manuals, because higher power limits play an important role in overclocking. Especially when it comes to maintaining higher clock rates over a longer period of time. With the CPU Power Limit Unlock option in the OC Tweaker UEFI, ASRock now allows to raise this limit to keep the turbo clock frequency beyond the 65W power limit. Of course it is very helpful that ASRock once again has improved the VRMs of this Z590 Extreme.
ASRock Z590 Extreme memory settings …
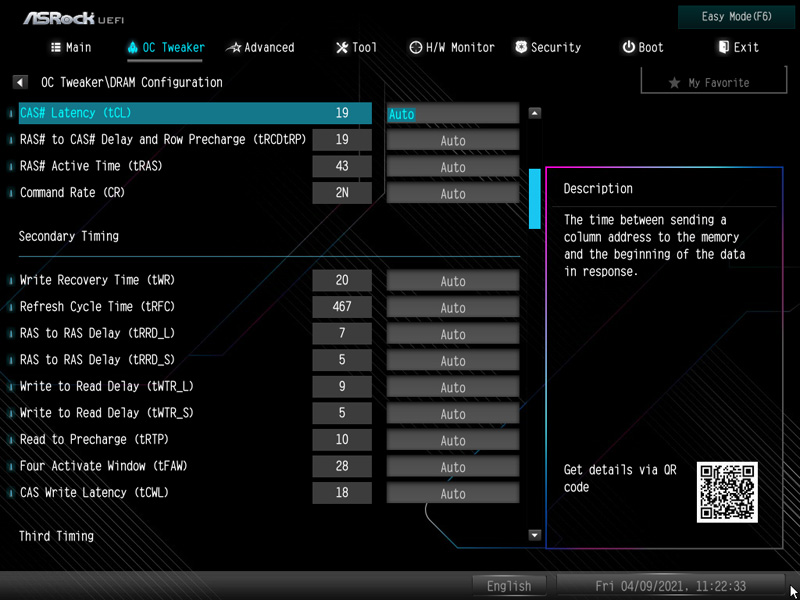
The DRAM Configuration Menu contains all important memory settings.
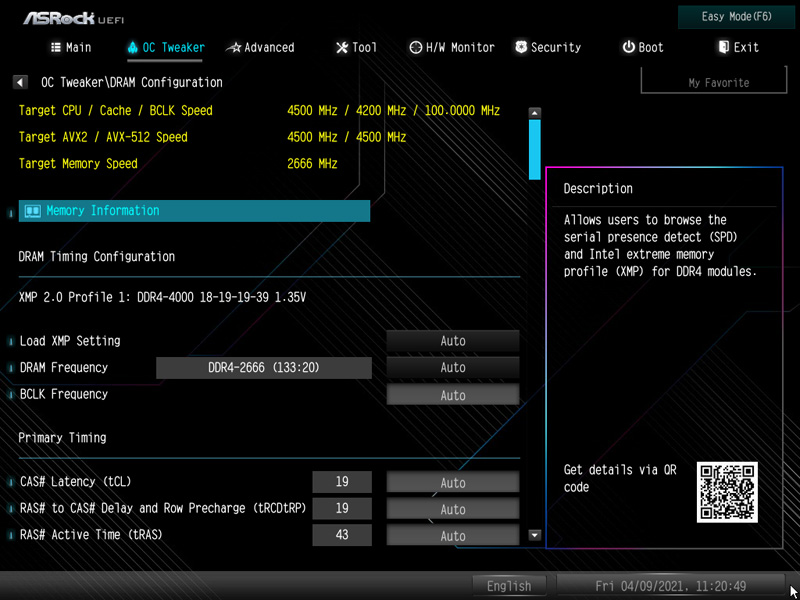
Thanks to Load XMP Setting support, XMP memory modules can be set correctly in the UEFI BIOS with just one mouse click.

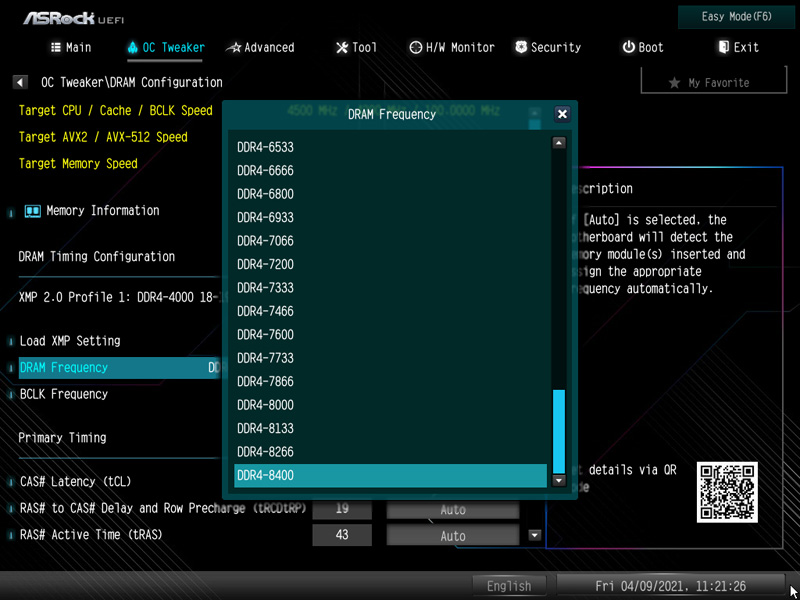
Alternatively you can select the values yourself. With the DDR4 memory clock, for example, you can select values from DDR4-800 …
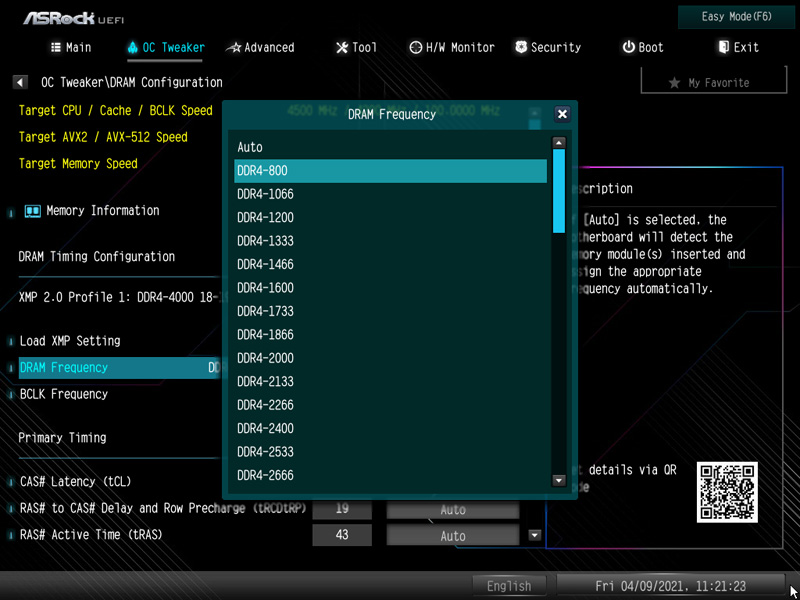
… to maximum DDR4-8400, because unlike the B560 or H570 (max. DDR4-2933 resp. max. DDR4-3200 with 11th Gen) the BCLK is also increased!
All DDR4 timings can optionally be adjusted manually.
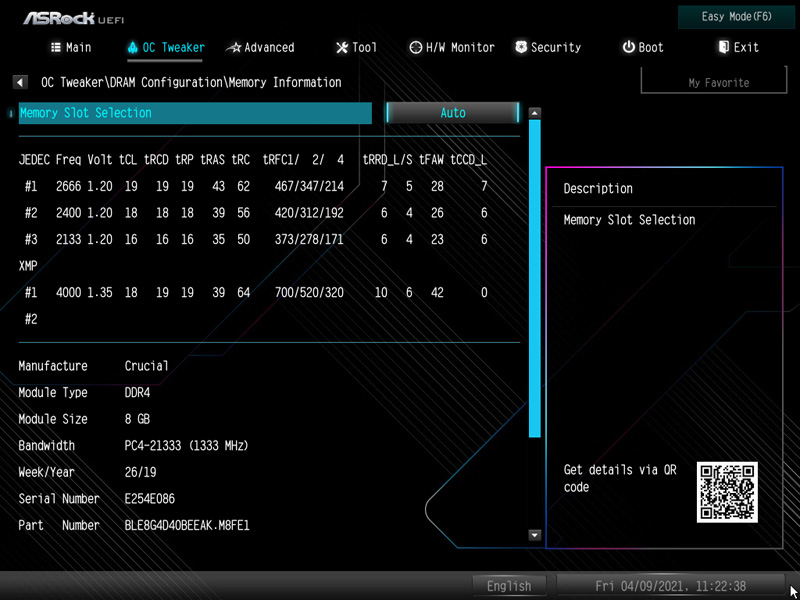
The ASRock Z590 Extreme offers under Memory Information an overview with all SPD and XMP memory values, which are no longer available for direct selection as in the DRAM Configuration Menu.
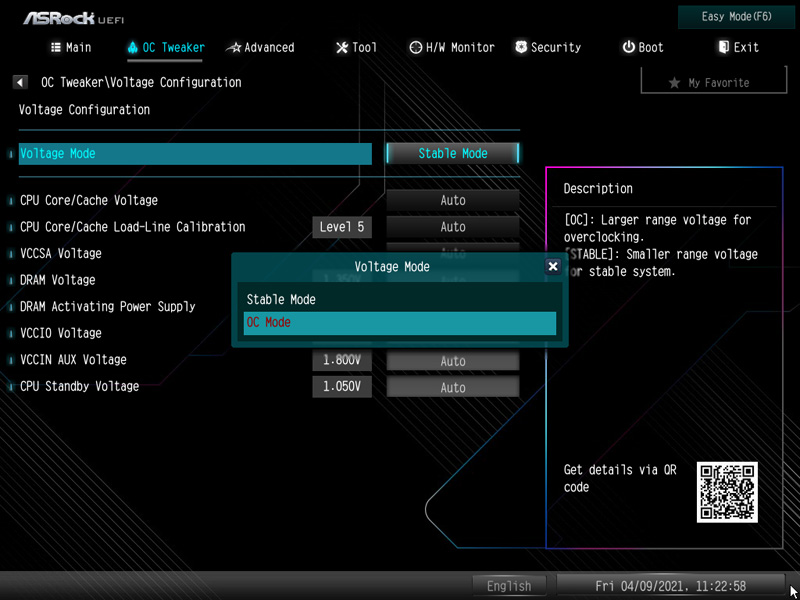
ASRock Z590 Extreme voltage settings …
Now we come to the different voltage values that can be set in the BIOS. The ASRock Z590 Extreme motherboard provides important voltage settings under Voltage Configuration and offers higher voltages in OC Mode. For example, it has VCCSA Voltage, VCCIO Voltage, GT Voltage, and the DDR4 voltage can also be set in the Voltage menu, as we already showed on the second test page in the technical details. Fortunately, the CPU Core/Cache Voltage can again be set to Offset and Fixed Mode. In the Intel Core i5-10500 test CPU, the Fixed Mode could be set from 0.800 Volts to 1.800 Volts and the Vcore Offset from -0.100V to +0.300V.
ASRock Z590 Extreme even easier overclocking …
Those who prefer to overclock in Windows can use the above voltage settings after a short installation …
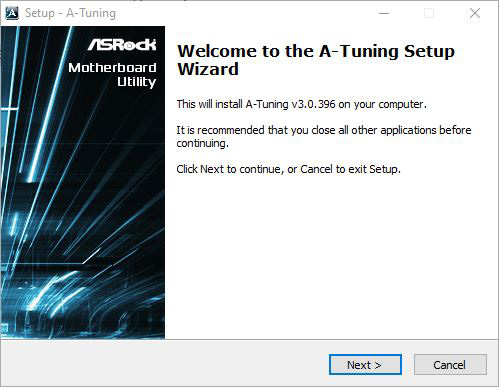
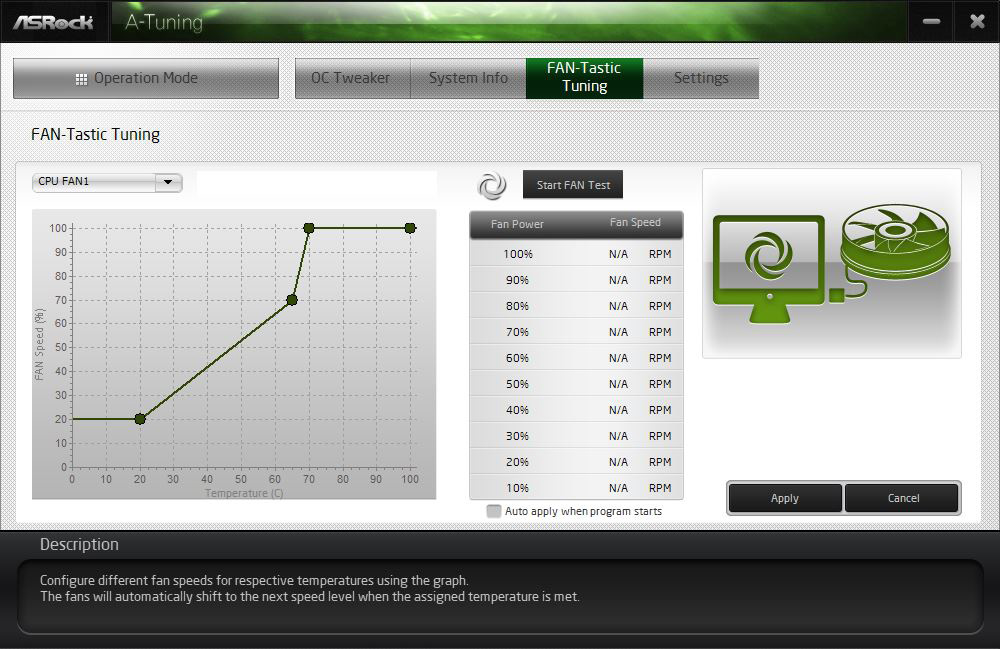
… can also be done with the ASRock A-Tuning Tool.
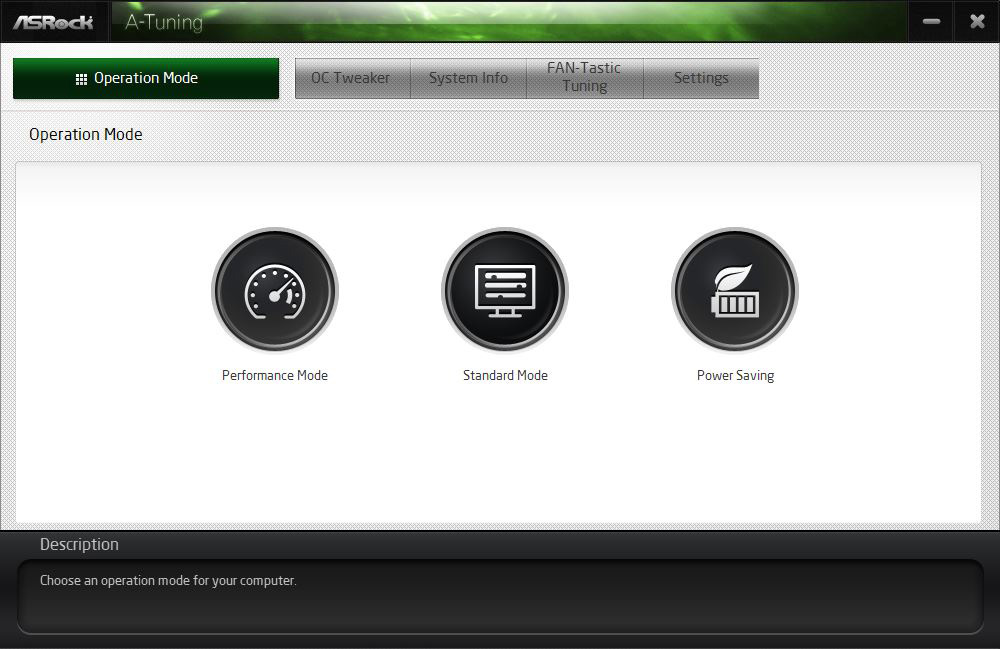
Here you can see the settings of the ASRock A-Tuning Tool.
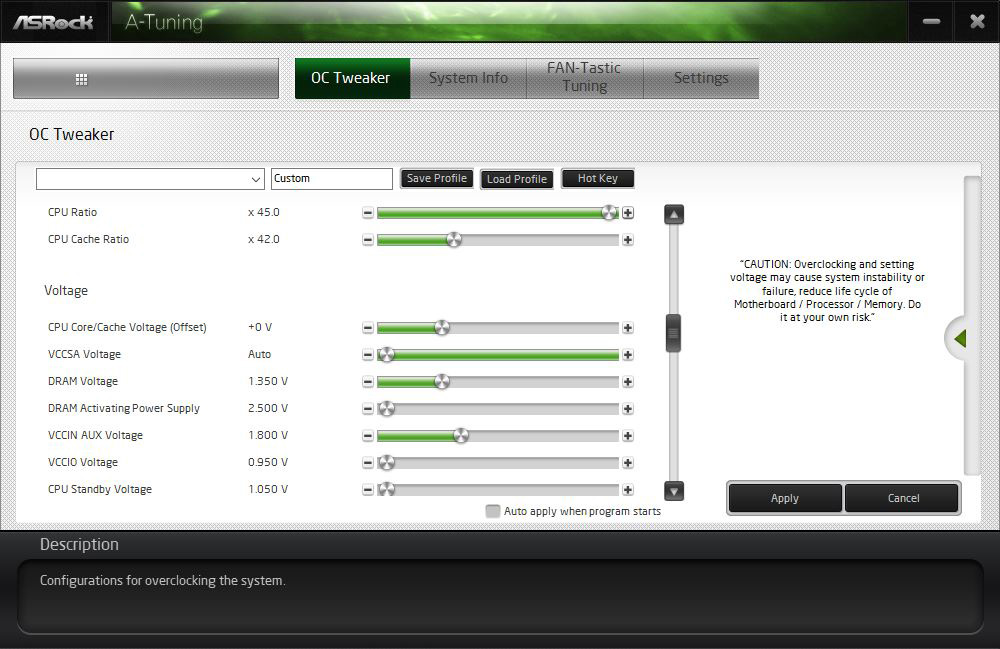
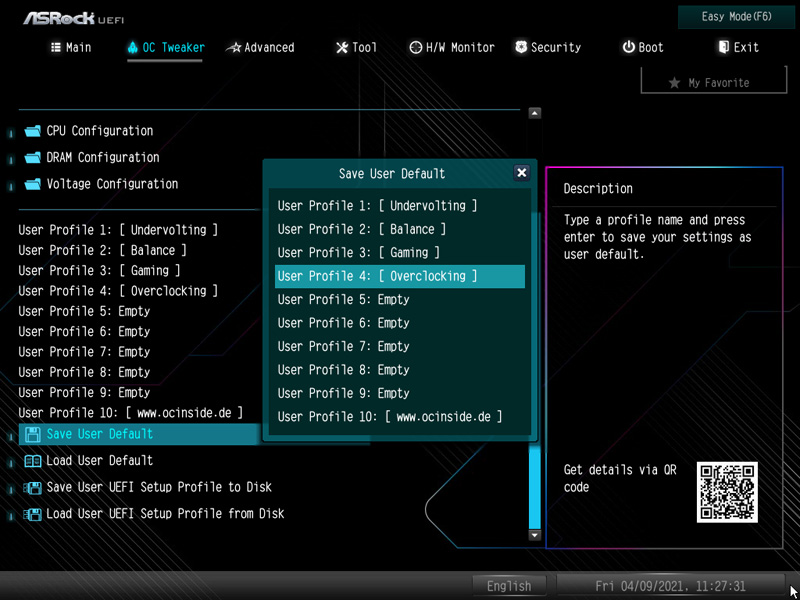
When the desired settings are found, you can save up to ten different BIOS settings with names in UEFI under OC Tweaker.
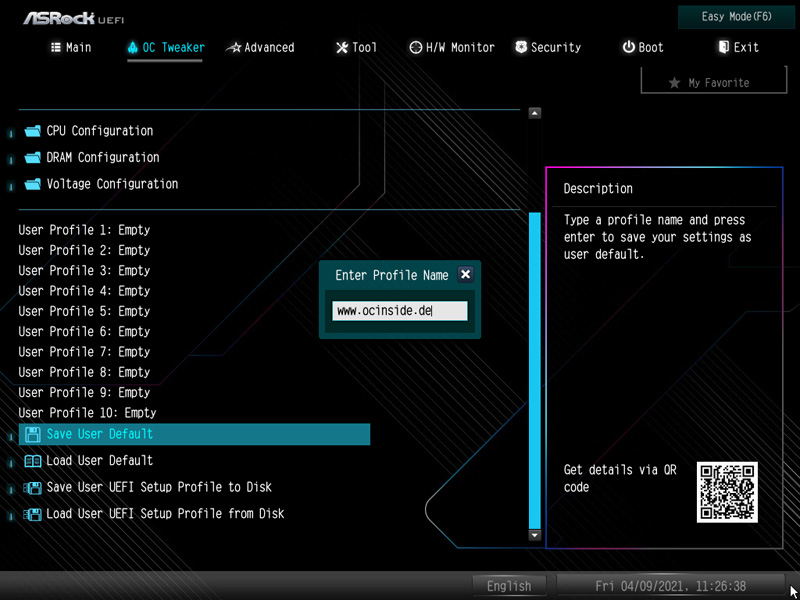
For example, you could store undervolting values, balanced BIOS settings, office or gaming settings as undervolting, balance and gaming user profile to be able to quickly reload these values at any time.
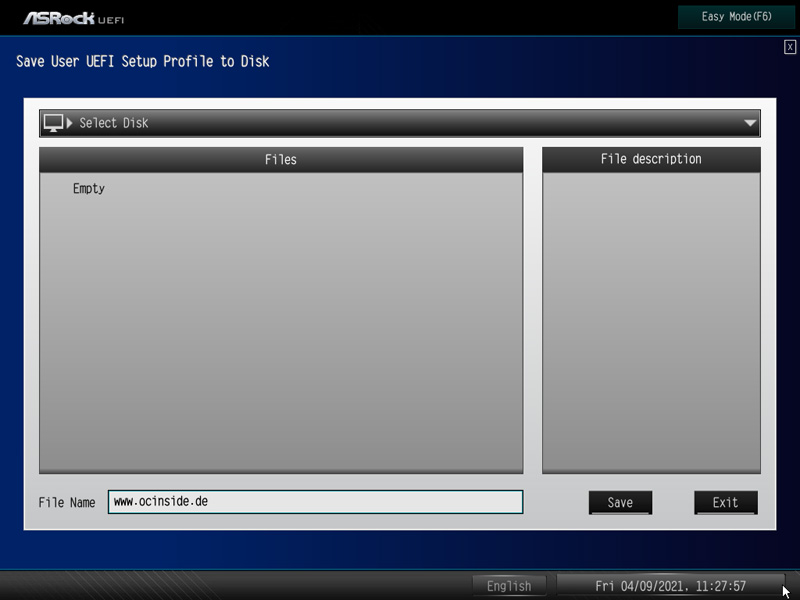
Interesting is also Save User UEFI Setup Profile to Disk. Simply click on it and save your UEFI settings on the hard disk or on a USB stick.
BIOS Undervolting …
The underclocking was also checked again in this test. The Intel Core i5-10500 CPU could not be underclocked. But it is possible to lower the voltage and thus further reduce the power consumption. Underclocking with low CPU voltage is of course as well as overclocking outside the specification, so that a little bit of luck is always necessary. But ASRock at least provides the basis for an easy undervolting.
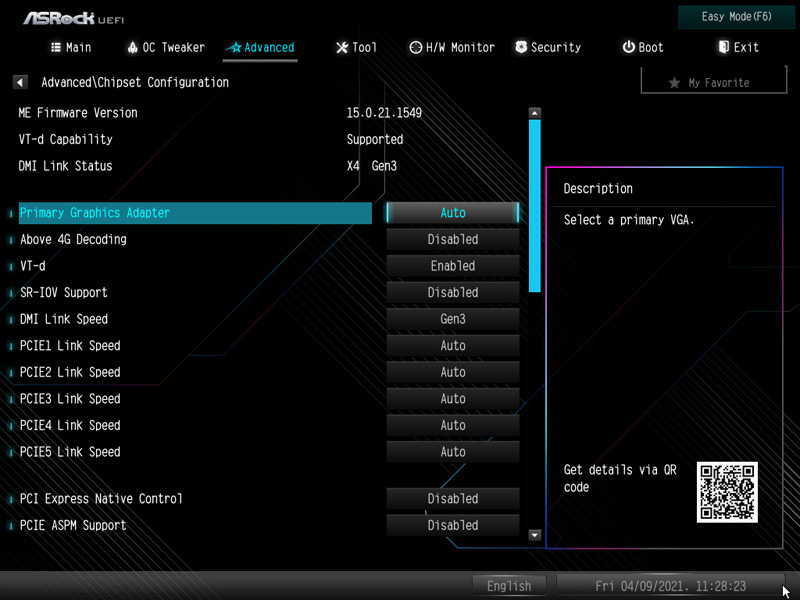
There are many more UEFI settings to choose from: CPU Configuration, Chipset Configuration, Storage Configuration, Intel Thunderbolt, Super IO Configuration, ACPI Configuration, USB Configuration and Trusted Computing.
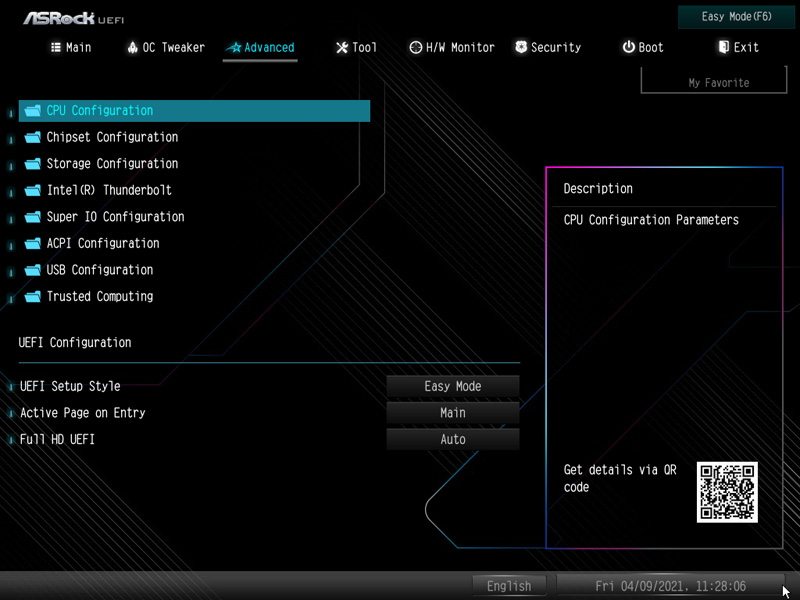
If you want to save power when using a PC with an Intel LGA1200 PC or if you use Intel Virtualization Technology to support multiple, simultaneous operating systems, you should also check the CPU Configuration menu under Advanced. But also the settings in Advanced Chipset Configuration with the individual speeds of the PCIe slots, selecting the first graphics card, etc. are interesting.
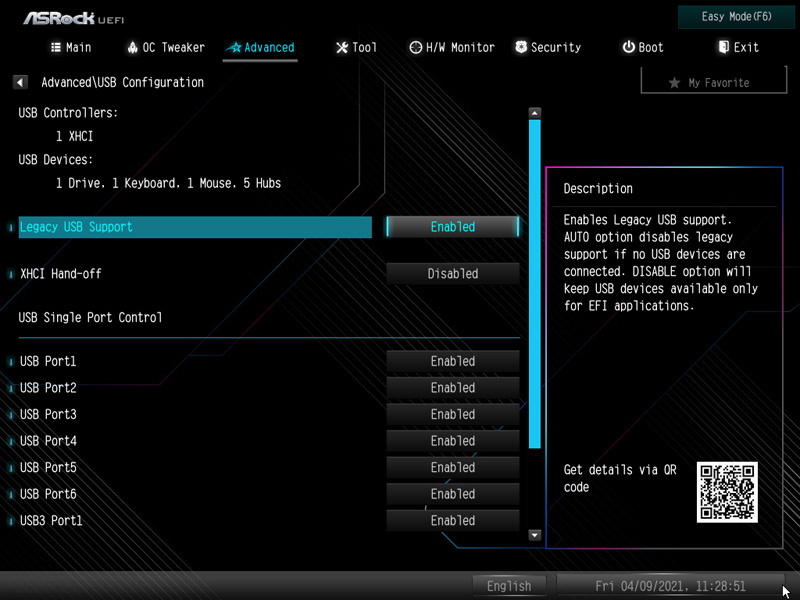
In the UEFI it is even possible to manually deactivate each individual USB port.
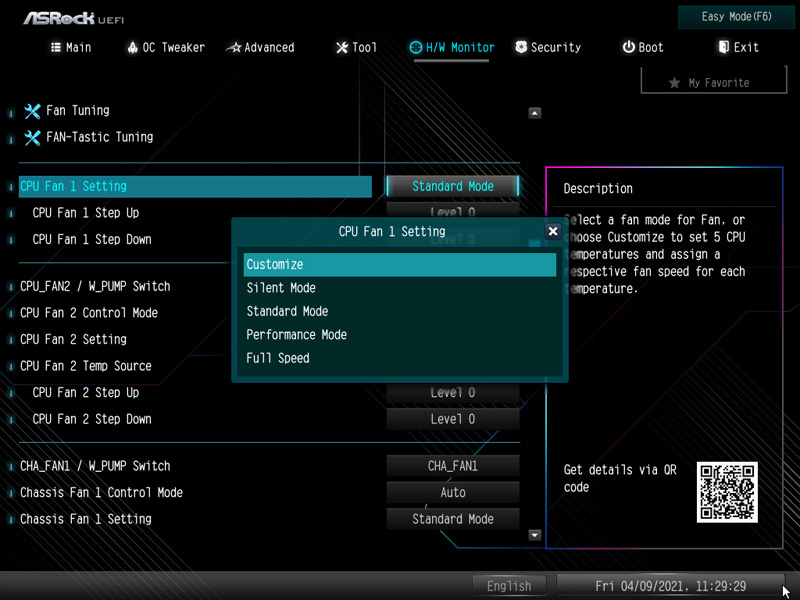
Fan control …
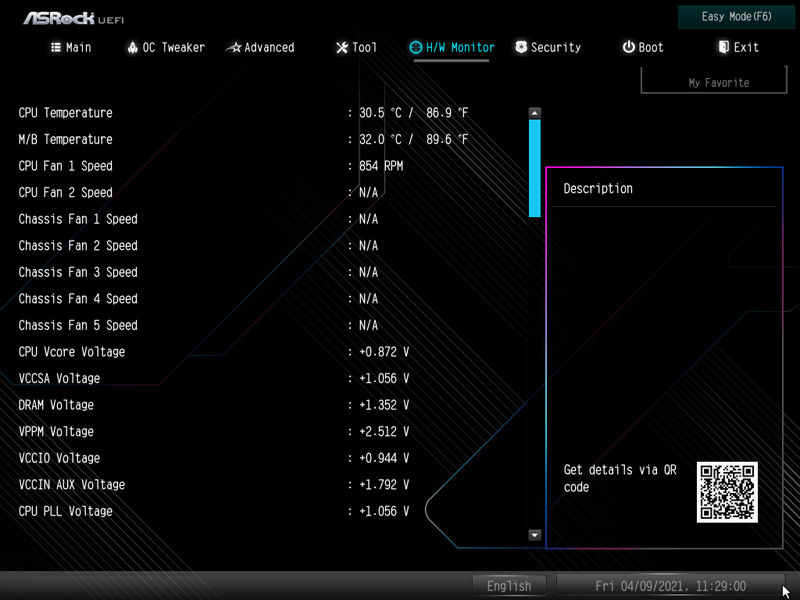
The UEFI Setup of the passive cooled Z590 Extreme motherboard also features an extensive temperature controlled fan control. The settings for the fan controller can be found in H/W Monitor directly below the temperature and voltage display.
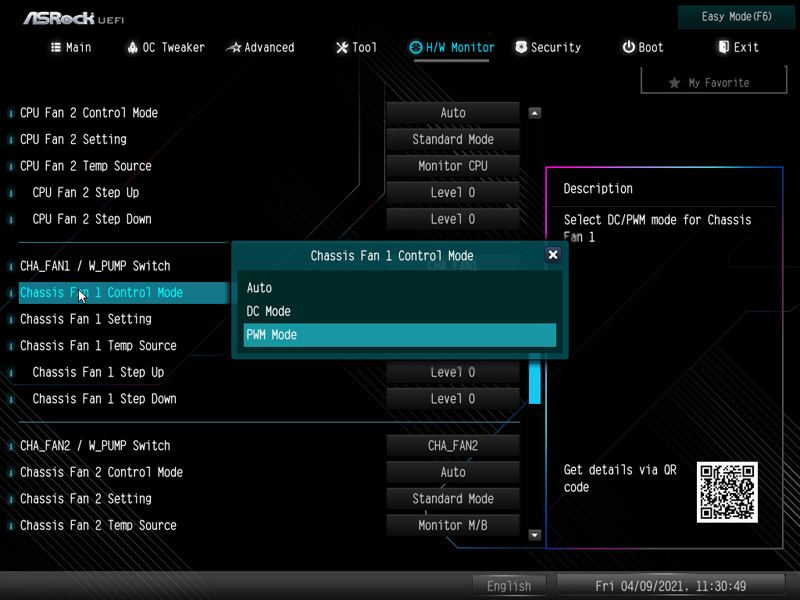
Here are settings for the CPU fan, chassis fans or W_Pump switch.
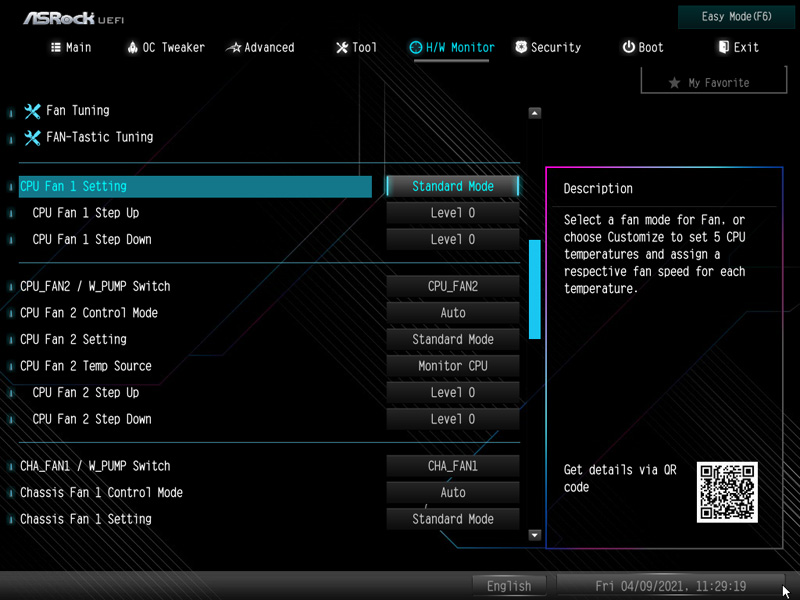
You have the choice between Customize, Silent, Standard, Performance and Full Speed.
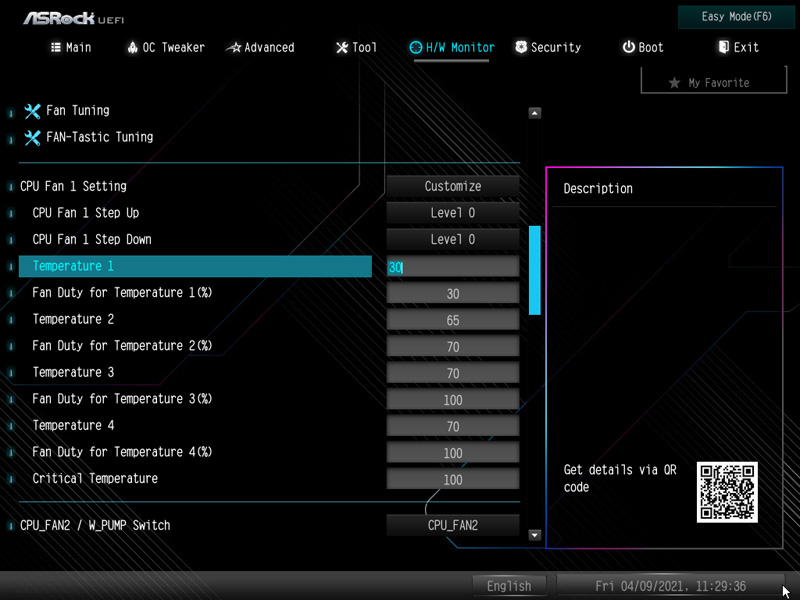
In Customize Mode, several temperature steps are available to which the desired fan speed can then be assigned. The fan settings are changed immediately and can therefore be heard immediately.
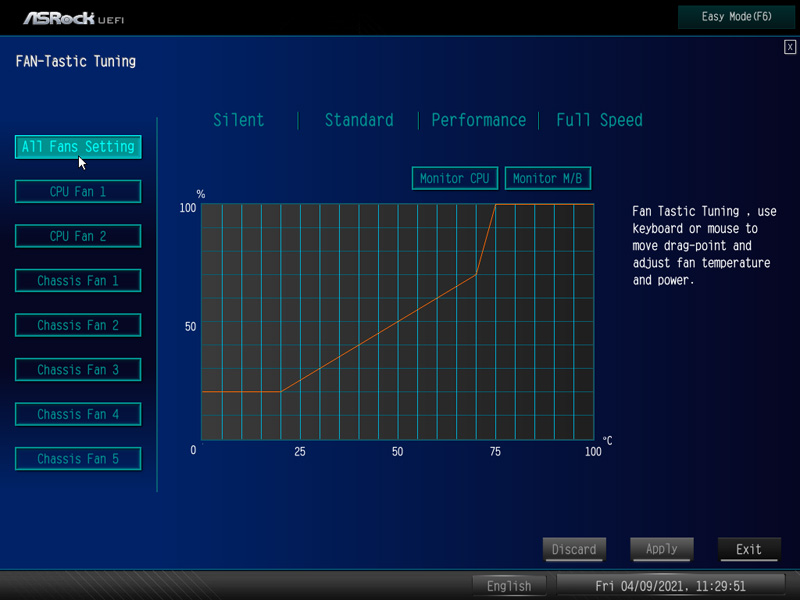
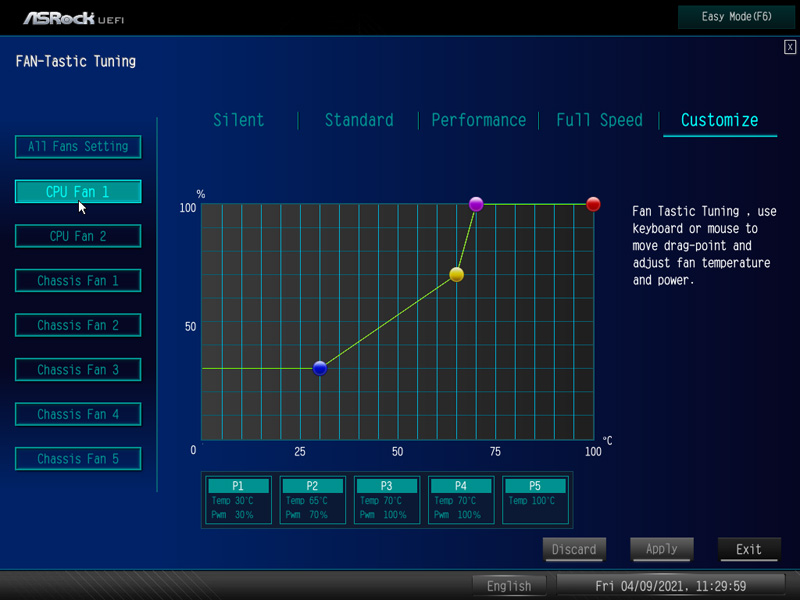
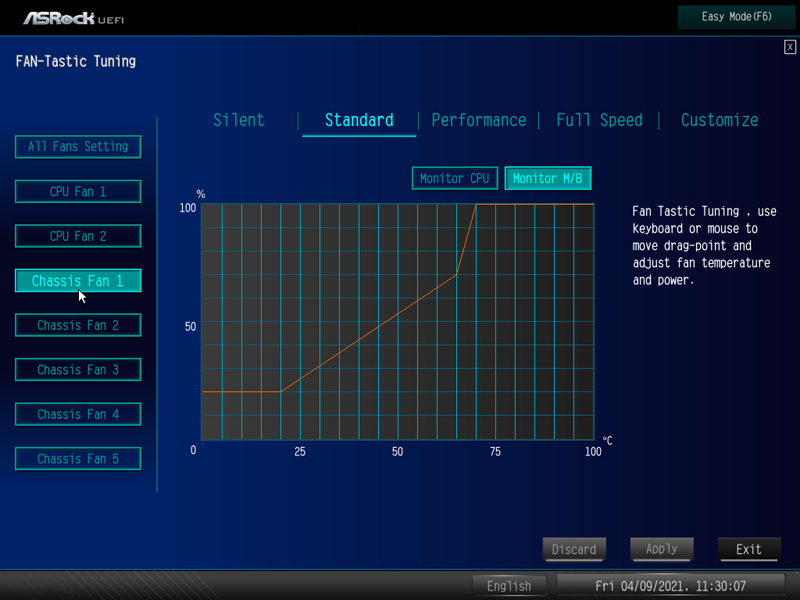
ASRock has also integrated the graphical user interface for controlling the fans in the UEFI setup. The FAN-Tastic Tuning menu item can also be found in the H/W monitor and can be used for all settings. Simply select the respective fan connector on the left side and then select the mode on the right side: Silent, Standard, Performance or Full Speed.
In Customize mode, you can set all values directly in the chart and save.
For the chassis fan connectors you can even select, which source you want to use for temperature measurement – Monitor CPU or Monitor Motherboard. Then click on apply and save the values.
And even the control of the 3-pin chassis fans is possible with the DC/PWM mode switch.
Who would rather set the values in Windows, you can use also the ASRock A-Tuning tool.
You can usually get along without an expensive Fan Controller, because the fans are controlled with this fan control based on CPU or motherboard temperature.
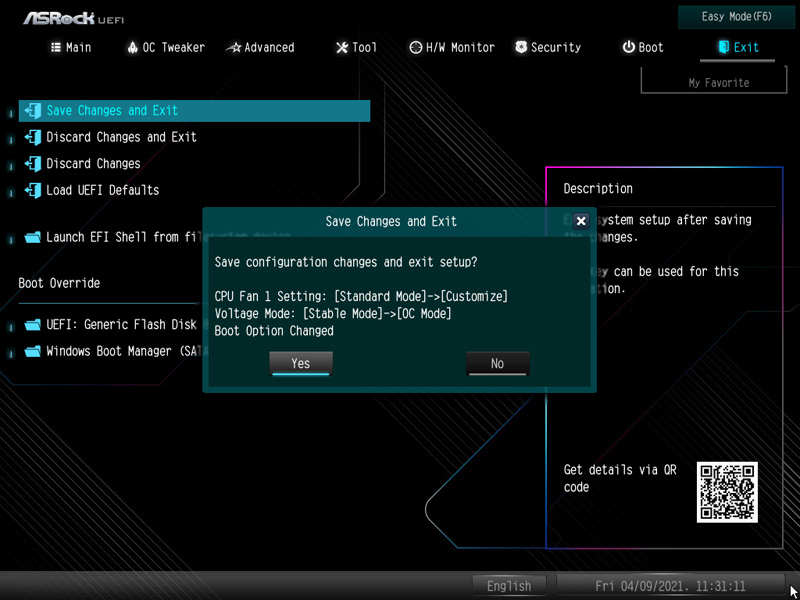
If everything is set, simply store the settings as usual with the F10 key and confirm with Z or on an English keyboard with Y. A new feature of ASRock is that all changes made are shown to the user before saving them – very useful!
ASRock Z590 Extreme energy consumption …