
Quickly to the right hardware equipment …
ASRock Z790 PG-ITX/TB4 Layout, design and features
ASRock Z790 PG-ITX/TB4 Voltage Regulator and Heat Sink
ASRock Z790 PG-ITX/TB4 Equipment
ASRock Z790 PG-ITX/TB4 Expansion cards and Memory
ASRock Z790 PG-ITX/TB4 SATA connectors
ASRock Z790 PG-ITX/TB4 USB and Thunderbolt
ASRock Z790 PG-ITX/TB4 Network
ASRock Z790 PG-ITX/TB4 Sound
ASRock Z790 PG-ITX/TB4 ATX Backpanel Connection
ASRock Z790 PG-ITX/TB4 Test System
Layout, design and features …
But now it’s finally time to take a look at the ASRock Z790 PG-ITX/TB4.
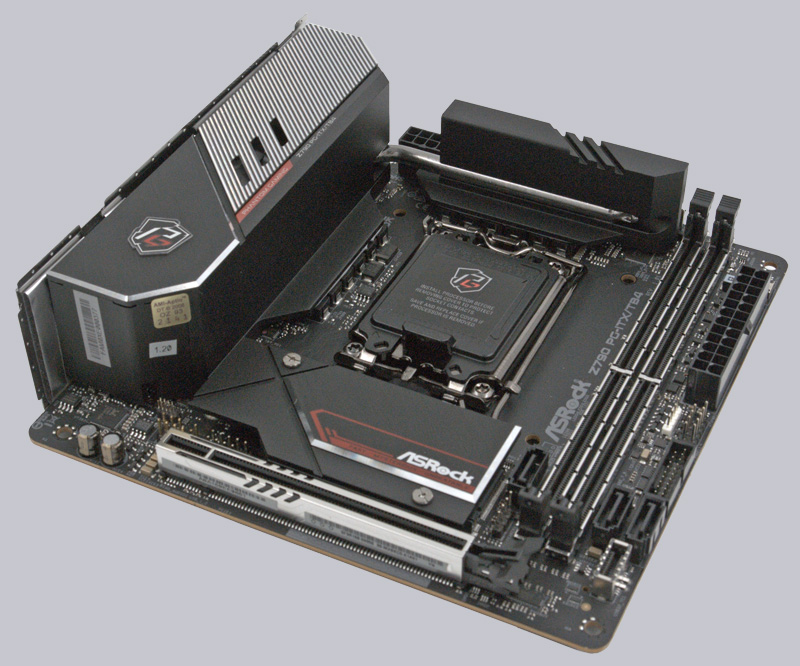
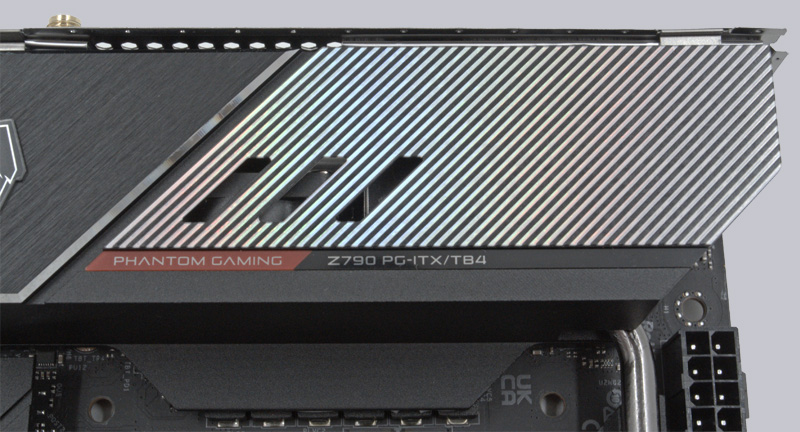
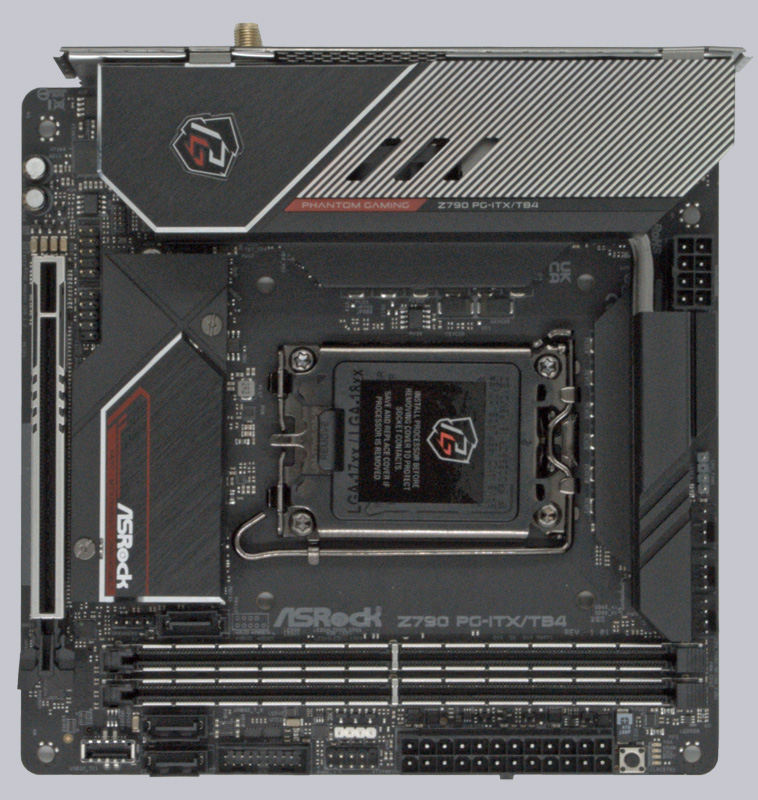
The ASRock Z790 PG-ITX/TB4 ITX motherboard is very high-quality and extremely stable, which is partly due to the massive heatsinks that ASRock has given the board and the good 10-layer construction of the PCB. The board has a very high-quality finish and also makes a great visual impression. The silver area on the large heatsink shimmers in different colors depending on the light source, so the board also harmonizes visually with existing lighting.
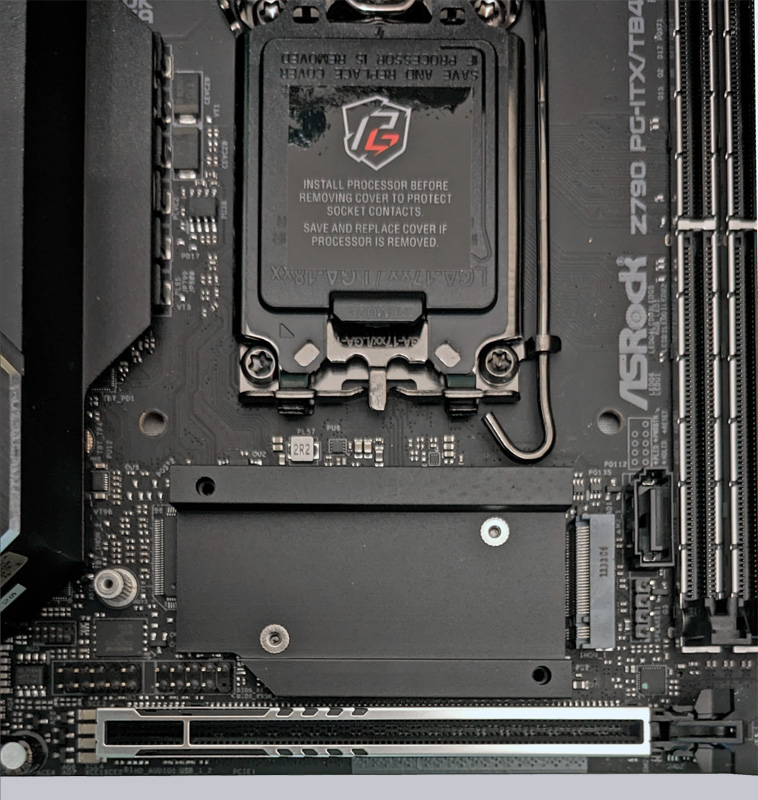
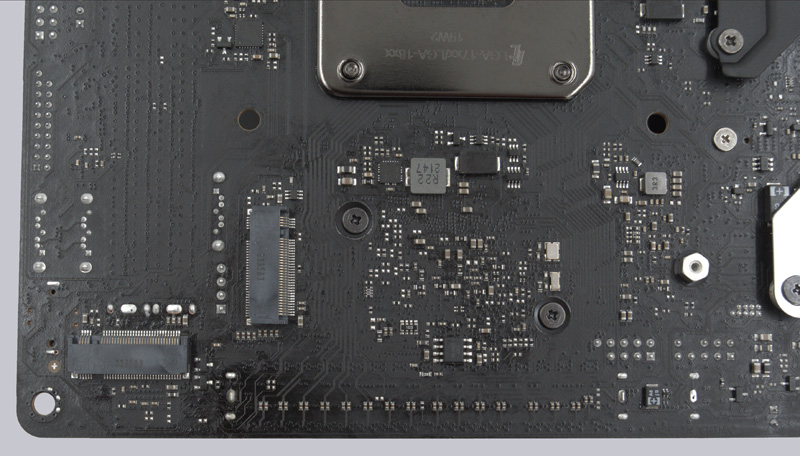
If you turn the board around, you will find two M.2 slots for SSDs. The backplate also makes it clear that every inch of the is used. However, the small white connector at the bottom is a mystery, since it is not documented anywhere and does not correspond to a standard connector in terms of design.

Now let’s take a look at the front side centimeter by centimeter. Let’s start with the PCIe 16x slot, this is executed in the PCIe 5.0 version and should have enough throughput for all graphics cardn on the market. ASRock has reinforced it with stainless steel so that it can hold the sometimes huge graphics cards.
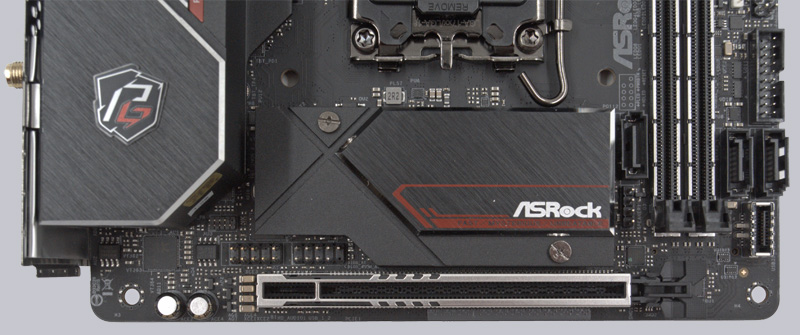
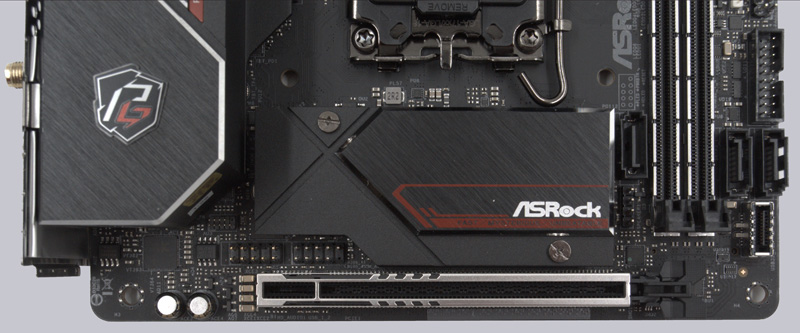
The cooling plate above the PCIe slot can of course be removed, and below it is one of three M2 slots for SSDs. Unlike most other motherboards, the SSD is not only passively cooled from above, but also from below.
On the underside of the disassembled cooling plate there is of course also a heat conduction pad. By the way, it is very practical that the screws remain stuck in the cooling plate and thus cannot get lost.
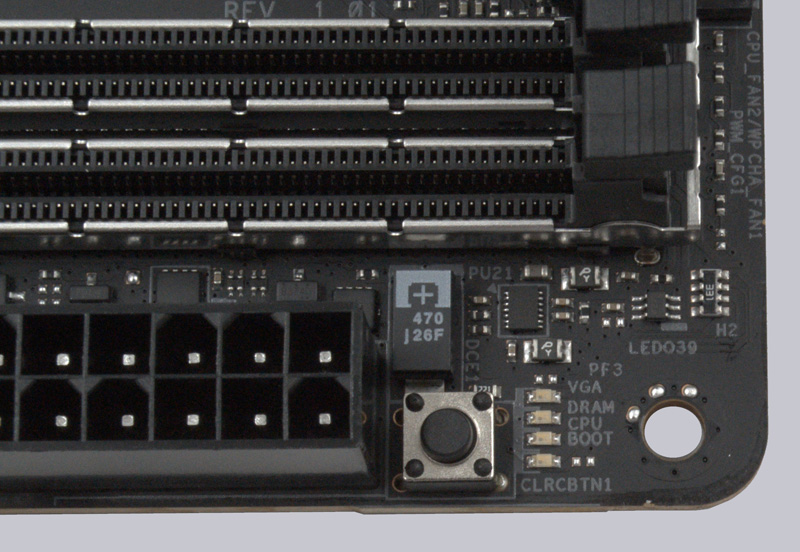
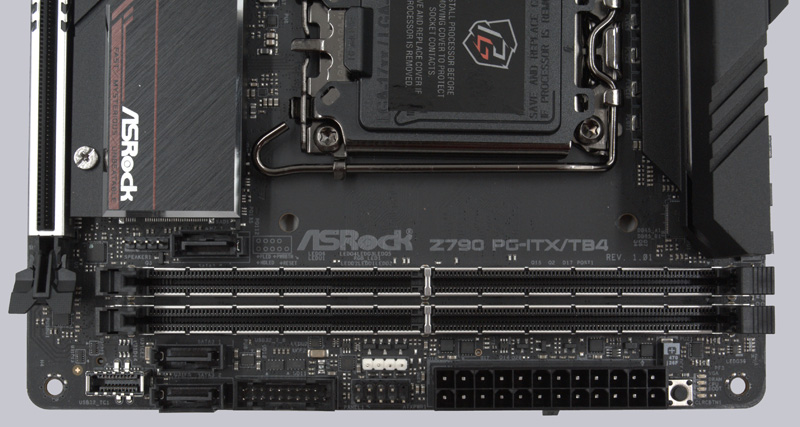
A large part of the IO connection is also found at the bottom of the board. From left to right, we find HD audio headers, CMOS reset headers, 2x LED headers, 2x fan connectors, 1x TPM header, 1x USB 2.0 header, 1x SATA (independent), Dr. Debug LED, power and reset switches, CMOS reset switches, the connector headers and two fan connectors. There is absolutely nothing to complain about here, ASRock has installed pretty much everything there is.
If we turn the board by 90 degrees, the two working memory slots in stainless steel design as well as most of the IO connection are revealed. From left to right we find 1x USB-C header, 3x SATA, 1x USB 3.2 header, 1x ARGB header, the connector headers and a CMOS reset button.
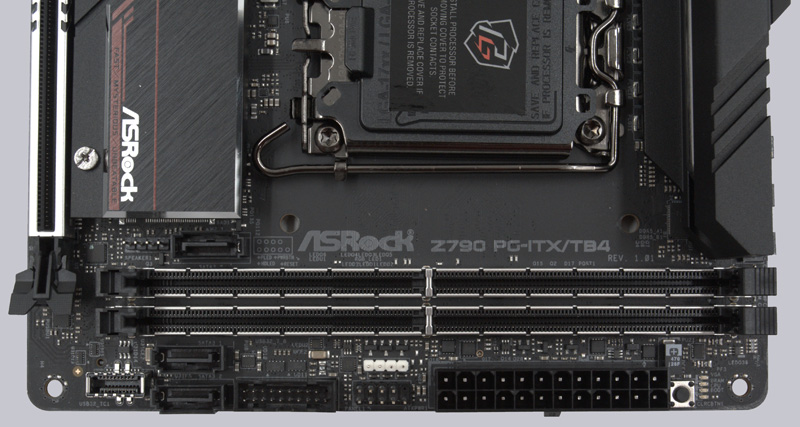
By the way, the debug LEDs are barely visible to the right of the reset button, which can be very helpful in case of an error.
Voltage Regulator and Heat Sink …
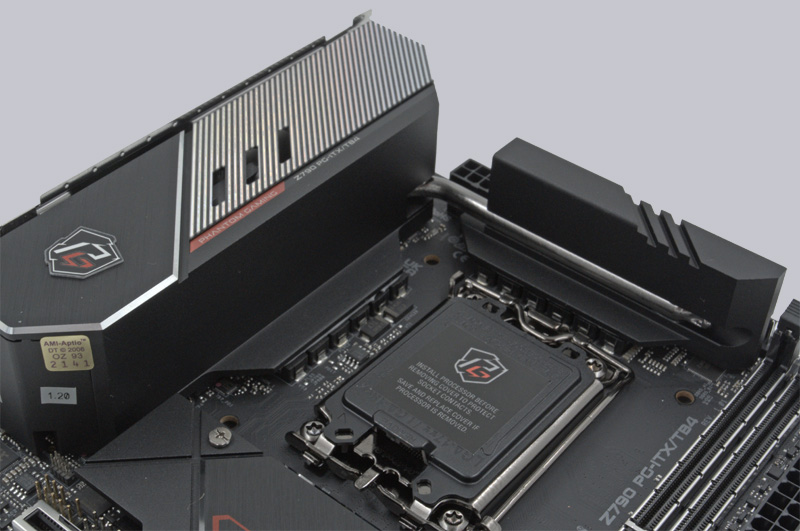
The smaller of the two heatsinks is made of solid aluminum and connected to the larger one via a nickel-plated heat pipe. Behind it are the three FAN connections and the RGB header for atmospheric lighting. The motherboard is powered via an 8-pin power connector.
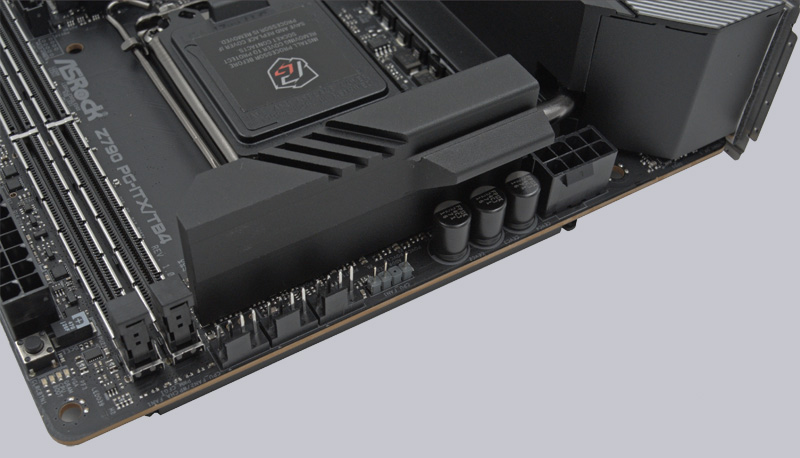
The larger heatsink is incorporated into the rear panel bezel. Hidden under the three slots is a small fan that dissipates the waste heat. The Nichicon capacitors in front of it are, of course, specified to 105 °C as well as a lifetime of 12000 hours, which corresponds to a good year and a half in 24/7 operation at full load.
A 12-phase (10+1+1) VRM voltage regulation, which is controlled via ASRock’s DR.MOS Smart Power Stage (SPS) in 105A design, provides the necessary load stability. According to the manufacturer, this optimizes the temperature and current for each individual phase and thus supplies the processor with power much more evenly, which is especially important with the current Intel processors with different core types. Even though you should not expect miracles in terms of overclocking, the motherboard can easily cope with the big i9 processors.
Equipment …
Small but mighty! That is completely true here. ASRock gives the small board a lot of features, including ASRock Full Spike Protection (for all USB, audio and LAN interfaces), Intel 2.5G LAN (Killer E3100X) and 802.11ax Wi-Fi 6E. Also on board are metal reinforced PCIe and DRAM slots, a heatsink above the upper M.2 interface, ASRock Ultra USB Power as well as the well-known ASRock Live Update App, ASRock Instant & Internet Flash, ASRock EZ Mode and support for ASRock Polychrome RGB. On top of that, there is also USB/Thunderbolt 4.0 support.
Expansion cards and Memory …
Due to the limited space available, the Z790 PG-ITX/TB4 naturally only has one PCIe x16 slot. This is designed in PCIe 5.0 and of course reinforced with steel. In addition, there are three M2 slots, one directly above the PCIe slot and two on the back.
The other two are on the back of the board. There are no restrictions in terms of speed, all three slots are connected with PCIe Gen4x4 (64 Gb/s) and support M2 SSDs with 2280 form factor.
In terms of memory support, we have two slots for DDR5 with dual-channel support. A maximum of 64 GB of memory can be installed here, which is supported up to a maximum speed of 7.0 GHz +. Of course, XMP 3.0 is also included here, so nothing stands in the way of easily overclocking the working memory.
Of course, it is still advisable to check ASRock’s official memory support list before blindly buying memory and then not getting it to run at the desired speed. A distinction is even made here between Raptor Lake and Alder Lake.
This also shows that the motherboard only supports NON-ECC memory.
SATA connectors …
Besides the M.2 interfaces, the Z790 PG-ITX/TB4 also has 3 SATA connections with 6 Gbit/s data throughput each. These also support RAID levels 0, 1, and 5. The three RAID levels are also supported for the three M.2 interfaces that can be used for SSDs.
USB and Thunderbolt …
The Z790 PG-ITX/TB4 from ASRock offers a lot of USB and Thunderbolt connectivity. There are six USB 3.2 A ports on the ATX panel, all Gen2x2. In addition, there are 2 USB 4.0 Thunderbolt interfaces in Type-C design. These support up to 40 Gbit/s throughput and charging power of 27W (9V@3A). Of course, all connections are equipped with ESD protection, which protects connected devices and the board against overvoltage.
On the board itself there is also a lot to discover. Since the connections are somewhat distributed on the board, we have marked them in blue. The motherboard offers one USB 2.0 and one USB 3.2 header, which can be used to create two connections each. In addition, there is a front panel Type-C USB 3.2 header with 20 Gbit/s throughput.
All connections have ESD protection, which means that they are protected against electrostatic discharge or charging.
Note: If you are wondering about the different descriptions of the USB ports, we would like to explain the differences between USB 3.0, USB 3.1 Gen1, USB 3.1 Gen2, USB 3.2 Gen1 and USB 3.2 Gen2. Regarding the USB power for charging devices, USB 2.0 officially offers 5V with 0.5A, which means 2.5W, and USB 3.0/3.1/3.2 officially offers 5V with 0.9A, which means 4.5W, or at ASRock with Type-A port up to 1.5A and at USB Type-C port 5V with 3A, which means 15W of power (1A in sleep state). Furthermore, the transfer rates of the USB ports differ. USB 3.1 Gen1 used to be called USB 3.0 and is thus identical, they both deliver up to 5 GBit/s. USB 3.1 Gen2 and USB 3.2 Gen2 both deliver up to 10 GBit/s. In addition, there is USB 3.2 Gen2x2, which enables a doubling up to 20 GBit/s. There is also a special feature for the Intel JHL7540 Thunderbolt 3 protocol, which even enables up to 40 GBit/s. USB 4.0 is also new here, which supports up to 40 GBit/s and is fully Thunderbolt compatible. Here you can see the possible transfer rates again in a table.
| USB interfaces comparison | ||
| Transfer rates | ||
| Interface | theoretical | practical |
| USB 2.0 | 480 MBit/s | 30 MByte/s |
| USB 3.0 | 5 GBit/s | 450 MByte/s |
| USB 3.1 Gen1 | 5 GBit/s | 450 MByte/s |
| USB 3.1 Gen2 | 10 GBit/s | 800 MByte/s |
| USB 3.2 Gen1 | 5 GBit/s | 450 MByte/s |
| USB 3.2 Gen2 | 10 GBit/s | 800 MByte/s |
| USB 3.2 Gen2x2 | 2×10 GBit/s | 1600 MByte/s |
| USB 4.0 | 40 GBit/s | 4000 MByte/s |
Network …
The ASRock Z790 PG-ITX/TB4 is equipped with a network card. The card supports Wake-On-Lan, 802.3az (Energy Efficient Ethernet), ASRock’s Lightning/ESD Protection and PXE Boot.
The 2.5 Gigabit network card with Intel Killer E3100X chipset is joined by a built-in WiFi/Bluetooth module. In detail, this is an Intel Killer AX1675. It supports WiFi 6E (802.11ax), Bluetooth 5.3, OFDMA and MU-MIMO.
A very exciting thing is the so-called Killer DoubleShot Pro feature of the motherboard. What sounds a bit like the “Double Kill” from Unreal Tournament is actually a possible coupling or teaming of the two network cards from Intel’s Killer series. That means, in the optimum case, a throughput of 4.9 Gbit/s can be achieved here. Much more practical than the throughput is the prioritization of the individual protocols and applications. Less prioritized applications, such as mail, YouTube or Windows updates, are routed via the slower WiFi Network card, while high-priority applications, such as games, always take the path via the wired Killer Network card.
Sound …
As for the sound, there is no old ALC1220 chipset from Realteak this time. Instead, the ALC4082 has been installed. Unlike the ALC1220, it is no longer connected directly to the CPU, but via USB. There is an exciting article about it.
Whether this is good or bad is up to the user. In any case, we could not determine any weaknesses acoustically. The sound is completely legitimate and good. On the connection side, there are only two audio jacks in 15µ gold design and an SPDIF output. In addition, there is premium Blu-ray audio support and overvoltage protection.
Of course, Nahimic Audio is again on board, which can be used to optimize the sound output for the corresponding content.
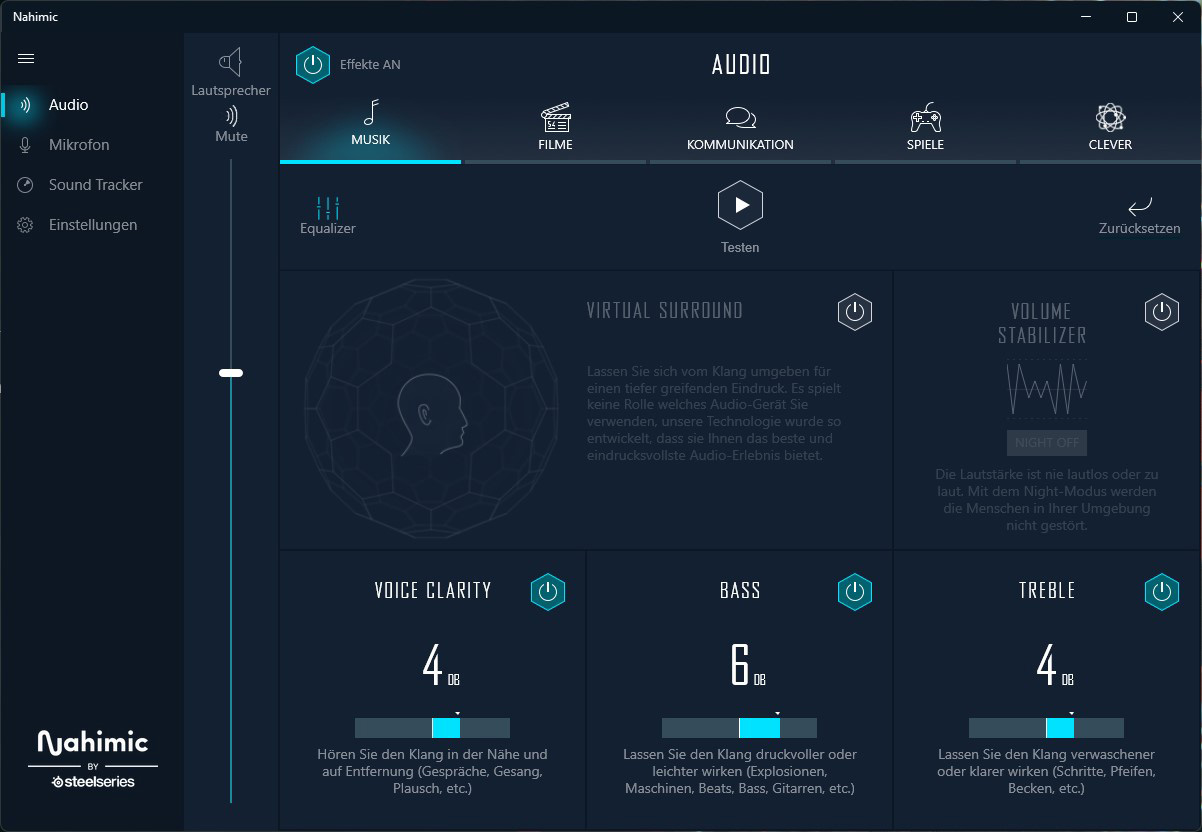
This can also be used to tune the headset a bit if you have problems with the microphone. Especially the noise cancellation can be very helpful, as long as it is not already integrated into the microphone ex-factory.
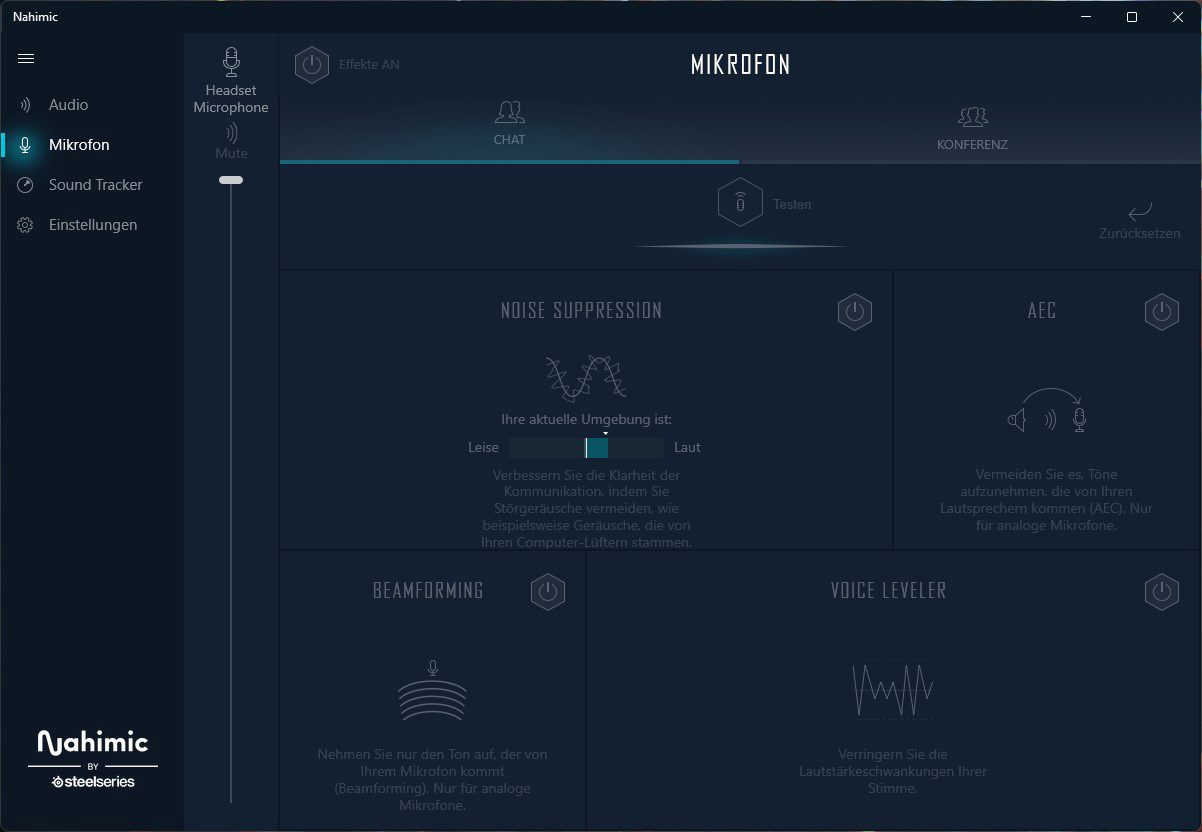
Optionally, the software can also visually track an opponent in a supported game. This is certainly a nice feature for one or the other gamer.

But even without Nahimic’s tuning software, the integrated sound card delivers a clean and precise sound. We could not detect any noise or even an unclean sound.
ATX Backpanel Connection …
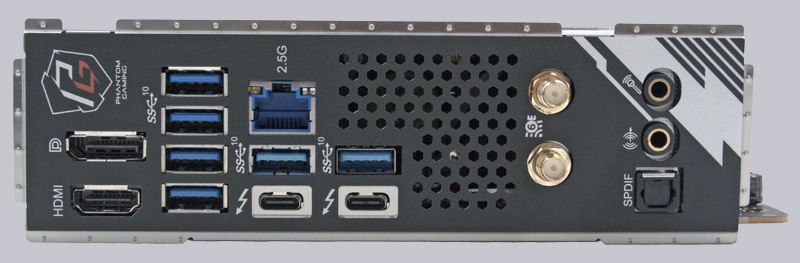
From left to right you can see HDMI 2.1 (TMDS/HDCP), Displayport 1.4 (DSC), 6x USB 3.2, 2x USB Type-C, 1x RJ45 2.5 Gbit, 2x WiFi antenna preparation (antenna included), optical SPDIF output and 2x 3.5mm jacks for sound.
Test System …
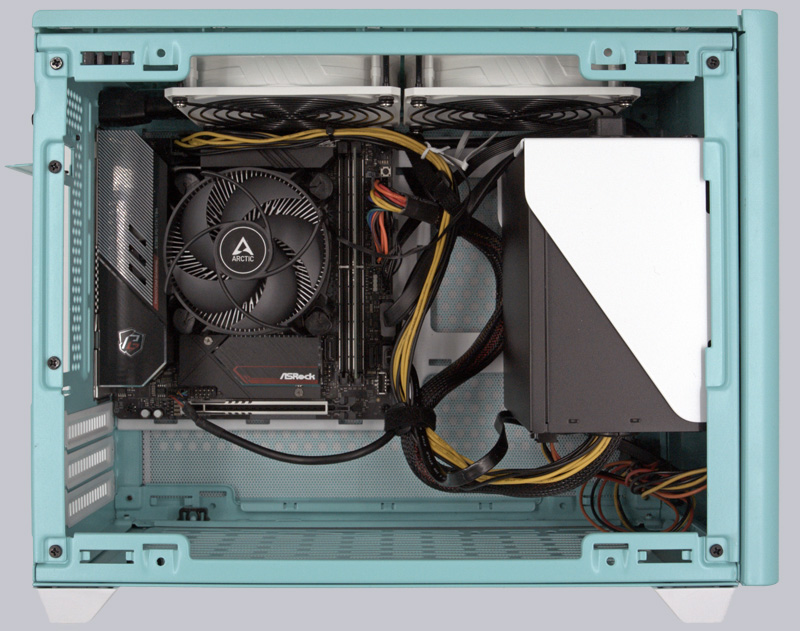
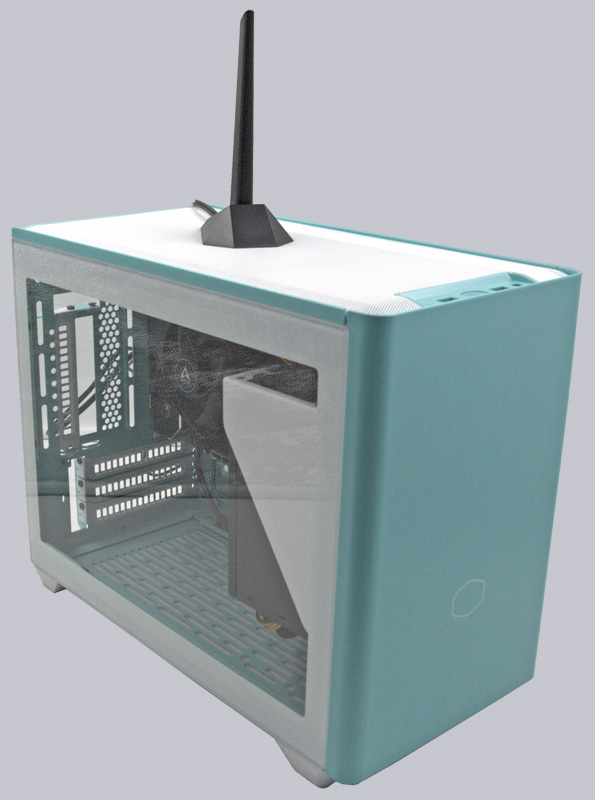
This time, we didn’t use an Intel Core i5, i7 or i9 to power the motherboard, but opted for a small Intel Core i3-12100 and 1x 16GB DDR5 memory. We installed the whole thing in the Masterbox NR200P from Cooler Master.
Of course, the antenna must not be missing. As you can see, there is also enough cable to position the antenna appropriately.

Finally, before we get to the UEFI, here is a picture of the entire test system.
Here is again the ASRock Z790 PG-ITX/TB4 Short on YouTube in our OCinside YouTube channel.
Note: Please allow our cookies first to see this external content!
Let’s now move on to the UEFI and the overclocking options …
ASRock Z790 PG-ITX UEFI and Overclocking …