
AMD Socket FM2 Processor OC Guide How to overclock an AMD A10-5800K, A10-5700, Athlon II X4 750K, etc. CPU and APU
The introduction …
If you like to get a faster PC, or like to save some money when you purchase a new PC without renouncing to play current games, or just having fun to overclock, you can overclock your PC with this new AMD overclocking guide. AMD socket FM2 processors are currently not only very popular due to the low purchase price for an APU with integrated graphics, but these processors reach often also very high overclocking results. This step by step AMD OC guide helps newbies to get an easy entry into overclocking and also provides tips for overclocking enthusiasts who like to get even more out of their AMD FM2 processor. The guide explains in detail how to overclock an AMD Athlon II FM2 CPU or AMD A4, A6, A8, A10 APU with unlocked multiplier or locked multiplier.
By overclocking you lose the warranty, OCinside.de assumes no liability for possible damages!
Thanks for the support …
Many thanks for the support by AMD, ASRock, Cooler Master and Crucial.
Each step of the AMD OC Guide …
1. Start the PC and check the PC functionality
2. Backup the PC
3. Update BIOS or UEFI Setup
4. Monitor the temperatures
5. Identify the CPU
6. Composition of the processor speed
7. How to change the multiplier
8. Determine the highest BCLK
9. Determine the highest CPU clock frequency
10. Increase the CPU voltage
11. Stability tests
12. More optimizations
13. Questions about PC overclocking
A tip before you start …
If you have an energy meter, you can connect it now to the PC before starting with overclocking, to measure the demand for electricity before and after overclocking (you should note the idle and full load values in watts). With our small interactive PC power consumption calculator you can calculate, how big the difference is in price of the PC power consumption depending on the energy consumption and runtime. Calculate the PC power consumption and the PC energy costs at best before and after overclocking:
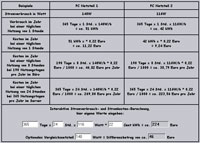
Interaktive power consumption calculator
1. Start the PC and check the PC functionality …
Before you start with the PC overclocking, it should be ensured that the PC runs stable without overclocking. This is useful for pulling any wrong conclusions on possible failure, especially if the PC has been build newly. So start the PC with default settings in the operating system and download a benchmark program like e.g. 3DMark, a diagnostic software like SiSoftware Sandra and a CPU stress software like e.g. Prime95. Regarding download, at this point you can directly download the tool CPU-Z and motherboard monitor or SpeedFan from our links & download area, we will go later to some tools. If you rather like to overclock with software, you can download some OC Tools like AOD from our OC software page. Now you run 3DMark in Windows and write down the results or create a screenshot of the benchmark results (e.g. using the Snipping Tool in Windows 7 under Start -> All programs -> Accessories -> Snipping Tool). Then run Prime95, confirm “only stress test”, select “blend” with the total number of CPU cores/threads, so that all CPU cores will be stressed and check if there are errors after some time. If all goes perfectly, you can stop the Prime95 by Test -> Exit (otherwise it continues in the background). Additionally, you can perform specific benchmarks with SiSoftware and do some more PC diagnostics.
At high overclocking, you can destroy not only hardware, but also data of hard disks may be lost – mainly with too high memory overclocking this is not uncommon! So backup now all important data with Norton Ghost, Acronis True Image, etc. or do a full backup on DVD or a hard drive that you seperate physically from the PC. Alternatively, you can perform all overclocking attempts with an other SSD, hard drive or a bootable USB stick, which contains no important data.
3. Update BIOS or UEFI Setup …
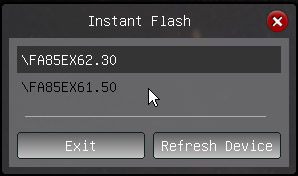
It can be helpful to update the motherboard BIOS or UEFI Setup to fix older BIOS bugs or to get new UEFI setup functions that were not yet integrated at the purchase date of the mainboard. So it is time to visit the motherboard manufacturer on its support page, download the latest motherboard BIOS/UEFI and flash it. Exceptions prove the rule, so it may also happen that one overclock worse with a newer BIOS – the ASRock FM2A85X Extreme6 with an AMD A10-5800 K APU for example reached with the version P2.30 a slightly lower overclocking result than with previous BIOS versions.
You reach the UEFI setup by pressing the delete key or the F2 key, after switching on the PC. Btw. most manufacturers show the supported keyboard shortcuts directly after switching on the PC on and explain it in the motherboard manual. Some manufacturers also have shortcut keys that can unlock advanced BIOS content, such as for example CTRL + F1 in the BIOS from Gigabyte. It’s helpful to disable the full screen logo, which should be set to “Disabled” in the BIOS. To save the values, you go to Save and Exit or press the F10 key and confirm with Z or Y depending on the keyboard used. Who like to get detailed assistance for the UEFI Setup or BIOS update from the manufacturer, can request it 24 hours a day in the Forum, where our friendly community answer immediately on all requests.
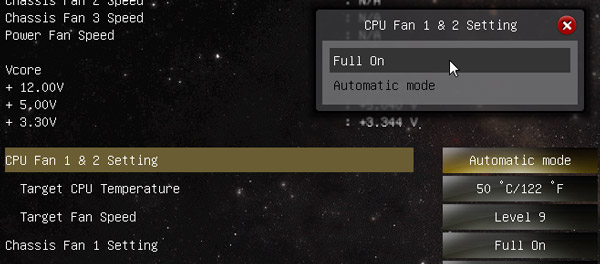
It is also advisable to monitor the temperatures of the components for all further work. With motherboard monitor or SpeedFan it’s possible, to output the CPU temperature in the task tray (next to the Windows clock) at any time and optionally send an alert on high temperature values. Any kind of overclocking produces unfortunately more heat and you must take care about this to prevent a heat death of the CPU or any overclocked components! The internal CPU temperature of current AMD socket FM2 Trinity and Richland processors as a rough guide should not exceed approx. 60° C. Even if the CPU is using the CPU Thermal Throttle option at about 70-74° C to protect the processor, it is highly advisable to monitor the temperatures for overclocking over a longer period, to ensure a good air ventilation inside of the case, to use a suitable CPU cooler and to adjust the fan speed of the CPU cooler on maximum power, I.e. “Full On” at the first overclocking attempts. On some motherboards you can find a fan controller in the hardware monitor menu:
For easy comparison of the cooler, here is a cooler comparison with some AMD Socket FM2 cooler reviews, each with the option to listen to the cooler sound, to avoid a heart attack after the purchase. Who like to build the PC with a nearly-silent water cooler, or who like to do extreme overclocking with a compressor cooler, should lool around a bit in our hardware test area, where we tested also water coolers and compressor coolers in addition to the conventional air coolers.
First you should know more about the excact CPU you have inside of your computer, so you can now read data of the CPU using software such as CPU-Z. Alternatively, it is time to shutdown and power off the PC by the main switch, open the PC case, remove the CPU heatsink and take a closer look at the name of the CPU. You can then later type in this product ID in the interactive AMD Athlon64 product ID guide or in the interactive AMD Phenom product ID guide to see the official values of this CPU.
 OC database you can take a look at the results of several thousand other overclockers and thus already get an overview about the frequency you can approx. achieve with your CPU. Please do not forget to enter your overclocking results for other visitors as well !
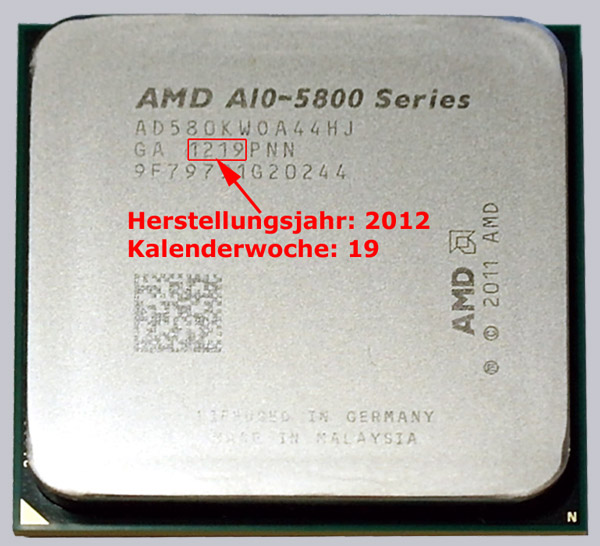
The AMD Trinity and AMD Richland manufacturing week can be found in the line below the product ID number on the CPU or APU, e.g. GA 1219PNN or GA 1235SUT, where the first two digits of the number indicate the year and the next two digits indicate the manufacture calendar week.
1235 stands for week 35 in 2012 and 1219 stands for week 19 in 2012:
6. Composition of the processor speed …
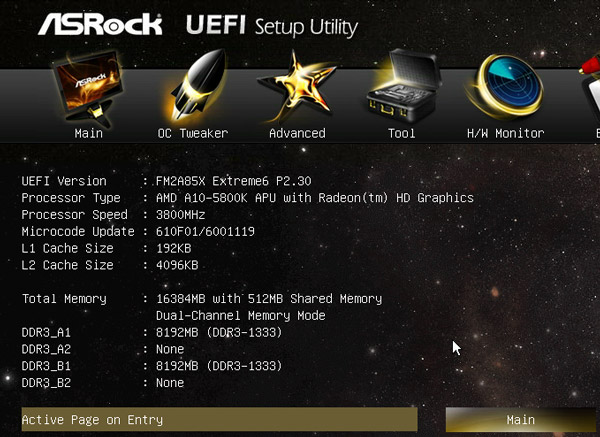
The APU frequency of AMD Socket FM2 processors is composed by the so-called reference clock (BCLK) and the multiplier (another multiplier is for the Turbo). An AMD A10-5800 Trinity APU with the processor part number AD580KWOA44HJ has e.g. a BCLK of 100 MHz and a multiplier of 38, which results in a frequency of approx. 3.8 GHz (100.00 MHz x 38 = 3800 MHz):
There are a number of other frequencies that you can adjust by the UEFI Setup automatically, or manually, or even not, depending on the mainboard used. We start right now with the two fundamental values, to increase the CPU frequency.
7. How to change the multiplier …
Now it’s getting exciting, because depending on the CPU or APU and depending on the motherboard whether and how we can change the multiplier of the processor.
With an AMD Socket FM2 Trinity APU, there are basically only two ways:
- We have a so-called “K” CPU with open multiplier (A10-5800K, A8-5600K, A6-5400K). This is the best requirement for overclocking the processor, because we can increase the multiplier easily via the UEFI Setup or with an OC Software. The standard multi of an AMD A10-5800K APU is for example 38x, the Turbo of a Core is 42x BCLK. ASRock one increase the multiplier in the OC Tweaker menu by setting the “Multiplier/Voltage” change option to “Manual” and then increase the multiplier over the important menu item “CPU Frequency Multiplier”. ASUS calls it AI Tweaker menu and once AI Overclock Tuner is set to Enabled, one obtains the APU multiplier selection to change the so-called Piledriver Cores from approx. 14x to 63x.
- We use a CPU with a locked multiplier (e.g. AMD A10-5700, A8-5500, A4-5300 APU). One can not increase the multiplier over the UEFI Setup, but AMD allows a reduction of the CPU or APU multiplier and the APU Turbo multiplier. The base multiplier of an AMD A10-5700 APU is for example 34x BCLK and the Turbo goes up to 40x BCLK.
Now we know whether and in which range the multiplier can be changed, but before we overclock using the multiplier, it continues now with the determination of the highest FSB / BCLK.
8. Determine the highest BCLK …
Trinity processors have a standard reference clock of 100 MHz, where we have luckily good ways to increase the reference clock to change all dependent clock speeds. Not only the processor clock is dependent on the reference clock, but also some other clock rates, such as the iGPU clock and memory clock, so you can use the increasement of the reference clock not only to increase the processor speed of an APU with a locked multiplier. On the other side, the clock rates depending on the BCLK must necessarily be adjusted if the motherboard does not already automatically changes all dependent dividers and multipliers. Additionally, there are differences in the maximum possible BCLK clock rates, because of the internal clock (PLL) allows speeds from 100 to about 136 MHz. Depending on the motherboard, there’s an optional external PLL IC which enables over 170 MHz reference clock and is working significantly more precise.
Before the first FSB Overclocking, inexperienced users should create for example photos or screenshots of all BIOS settings, because they may be completely reset at excessively high overclocking and you should know how they are set correctly (navigation in the UEFI Setup using mouse or in BIOS using page up/down key, cursor keys, selecting with enter and changes often over the + and – key on the keyboard).
Since the multiplier even at non-K processors can be decreased, the multiplier for the next test should be reduced first to a very low value like 16x, to prevent that we already reach the CPU/APU maximum clock. Because as I mentioned earlier we enhance also the memory clock with the reference clock, it makes sense to set the memory frequency for this BCLK testings to the lowest value of e.g. DDR3-800 and DDR3-1066.
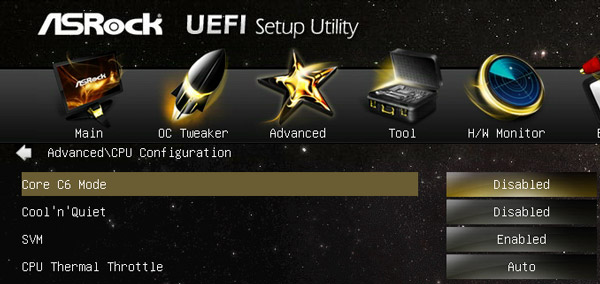
Another very important divider / multiplier is the CPU NB frequency multiplier which determines the clocking of the CPU Northbridge and is by default 1800 MHz (9x CPU NB). This multiplier should be significantly reduced, for example set CPU NB to 5x (or reach at least nearly 1800-2000 MHz) before the determining the maximum BCLK. Before it comes to the nitty-gritty, it is also recommended to disable the Turbo Core option in the OC Tweaker menu, set the voltages manually on the default values and manually disable AMD APM and all power saving modes such as Core C6 mode, CnQ, etc.:
Then we increase in small steps the reference clock using APU/PCIE Frequency in the UEFI setup of the motherboard, as long as the PC boots up properly. Who have for example the ASRock FM2A85X Extreme6 and want to save some time, can try to increase the reference clock directly to the maximum frequency of 136 MHz overclock, because we could successfully set this frequency in the FM2A85X Extreme6 review. This value should you run now a benchmark, because when a higher reference clock lead to a poorer result of the benchmark, we have to reduce it a little bit until it’s getting fast.
Here is a screenshot of the 136 MHz BCLK settings:
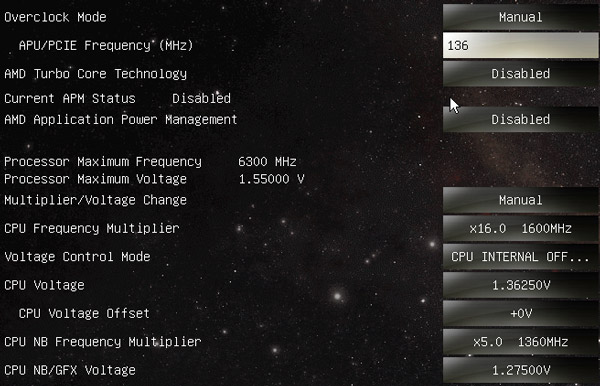
Tip: If the PC boot properly, but does not want to start in the operating system with increased BCLK, it can help to change the SATA controller from AHCI to IDE (not recommended with a SSD) or to use a different SATA port or another SATA controller. If the system does not boot at all because of a too high BCLK, you can reset values on several motherboards, keeping pressed the insert key during switching on the PC, others have a separate protection function like for example the Bootfailure guard, which automatically reduces the reference clock to moderate values after repeated false starts (select the number of false starts e.g. with the ASRock Boot Failure Guard Count). If this is not possible, you could switch the BIOS using clear CMOS button or replace the “Clear CMOS” jumper (near the battery) for a complete BIOS reset and then re-enter all values from the BIOS.
Once we know how high the BCLK can be adjusted, we can set them within the established range, to achieve, for example, the dependent memory frequency. With the highest memory divider you would mathematically be with 136 MHz BCLK at DDR3-3264. If the maximum reference clock has been determined and the system is correctly booting with this FSB setting, we can increase yet the memory clock in small steps. Raising the memory voltage can help to get a higher memory overclocking result. But be careful! mainly with memory overclocking at too high levels, data on the hard disk or SSD can be destroyed!
9. Determine the highest CPU clock frequency …
If it is set to the desired reference clock for the best DDR3 memory as described above, we can proceed to overclock the processor at this point. Here I would like to mention again that processors should be always cooled well, because any increasement of the frequency will also increase the CPU temperature – monitor it again! Now simply increase the multi (if possible) in small steps and check whether the PC is still working. If the endpoint of the CPU was determined e.g. by a failed start, a Windows crash, instable system, etc. you can try now to operate the CPU stable on this value (or higher) in the next step.
10. Increase the CPU voltage …
As best method to get a better stability is to increase the VCore (CPU voltage). But increase the VCore only in very small steps and with caution, because the VCore dramatically increases the CPU heat and thus possibly destroy a CPU core which could be the “death” of the processor. With a higher VCore, you can significantly improve the processor stability in almost all cases, at least as long as the power supply supports it and no device or components such as e.g. voltage regulator is on its last legs. For example, in our tests we were able to overclock an AMD 5800 K APU stable on 5 GHz, but this required a CPU voltage of 1.55000 Volt and in addition had to raise the offset to + 0.100 Volt. Such high voltages are however not recommended, a maximum 1.50 volts with a water cooling (do not forget the cooling of the voltage regulators) or a good air cooler are entirely possible, where you should give the CPU only as much voltage as necessary to run stable. Never directly select the highest possible VCore setting! Who still needs higher voltages could manipulate the voltage regulator IC with a resistor, to get in reality a significantly more VCore with a low voltage setting. Some instructions for many motherboards and voltage regulators can be already found in the Workshop area, more VR increasements can be requested in our Forum.
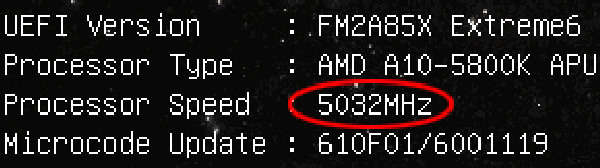
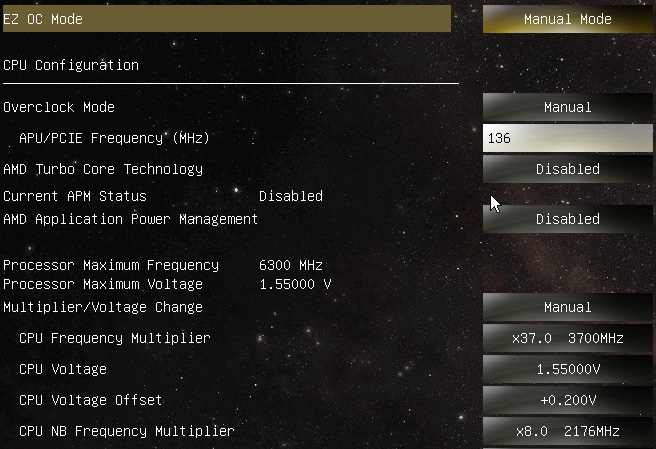
In our test, we reached with 136 MHz x 37 a total of 5032 MHz, but only with significantly higher increasement of the VCore of 1.55000V and +0.200V offset, strongly heated voltage regulators and a rise in the PC power consumption from 127 Watts to almost 200 Watt – so please do not try this!
AMD A10-5800K Black Edition Processor 3800 MHz overclocked to 136 MHz x 37 = 5032 MHz:
Who could locate next clock of the CPU the h, should now check the stability of t by st stronger CPU load with Prime (see links & download section), or other demanding programs over a longer period and this again to monitor the temperatures. If the PC becomes unstable, can you help possibly still a little with the VCore, or goes back to the clock a small step.
If you determine the maximum CPU multiplier, the maximum BCLK and the maximum memory speed, you can try now to allow similar high values with energy-saving settings. Power consumption and heat generation can be reduced particularly during idle periods, where the processor is less used or is not used (idle), may be by manual adjustment of the P-States, overclocking using Turbo core instead of all cores or with the use of Core C6 Mode, Cool n Quiet, etc.. Additionally to the CPU multiplier, BCLK and RAM divider, there is also the above mentioned CPU NB frequency multiplier of 1800 MHz (9 x CPU NB) which could be overclocked to values up to 2300-2500 MHz. Who would like to use the integrated graphics unit of the APU (CPU with GPU), can overclock the internal AMD Radeon HD 7660D GPU of an AMD A10-5800K processor (GPU and GPU clock varies depending on the APU) from the default 800 MHz to approx. 1000-1250 MHz, while it may be required to increase the APU / GFX Engine Voltage up to 1.40 volts.
13. Questions about PC overclocking …
Of course there is a lot more, you can overclock and optimize to get at best only under load the maximum clock rate with the minimal required voltage. The underclocking or Downclocking plays a major role at the ever rising electricity prices and from an environmental standpoint in some cases like HTPC or Office PC. It is not possible to go through all the individual settings at this point, especially because there are very large differences in the mainboards, you can only discuss it in detail, for the respective motherboard. If you have still overclocking problems or too little performance after all these OC instructions, I will help you individually or better ask in our Forum, because there you can discuss all outstanding issues in detaiö with several other overclocking enthusiasts and tuning friends.
PS: Who would like to support our work, should visit our sponsors in the About page to do Amazon orders, hardware orders, etc. – thank you 😉
Discuss in our forum and exchange experiences …