
Quickly to the right hardware equipment …
ASRock Z690 Extreme Layout, design and features
ASRock Z690 Extreme Voltage Regulator and Heat Sink
ASRock Z690 Extreme Equipment and other features
ASRock Z690 Extreme Expansion cards
ASRock Z690 Extreme Memory
ASRock Z690 Extreme Hard disk drive connectors
ASRock Z690 Extreme USB and Thunderbolt
ASRock Z690 Extreme Network
ASRock Z690 Extreme Sound
ASRock Z690 Extreme ATX back panel connectors
ASRock Z690 Extreme Test System
ASRock Z690 Extreme RGB lighting
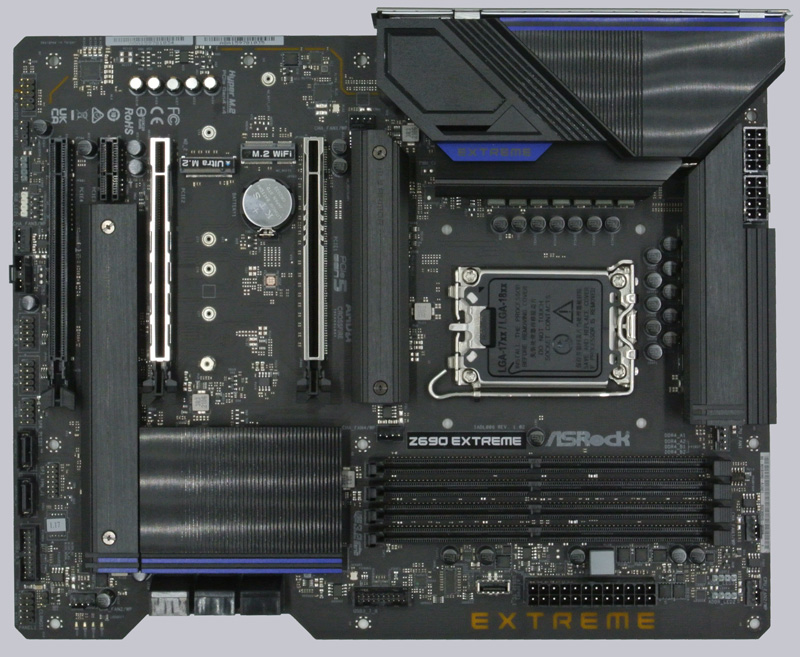
ASRock Z690 Extreme Layout, design and features …
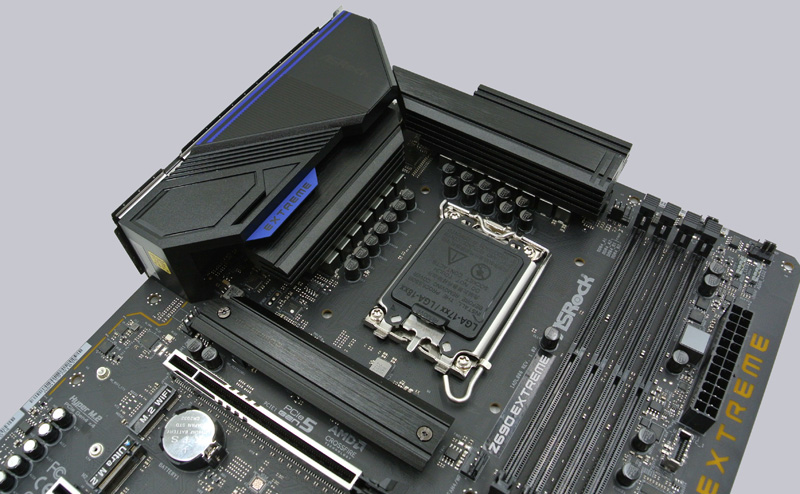
The Z690 Extreme looks very inconspicuous in its matte black. The shiny steel reinforced PCIe slots and the massive heatsinks around the processor socket are especially eye-catching. To keep the processor happy during overclocking, ASRock has equipped the board with a 60A SPS power choke system and a 13 phase VRM system. With 2×8 pin CPU power connectors there is definitely enough air for a rich power supply. In terms of quality, ASRock can score here, all soldering points are extremely clean and the motherboard is excellently processed thanks to 2oz copper manufacturing.
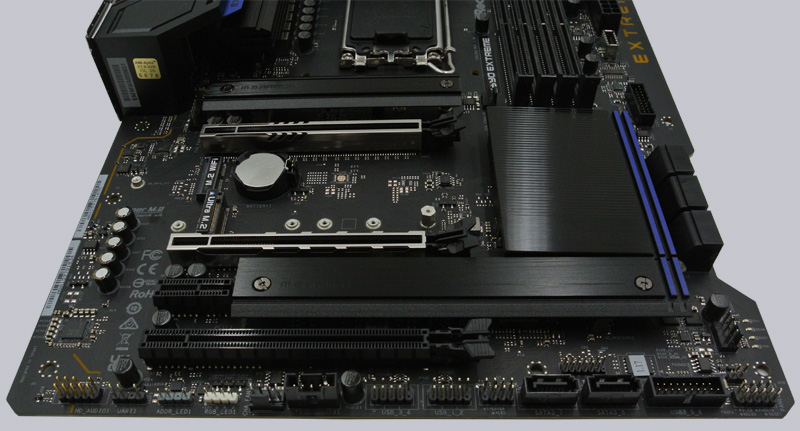
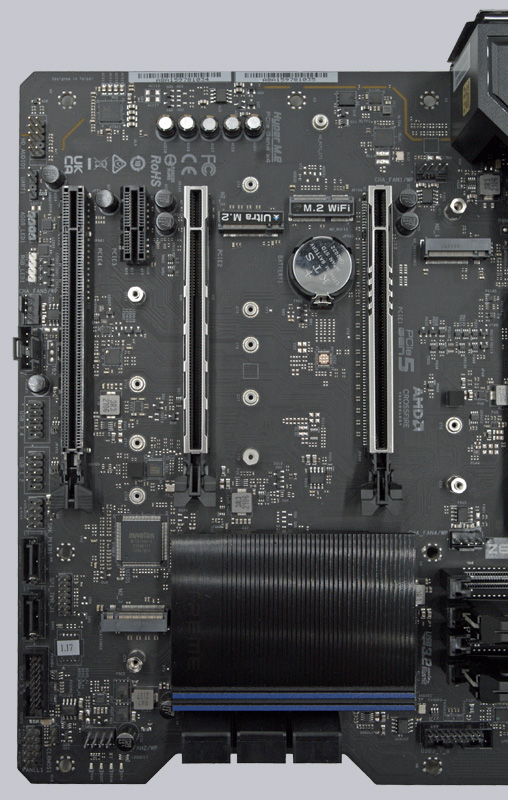
Let’s take a closer look at the lower part of the board, because there is a decent amount of equipment to discover in detail. The motherboard offers a total of four M.2 slots, one of which is intended for retrofitting a Wi-Fi module. The “slower” M.2 slot, which only supports 32 Gbit, is right next to it. The other two slots are hidden under the heat sinks with the label M.2 Amor. ASRock supports all common sizes (2230/2242/2260/2280), and you can even install a 22110 M.2 in the lower slot.
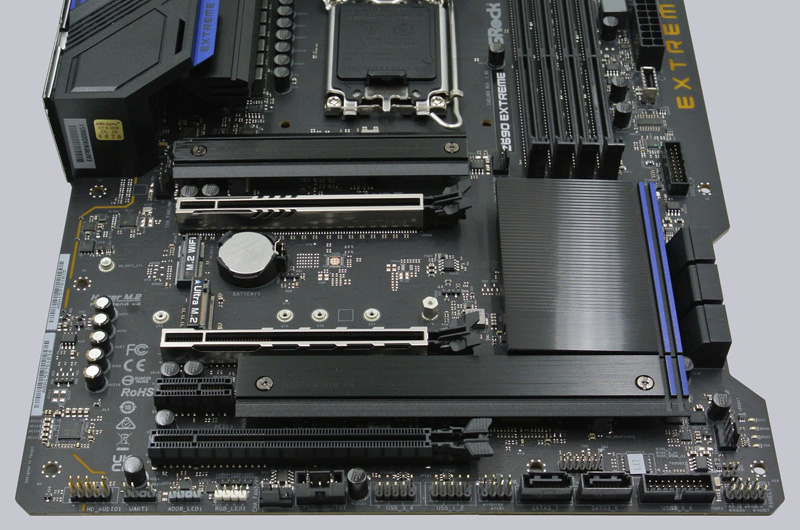
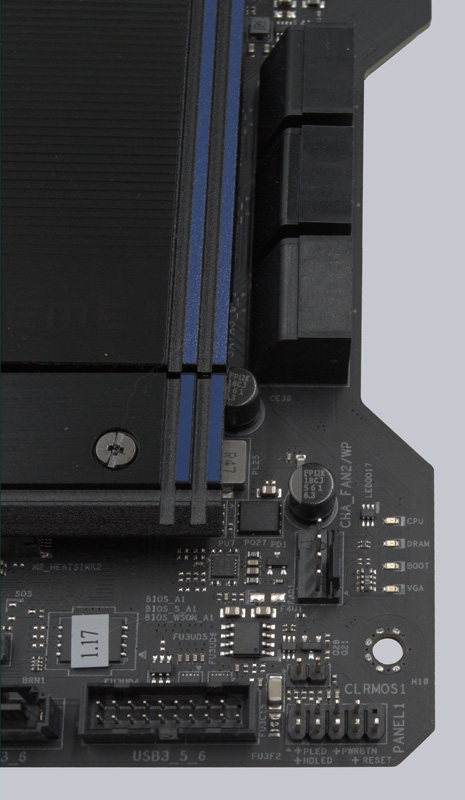
Of course, pretty much all of the motherboard’s IO connections are also available here. Compared to the ASRock Z690 Taichi, the ASRock Z690 Extreme has to make some small compromises in terms of features. For example, you won’t find a power or reset button. The in our eyes very practical two-digit debug display has also been replaced by 4 LEDs and is called Post Status Checker (PSC). Here you can only roughly check which component is causing an error (CPU, RAM, BOOT, VGA). In terms of normal RGB and addressable LED connection, there is nothing to complain about here.
Voltage Regulator and Heat Sink …
Since ASRock’s Extreme product line can of course mainly be categorized as “stable overclocking”, a proper cooling system should not be missing. The two aluminum heat sinks above the VRMs are very robust and massive and can dissipate the generated heat well. Nothing stands in the way of stable operation at high voltages, assuming good case ventilation, of course. The Nichicon capacitors in front of it are of course specified to 105 °C as usual as well as a lifetime of 12,000 hours, which corresponds to a good year and a half in 24/7 operation at full load.
The Z690 Extreme also offers a 13-phase VRM voltage regulation, which is controlled via ASRock’s DR.MOS Smart Power Stage (SPS) in 60A design. According to the manufacturer, this optimizes the temperature and current for each individual phase and thus supplies the processor with power much more evenly.
Equipment and other features …
ASRock gives the Z690 a lot of features, including ASRock Full Spike Protection, Intel 2.5G LAN and 802.11ax Wi-Fi support. Also on board are metal reinforced PCIe slots, two heatsinks via the Gen4 M.2 interfaces, ASRock Ultra USB Power as well as the well-known ASRock Live Update App, ASRock Instant & Internet Flash, ASRock EZ Mode and support for ASRock Polychrome RGB.
Expansion cards …
Sensibly reduced to the most important things, the Z690 Extreme offers everything a gamer needs. Three PCIe 5.0 x16 slots and one PCIe 3.0 1x slot. By the way, two of the three PCIe x16 slots are steel reinforced. In addition, there are three M.2 slots for SSDs and one for Wi-Fi. The layout is well done and offers good space for 2 graphics cards with a 3 slot fan design. Of course, AMD’s Crossfire is also supported here.
Memory …
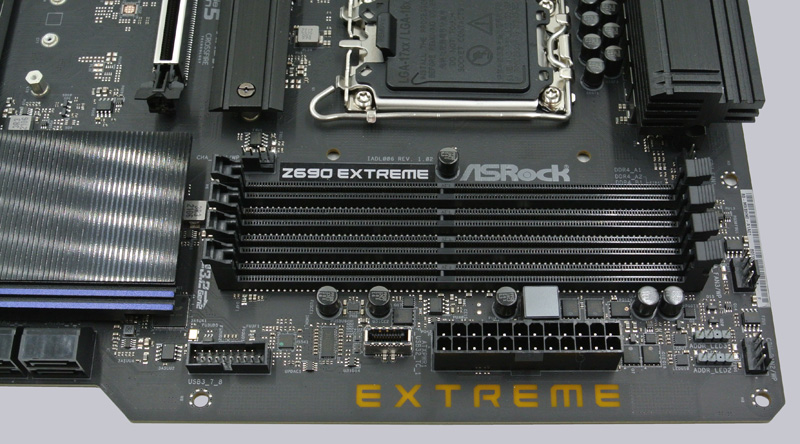
In terms of memory support, we have a total of four slots for DDR4 with dual-channel support. A maximum of 128 GB memory can be installed here, which is supported up to a maximum speed of 5 GHz+. Of course, XMP 2.0 is also supported here, so nothing stands in the way of easily overclocking the working memory.
Of course, it is still recommended to check ASRock’s official memory support list before blindly buying memory and then not getting it to run at the desired speed. The list can be found here.
However, there is still a small surprise in the memory support. The Z690 Extreme supports both normal UDIMM memory and ECC memory. If the latter is installed, the ECC function is deactivated because Intel’s Eagle Lake processors of the Core series do not support it.
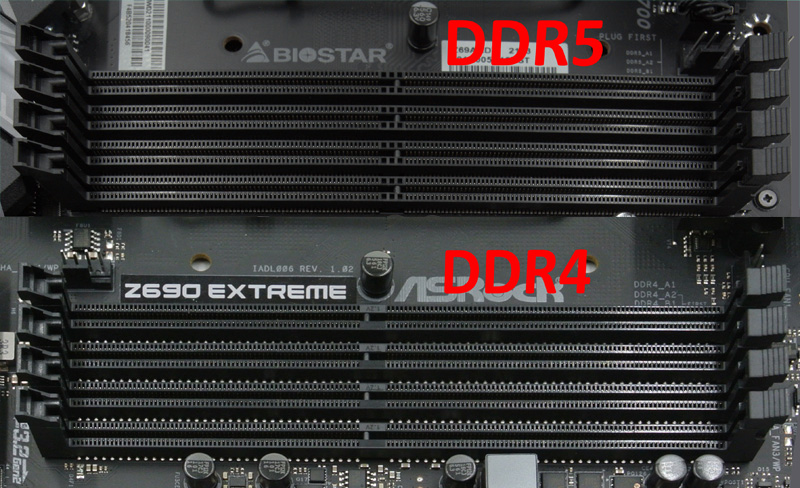
Basically, Intel’s Z690 chipset also offers support for DDR5 working memory. A first look at the new working memory socket can be seen here. Here you can see the DDR5 compared to the DDR4 RAM.
Hard disk drive connectors …
The Z690 Extreme does not have to hide in terms of non-volatile memory connections either. Basically, it is well equipped with 8 SATA3 connections. These support RAID 0, RAID 1, RAID 5 and RAID 10, which means you can also play around with several hard drives or SSDs.
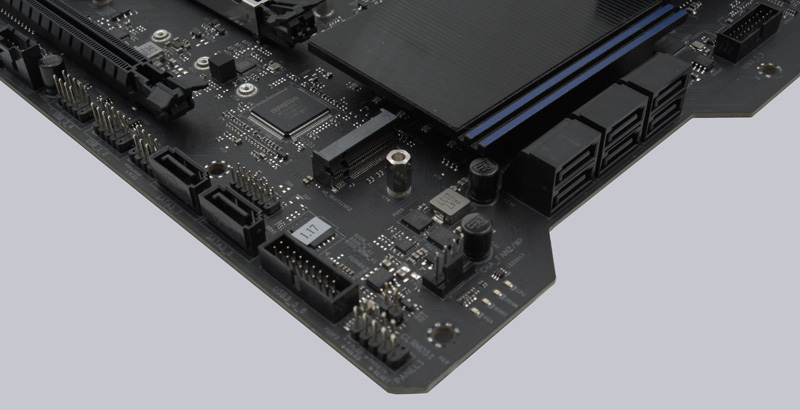
By the way, RAID 0, RAID 1 and RAID 5 are also supported for the three M.2 interfaces that can be used for SSDs. One important note, however, is that when using the M.2 interface connected via SATA (32 Gbit/s), the seventh SATA interface is disabled. That means it is not possible to use all SATA interfaces as well as all M.2 interfaces with SSDs/hard disks at the same time.
USB and Thunderbolt …
ASRock has not spared on the USB connections either. The Z690 Extreme has five USB 3.2 (1x Gen2 and 4x Gen1) connections on the ATX panel and one Type C (also USB 3.2).
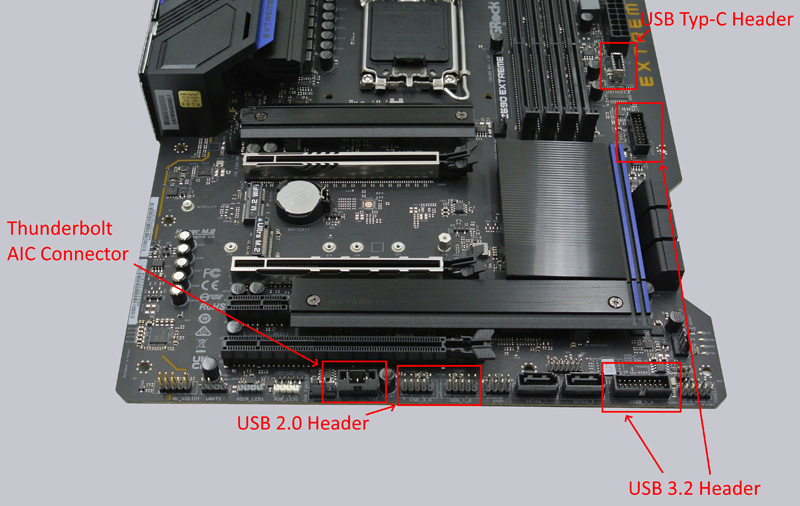
If that’s not enough, you can find two USB 3.2 headers on the motherboard itself, which can be used to create a total of four USB ports. The same applies for the two USB 2.0 headers. In addition, there is a USB Type-C header with 20 GB/s throughput. In terms of Thunderbolt, ASRock provides the motherboard with an AIC connector. This of course supports the optional ASRock Thunderbolt 4 AIC Card, via which you can expand the system with two Thunderbolt Type-C ports as well as two DisplayPort inputs.
By the way, all connections have ESD protection, which means that they are protected against electrostatic discharge or charging.
Tip: If you are wondering about the different descriptions of the USB ports, we would like to explain the differences between USB 3.0, USB 3.1 Gen1, USB 3.1 Gen2, USB 3.2 Gen1 and USB 3.2 Gen2. Regarding the USB power for charging devices, USB 2.0 officially offers 5V with 0.5A, which means 2.5W, and USB 3.0/3.1/3.2 officially offers 5V with 0.9A, which means 4.5W, or at ASRock with Type-A port up to 1.5A and at USB Type-C port 5V with 3A, which means 15W of power (1A in sleep state). Furthermore, the transfer rates of the USB ports differ. USB 3.1 Gen1 used to be called USB 3.0 and is thus identical, they both deliver up to 5 GBit/s. USB 3.1 Gen2 and USB 3.2 Gen2 both deliver up to 10 GBit/s. In addition, there is USB 3.2 Gen2x2, which enables a doubling up to 20 GBit/s. There is also a special feature for the Intel JHL7540 Thunderbolt 3 protocol, which even enables up to 40 GBit/s. Here you can see the possible transfer rates again in a table.
| USB Type Comparison | ||
| Transfer rate | ||
| Interface | theoretical | practical |
| USB 2.0 | 480 MBit/s | 30 MByte/s |
| USB 3.0 | 5 GBit/s | 450 MByte/s |
| USB 3.1 Gen1 | 5 GBit/s | 450 MByte/s |
| USB 3.1 Gen2 | 10 GBit/s | 800 MByte/s |
| USB 3.2 Gen1 | 5 GBit/s | 450 MByte/s |
| USB 3.2 Gen2 | 10 GBit/s | 800 MByte/s |
| USB 3.2 Gen2x2 | 2×10 GBit/s | 1600 MByte/s |
Network …
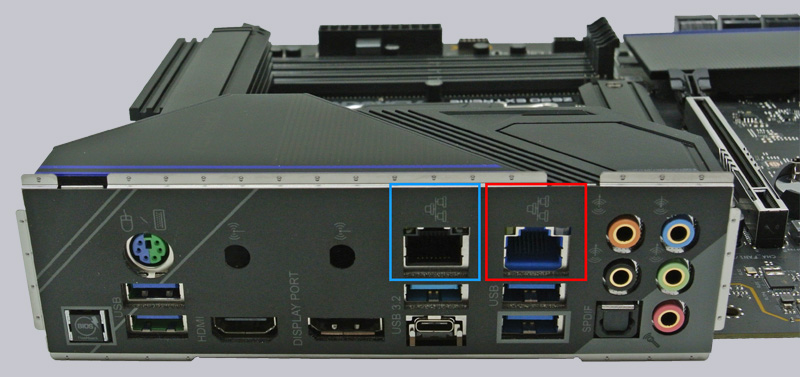
The ASRock Z690 Extreme is equipped with two network cards. One is a 2.5 Gigabit network card with Dragon RTL8125BG chipset, the other is a one Gigabit network card with Intel I219V chipset.
Both support Wake-On-Lan, 802.3az (Energy Efficient Ethernet), ASRocks Lightning/ESD Protection and PXE Boot. The 2.5 Gbit network card also offers functions such as Smart Auto Adjust Bandwidth Control, Visual Network Usage Statistics and User Customized Priority Control through the “Dragon 2.5G LAN Software”.
In terms of differentiation, you have to look a bit closer. The slightly faster card is colored blue, just like the USB 3.2 Gen1 ports. For simplicity, we have marked the 2.5 Gbit network card in red and the 1 Gbit card in blue.
Sound …
ASRock has chosen the well proven ALC1220 from Realtek for the audio, which offers five audio jacks in 15µ gold design as well as an SPDIF output.In addition, there is premium Blu-ray audio support, overvoltage protection, an isolated shield from the PCB, impedance sensing at the rear output as well as individual PCB layers for the two audio channels on the left and right.
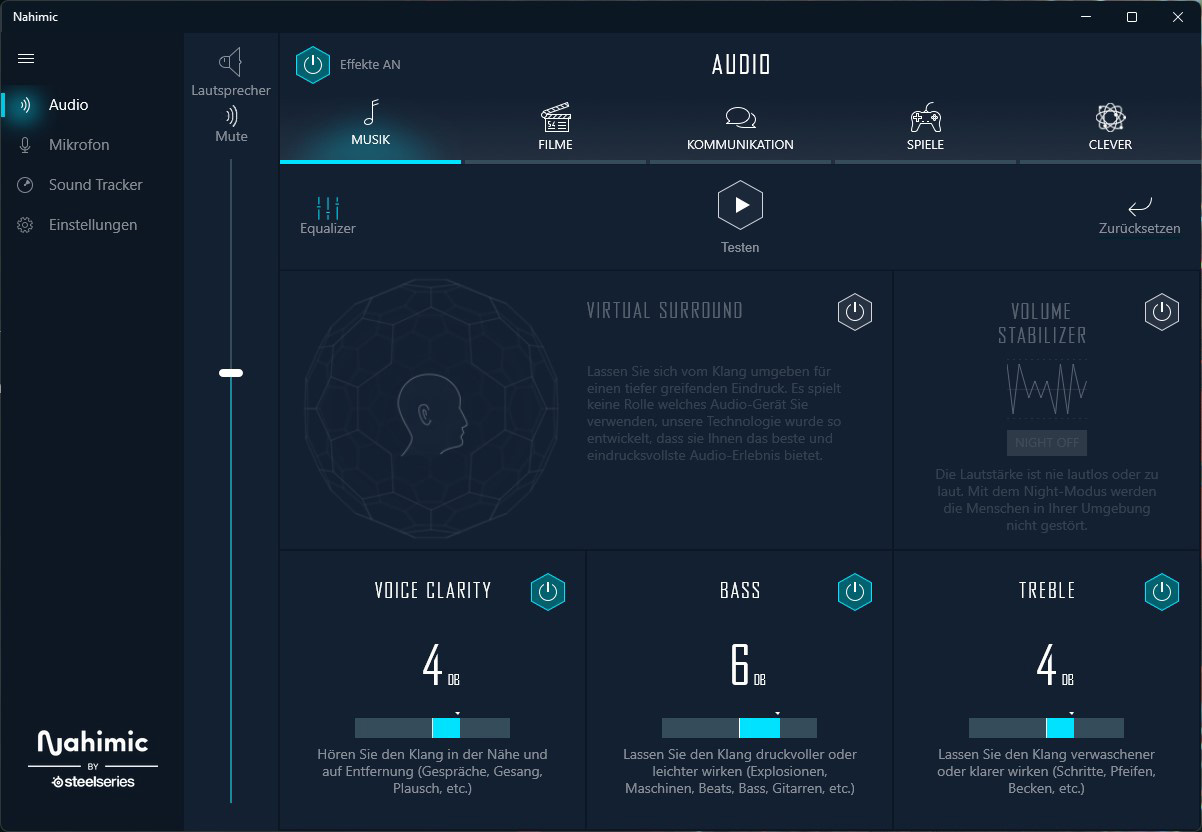
Of course, Nahimic Audio is again on board, which can be used to optimize the sound output for the corresponding content.
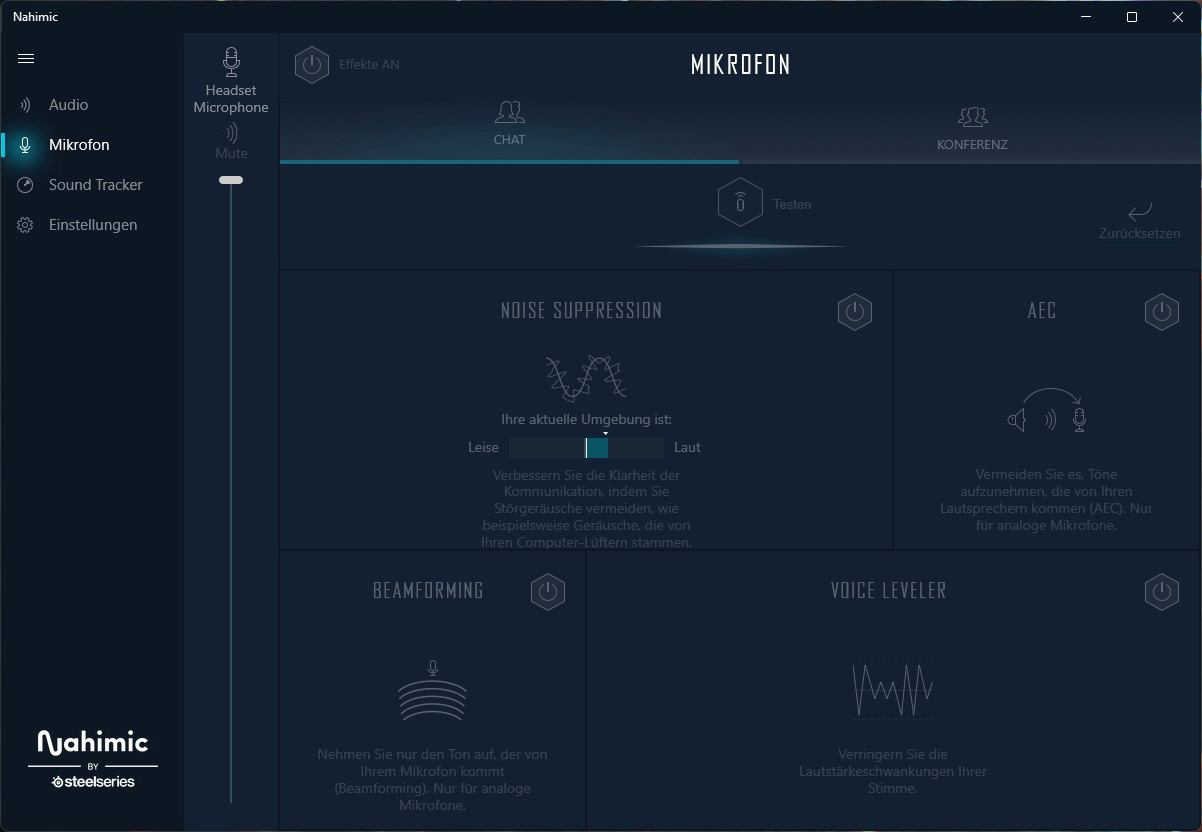
This can also be used to tune the headset a bit if you have problems with the microphone. The noise cancellation can be very helpful, as long as it is not already integrated into the microphone ex-factory.
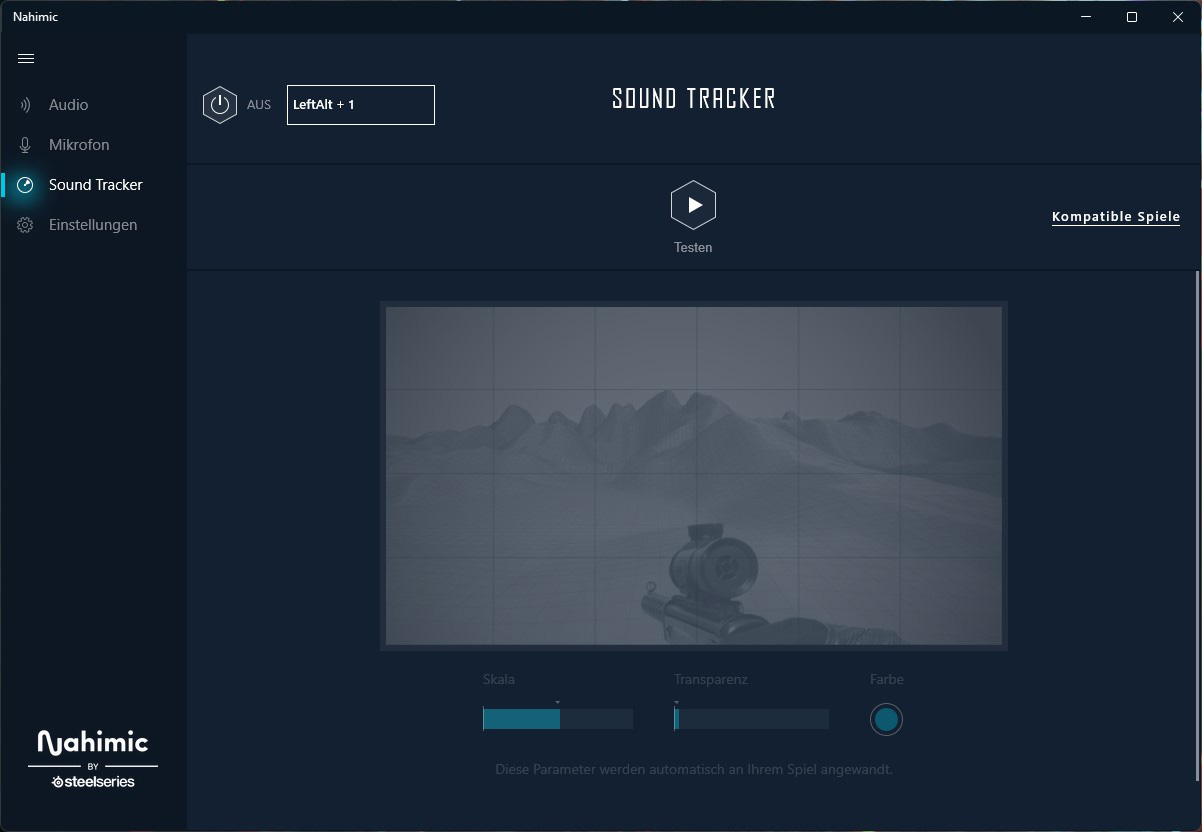
Optionally, the software can also visually track an opponent in a supported game. This is certainly a nice feature for one or the other gamer.
But even without Nahimic’s tuning software, the integrated sound card delivers a clean and precise sound. We could not detect any noise or even an unclean sound.
ATX back panel connectors …
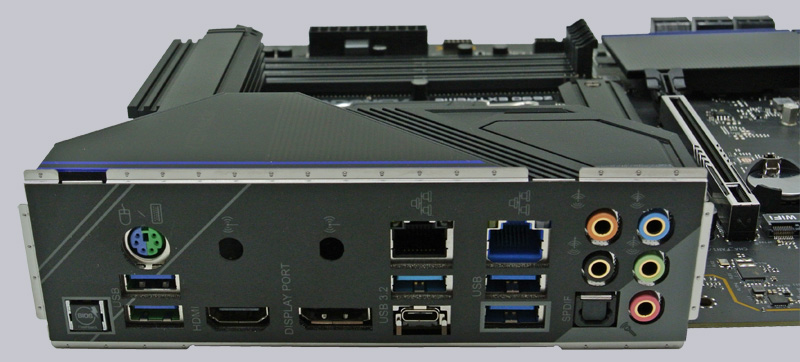
From left to right you can see BIOS flashback switch, PS2 combo port, 2x USB 3.2, HDMI 2.1, DisplayPort 1.4, 2 WiFi antenna ready, 2x RJ45 2.5 & 1 Gigabit LAN, 1x USB 3.2, 1x USB Type-C, 2x USB 3.2, optical SPDIF output and 5x 3.5mm jacks for sound.
Test System …
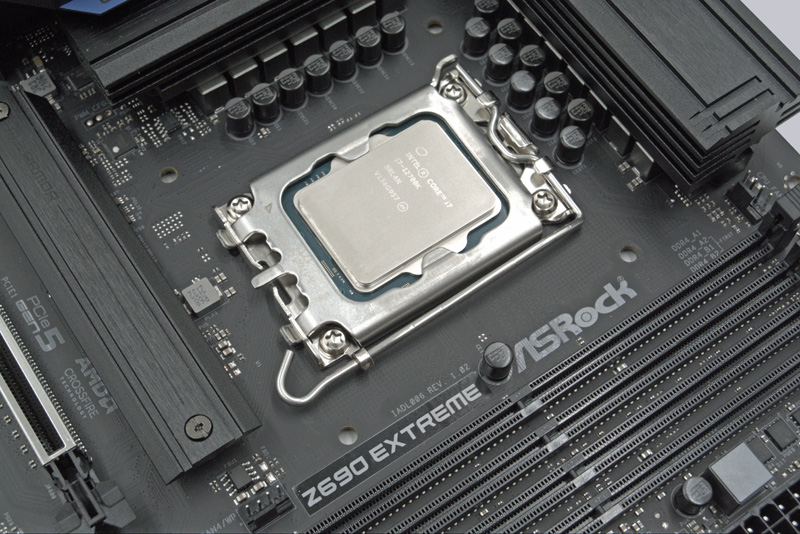
Now we come to the Intel LGA 1700 CPU socket. Intel has made many changes with the Socket 1700, firstly it is significantly larger than its predecessors in the mainstream sector, with a whopping 1700 pins. Secondly, the hole spacing for the CPU cooler has been adjusted after decades, so older CPU coolers are not compatible without an adapter kit.
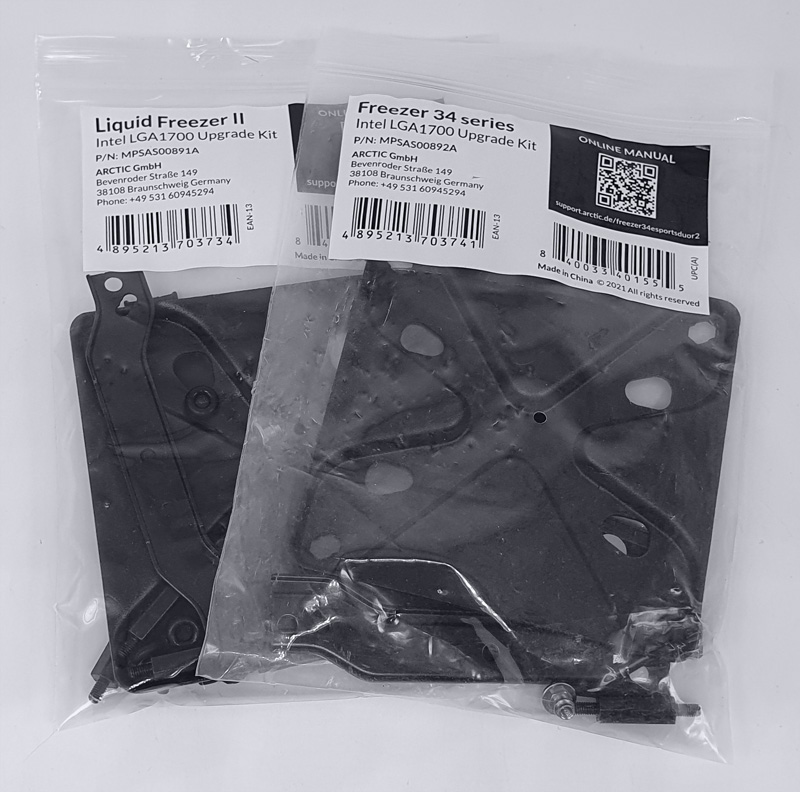
Fortunately, however, many cooler manufacturers have responded by offering LGA1700 cooler assembly kits for upgrading, as can be seen here with the Arctic Freezer II Intel LGA1700 Upgrade Kit and the Arctic Freezer 34 Intel LGA1700 Cooler Upgrade Kit.
Otherwise, the socket is classically equipped with a lever that presses the CPU evenly onto the pins in the socket. As always, do not touch or even bend the contacts in the socket during installation and be sure to install the protective cap on the socket during storage or transport. If pins are bent and the motherboard does not run anymore, we help with words and deeds in the Intel Forum.
So that the board can also show what it’s made of, we decided for an Intel Core i7-12700K.
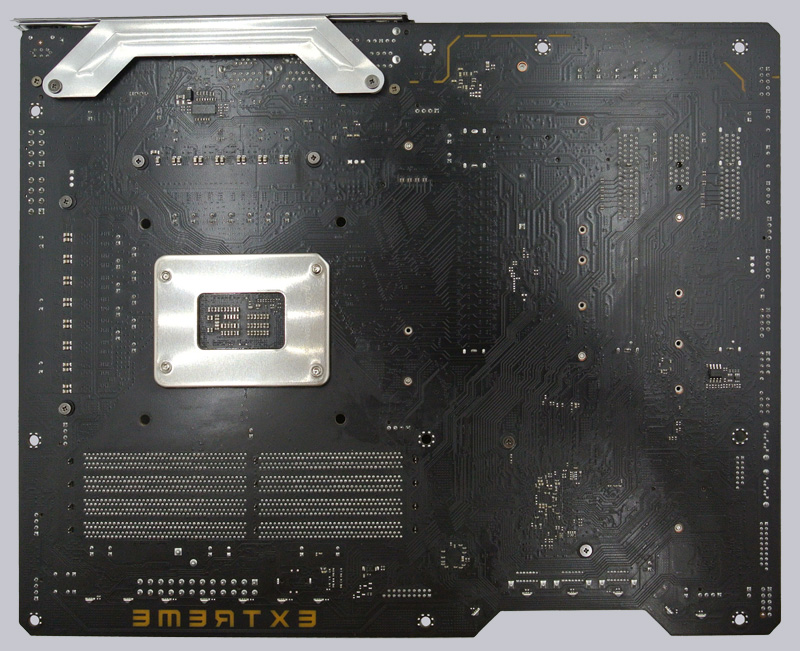
Unfortunately, we stumbled upon a new problem here. The cooler was suitable for the new socket LGA1700, but required a backplate. As you can see, ASRock does not include a backplate with the Z690 Extreme, so you should definitely look for a cooler with a matching Intel LGA 1700 backplate when buying a cooler.
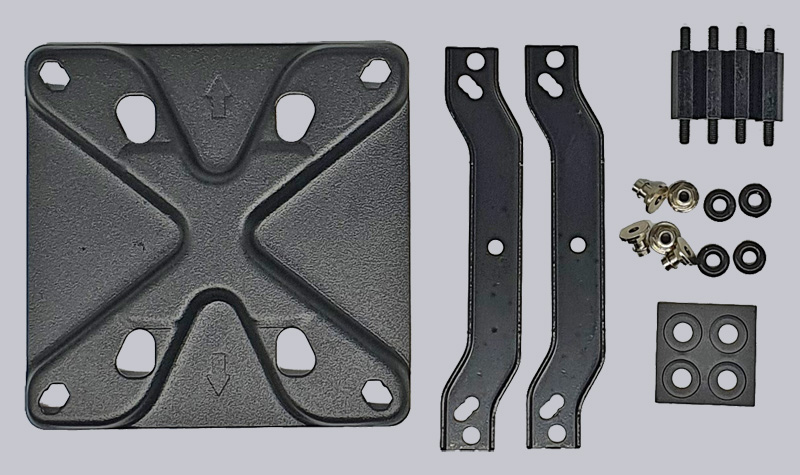
Here you can see the above-mentioned Arctic Freezer 34 Intel LGA1700 Upgrade Kit in detail, which also includes a matching Intel Socket 1700 backplate in addition to the modified hole spacing on the mounting brackets. The small O-rings for locking the backplate nuts are very practical here, as they also serve as spacers.
We were able to mount the cooler with a self-milled backplate at first, but of course we are very happy about the upgrade kits from the various cooler manufacturers.
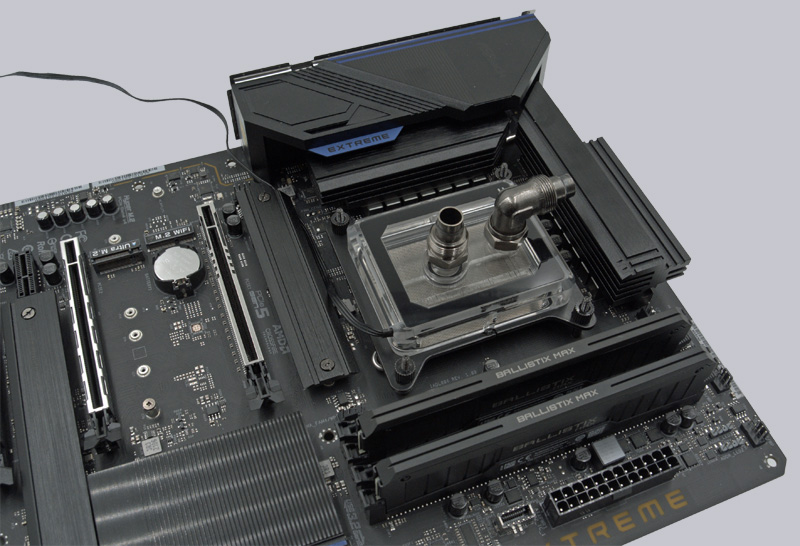
Regarding the memory, we chose 2x 8 GB Ballistix Max DDR4 memory from Crucial. As you can see in the picture above, it is important to put the memory into the respective A1/A2 or B1/B2 slots as described in the manual, so that the motherboard can also address the memory in dual channel.
ASRock Z690 Extreme RGB lighting …
After we have mounted both the memory and the cooler, the board can be installed in our case. We had to replace the cooler we normally used for our water cooling system with an Alpha Cool Eisblock XPX Pro Aurora Light due to the new hole spacing. After switching on, the Z690 shows itself in all colors. You really can’t speak of discreet here. The LED lighting fills the case nicely and leaves enough optical space for other highlights, such as our CPU cooler.
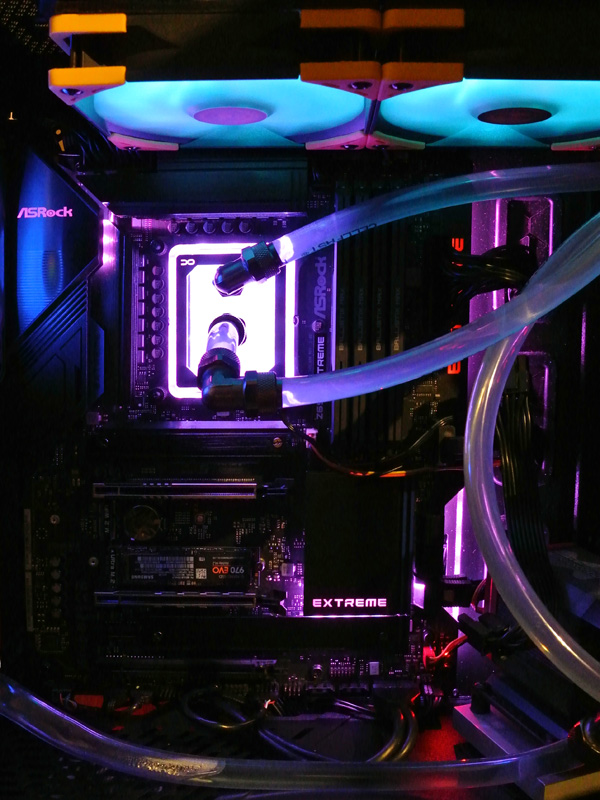
Before we get to the overclocking, we show a short video of the integrated ASRock Z690 Extreme motherboard lighting and a ASRock Polychrome RGB software video is still available on our OCinside YouTube channel.
After we have installed the board in the case, we now come to the UEFI and the overclocking options …