
Once the conditions were defined, I went to the Internet research to find out which would be the most suitable and above all available components for implementation.
I wanted to avoid unnecessarily complicated orders from China, etc.
Finally, I ordered all the components in Germany and France via Amazon *Ad and Ebay, and happily there were no problems with any single delivery. However, I have to admit that I am always very critical in the online dealer selection.
The following is a list of the components I have installed, but a lot has come together:
– 1x Raspberry Pi 3 *Ad Model B – Raspberry Pi review on OCinside.de
(4×1.2GHz; 1GB RAM; 4x USB 2.0; 1x LAN; WLAN onboard; HDMI)
– Passive cooler set for Raspberry Pi 2 or 3 (not absolutely necessary)
– 1x Micro SD card 16GB UHS-I (but it can also be an 8GB Class10 card, or whatever larger / faster is currently available)
– 1x USB-double charger (1x 2.4A + 1x 1A as a power supply for the Raspberry Pi and the 2 fans)
– 2x 12V fans + fan grills (used 80mm fans with 0.13A from an old PC power supply, which are as good as not audible)
– Monitor: Asus VS247HR (23.6-inch / 60cm; 1920×1080 Pixel; 16:9; Audio-Out via 3.5mm jack)
– Low-energy installation box with fuse and on / off switch with lighting
– Hi-Fi stereo amplifier Lepy 2020A (2x20W, RCA + jack input) incl. power supply 230VAC 13.5VDC / 3A
– 2x 10cm Speakers (old surround speakers, but you could also use, for example, speakers from the car accessories, which are offered from ~ 20 euros per pair new)
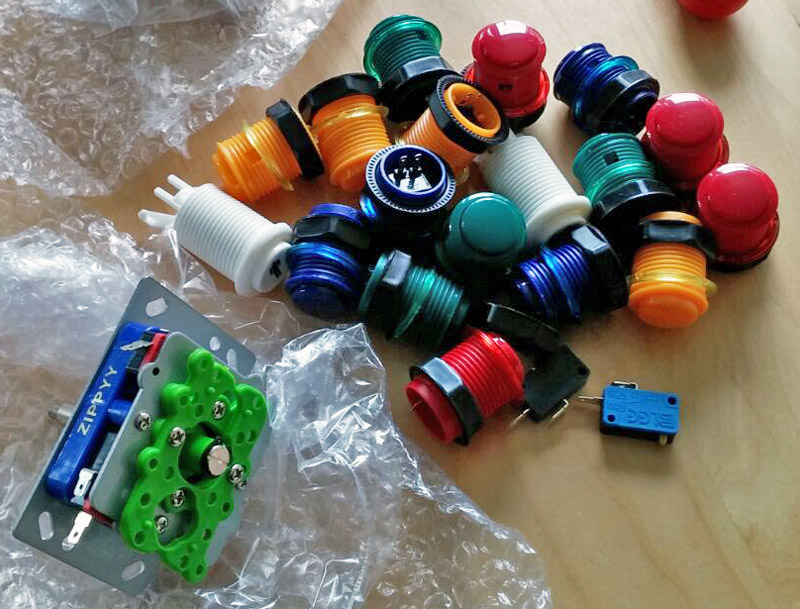
– 2x USB joysticks zero delay arcade USB encoder PC to joystick *Ad MAME 5Pin Sanwa Push Button AC425 (Connection cable for joysticks and buttons as well as USB cable for connection to the Raspi included)
– Joystick-Set *Ad (16 colorful buttons, 1/2-player buttons, 2x 4-way joystick, 26 micro-switches, various scenes for joystick movementlimits)
– 1x HDMI cable (highspeed cable for 1080p/60)
– 1x Stereo jack cable (with 2x 3,5mm jack plug)
– 1x Micro USB cable (for the power supply of the Raspi)
– 2x USB 2.0 device cable (“printer cable” with 1x type A + 1x type B plug) for the wiring of the external USB sockets
– 2x USB-Receptacle (for easy connection to a keyboard, a better W-LAN dongle or other gaming controllers later on)
– 1x USB cable with at least 1x type-A plug (power supply of the fans)
– 6.3 mm blade receptacles (for connection to the microswitches of the joystick and the low-power installation box)
– 1x Distribution socket (at least 2 slots for the USB dual charger and the power supply for the hi-fi amplifier
– 1x Block clamp (to connect the IEC socket to the junction box and monitor)
– Wood
16mm pressboard for the body (cover plate, front and rear wall), the soundbar (excluding front) and the monitor mount
4mm plywood (hardboard would be better) for the side walls of the body and the front of the soundbar.
– Self-adhesive decorative foil *Ad (to cover the wood)
– Mounting material (angle, various screws, nails, washers, adhesive base, cable ties)
– Cable (partly from the cut-off connection cable of the distribution socket and remnants of old PC power supplies)
– For later commissioning I recommend one small Bluetooth keyboard with touchpad *Ad (see also Rapoo E6700 Bluetooth Touch Keyboard review)
Regarding the joysticks and controller boards, I have to say that there are complete sets *Ad , which are perfectly assembled for such arcade self-construction.
If you take a bit of time, you will definitely find a suitable complete set, where the number of joysticks and button colors correspond to your own preferences and then you have all the electronics, micro switches and cables together.
For a complete 2 player set you should plan about 60-70 Euro in the budget.
Here is a photo of the individual buttons as well as a joystick and micro switch.
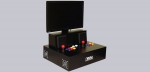
On the next page, the arcade machine is assembled …